Import Attendance
Last Updated: Oct 06,2025. Document Version: 1.0 Prepared for: Emgage HRMS Implementation Team
Import Attendance
Efficient Attendance Management The Import Attendance feature provides a streamlined method for bulk uploading daily attendance data through Excel files. This system ensures data accuracy through comprehensive validation and error reporting mechanisms.
Process Overview
Import Benefits
The Import Attendance system offers efficiency and accuracy in attendance management, allowing administrators to:
- Bulk Data Processing: Import multiple employee attendance records simultaneously.
- Data Validation: Automatic validation ensures data integrity and format compliance.
- Error Detection: Identify and highlight incorrect data entries for correction.
- Time Efficiency: Reduce manual data entry time significantly.
- Standardized Format: Maintain consistent data structure across all imports.
Import Process Workflow
The attendance import process follows a structured three-step workflow designed to ensure data accuracy and successful import completion.
Step 1: Upload File
File Upload Process
Initial Setup Steps:
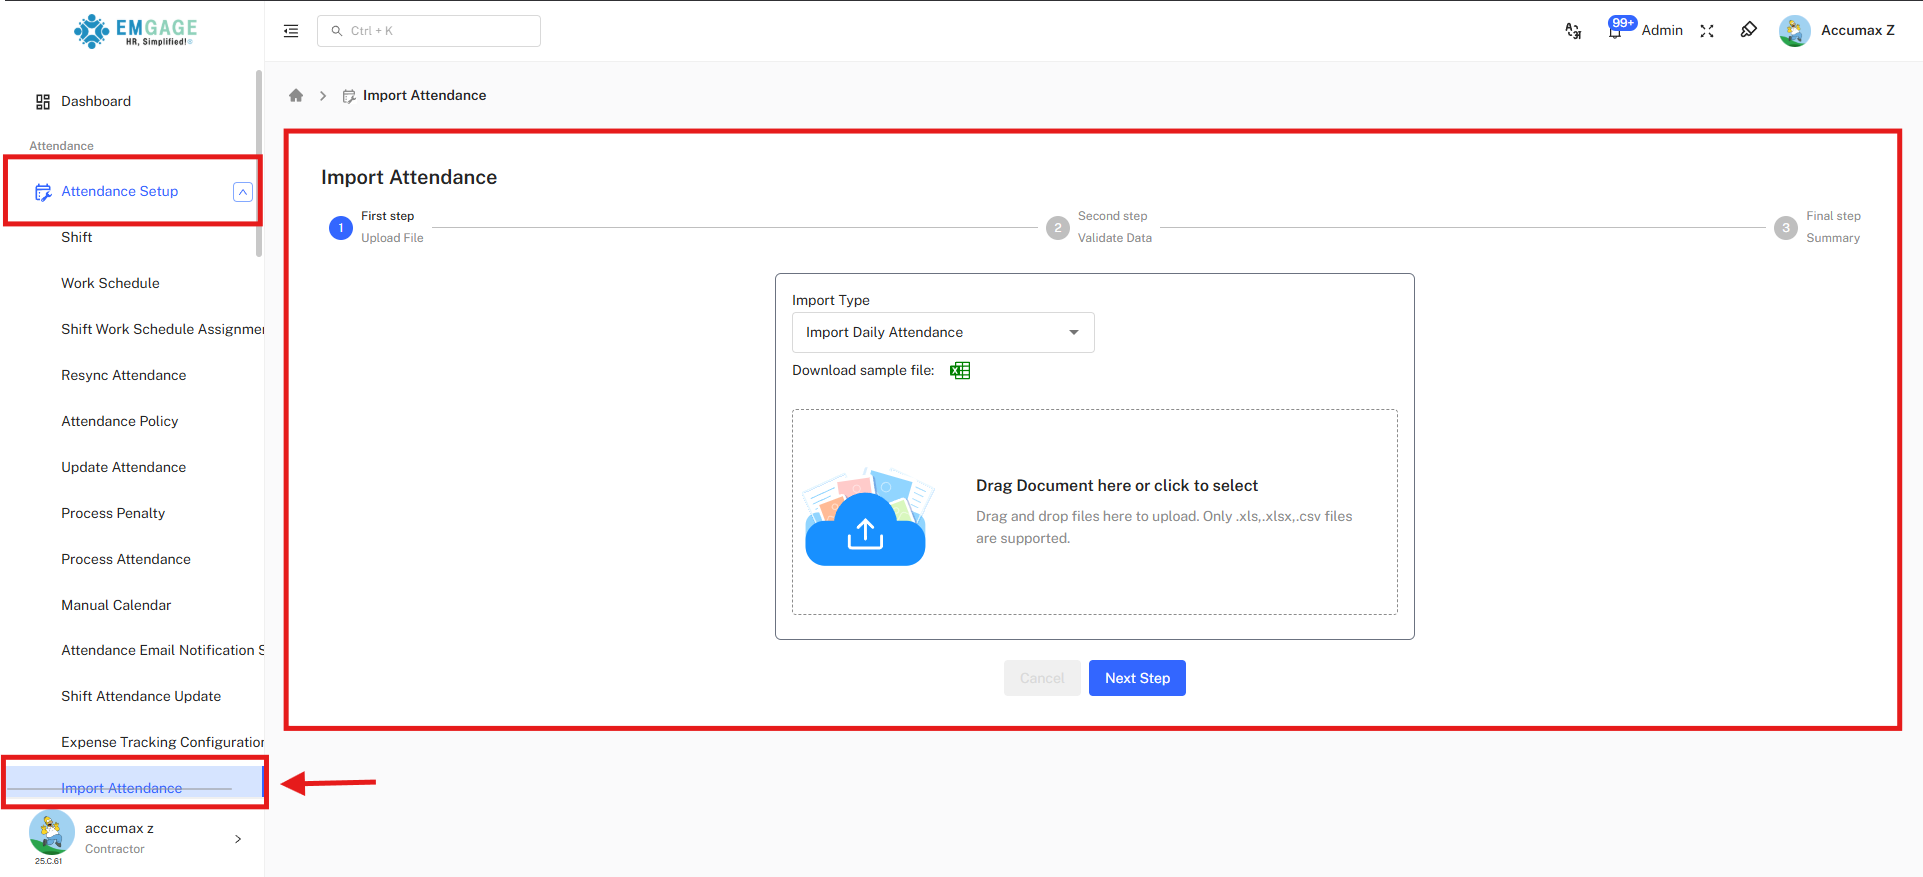
- Access Import Feature: Navigate to Attendance Setup → Import Attendance from the left sidebar.
- Select Import Type: Choose from the
Import Typedropdown menu.
- Import Daily Attendance
- Import Attendance In Days
- Import Shift And Offday
- Import WorkSchedule
- Download Template: Click the Excel iconto download the sample file template.
- Prepare Data: Fill the template with accurate attendance information.
- Upload File: Drag and drop or click to select your completed Excel file.
Step 2: Validate Data
Data Validation Stage
During this step, the system performs comprehensive validation checks on the uploaded data:
- Format Verification: Ensures all fields match required formats.
- Data Integrity: Validates employee IDs, dates, and time entries.
- Error Detection: Identifies inconsistencies and missing information.
- Validation Report: Generates detailed feedback on data quality.
Step 3: Summary
Final Import Summary
Completion Process:
- Import Results: View successful imports and any remaining errors.
- Final Confirmation: Complete the import process for validated data.
- Error Export: Download Excel file with highlighted errors for correction.
- Process Completion: Finalize the attendance import workflow.
Excel Template Structure
The sample Excel template includes the following columns and data requirements:
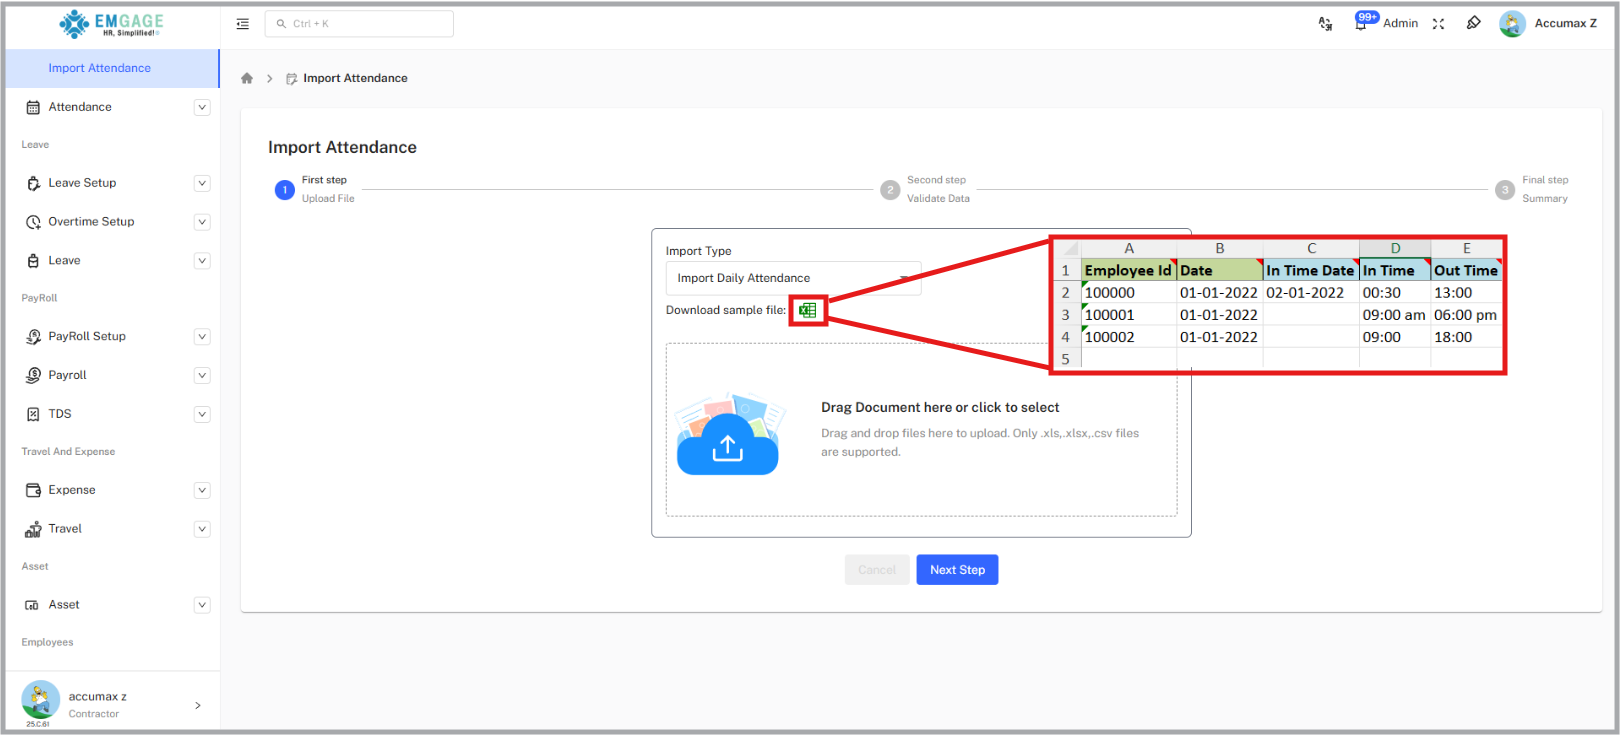
Required Data Fields
Template Structure
Column Requirements:
- Employee ID (Column A): Unique identifier for each employee (e.g., 100000, 100001, 100002).
- Date (Column B): Attendance date in DD-MM-YYYY format (e.g., 01-01-2022).
- In Time Date (Column C): Check-in date in DD-MM-YYYY format (e.g., 02-01-2022).
- In Time (Column D): Check-in time in HH:MM or HH:MM AM/PM format (e.g., 00:30, 09:00 am, 09:00).
Data Format Requirements
** Important Format Guidelines** Critical Formatting Rules:
- Date Format: Use DD-MM-YYYY consistently across all date fields.
- Time Format: Accept multiple formats (24-hour, 12-hour with AM/PM, or simple HH:MM).
- Employee IDs: Must match existing employee records in the system.
- Required Fields: All columns must contain valid data for successful import.
Error Handling and Validation
Validation Messages
When data validation fails during Step 2, the system provides detailed feedback:
** Error Management** Common Validation Issues:
- Invalid Employee IDs: Employee not found in the system database.
- Incorrect Date Formats: Dates not matching DD-MM-YYYY format.
- Invalid Time Entries: Time formats not recognized by the system.
- Missing Data: Required fields left empty or incomplete.
- Data Type Mismatches: Text in numeric fields or vice versa.
Error Resolution Process:
Error Correction Workflow
- Resolution Steps:
- Download Error File: System generates Excel file with errors highlighted in red.
- Identify Issues: Review highlighted cells to understand validation failures.
- Correct Data: Fix identified issues in the original Excel file.
- Re-upload File: Upload the corrected file to restart the validation process.
- Verify Success: Confirm all data passes validation in Step 2.
Best Practices:
Optimization Guidelines
- Template Usage: Always use the downloaded sample template as your starting point.
- Data Verification: Double-check all employee IDs exist in your system before upload.
- Format Consistency: Maintain consistent date and time formats throughout the file.
- Batch Size: Consider splitting large files into smaller batches for better processing.
- Backup Data: Keep a backup of your original data before making corrections.