Geo Setup
Last Updated: Oct 06,2025. Document Version: 1.0 Prepared for: Emgage HRMS Implementation Team
Geo Setup and Geo-Fencing Management
** Location-Based Attendance Tracking** The Geo Setup feature enables location-based attendance management through geographic coordinates and geo-fencing rules. This system allows employees to punch in/out from designated locations while providing administrators with comprehensive control over attendance tracking for on-site, remote, and field employees.
Overview Features
Geo Setup Benefits
The Geo Setup system provides flexible location-based attendance management, enabling:
- Location Management: Define multiple office and work locations with precise coordinates.
- Geo-Fencing: Create virtual boundaries around work locations for attendance validation.
- Radius Control: Set separate punch and fencing radii for each location.
- Rule-Based Enforcement: Configure detailed geo-fencing rules for different scenarios.
- Device Flexibility: Support both desktop and mobile device attendance tracking.
- Remote Work Support: Enable attendance for work-from-home and field employees.
- Real-Time Monitoring: Track employee location activity and geo-fence violations.
- Notification System: Automated alerts for geo-fence breaches and irregular activity.
1. Location List Management

Location List Overview
The Location List tab displays all configured geographic locations for attendance tracking.
Table Columns:
- Location Name: Name identifier for the location .
- Location Type: Classification of location .
- Location: Map pin icon indicating geographic coordinates are configured.
- Punch Radius (Meters): Distance within which employees can punch in/out (e.g., 200, 100, 5, 1000).
- Fencing Radius (Meters): Monitoring boundary for geo-fence rules (e.g., 500, 5, 1250).
- Action: Edit (pencil icon) and Delete (trash icon) options.
Adding a New Location
Location Creation Process:
- Click Add Button: Click the "+ Add" button in the top-right corner.
- Fill Location Details: Complete all required fields in the Add Location form.
- Select Map Coordinates: Choose precise location from the integrated map.
- Set Radii: Configure punch and fencing radius values.
- Submit: Click "Submit" to save the new location.
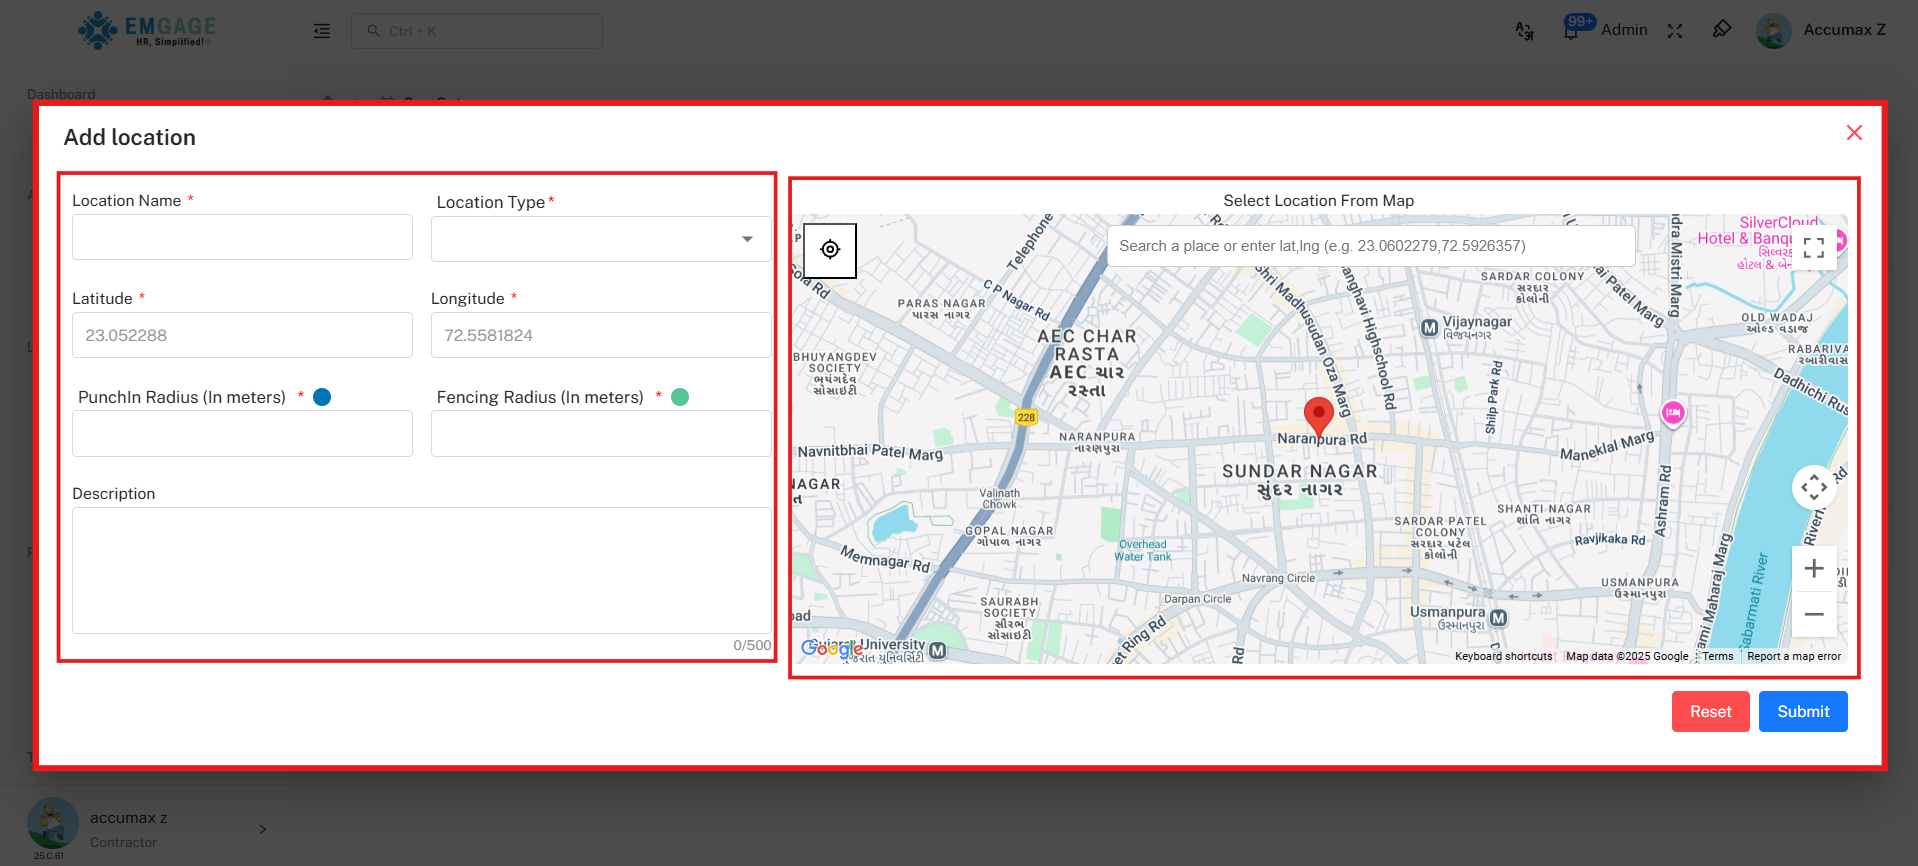
Add Location Form
Form Fields:
Basic Information:
-
Location Name* (Required): Enter a unique name for the location
-
Examples: "Head Office", "Branch Office", "Warehouse", "Client Site"
-
Character limit varies by system configuration
-
Location Type* (Required): Select from dropdown
-
Options: Branch, Head Office, Client Location, Field Location, etc.
-
Determines location classification for reporting
Geographic Coordinates:
-
Latitude* (Required): Automatically populated when selecting from map
-
Format: Decimal degrees (e.g., 23.052288)
-
Can be manually entered if coordinates are known
-
Longitude* (Required): Automatically populated when selecting from map
-
Format: Decimal degrees (e.g., 72.5581824)
-
Can be manually entered if coordinates are known
Map Selection:
- Select Location From Map: Interactive Google Maps interface
- Search bar: "Search a place or enter lat,lng (e.g. 23.0602279,72.5926357)"
- Crosshair icon: Use current GPS location
- Red pin marker: Indicates selected location
- Full-screen toggle: Expand map for better visibility
- Zoom controls: Adjust map zoom level
Radius Configuration:
-
Punch-In Radius (In meters)* (Required):
-
Distance within which employees can mark attendance
-
Range typically: 5 to 1000 meters
-
Slider control with numeric input field
-
Smaller radius = stricter location requirements
-
Fencing Radius (In meters)* (Required):
-
Monitoring boundary for geo-fence rules
-
Range typically: 5 to 5000 meters
-
Slider control with numeric input field
-
Should generally be larger than punch radius
Additional Information:
- Description: Optional text field for location notes
- Maximum 500 characters
- Useful for special instructions or location details
Form Actions:
- Reset: Clear all form fields (red button)
- Submit: Save the new location (blue button)
Location Management Actions
Editing Locations:
- Click Edit Icon: Click the pencil icon in the Action column
- Modify Details: Update any location information in the form
- Save Changes: Click "Submit" to update the location
Deleting Locations:
- Click Delete Icon: Click the trash icon in the Action column
- Confirm Deletion: System prompts for confirmation
- Location Removed: Location is permanently deleted from the system
** Important Location Considerations** Location Setup Guidelines:
- Punch radius should be smaller than fencing radius for proper monitoring
- Test location coordinates before deploying to employees
- Consider GPS accuracy margins when setting radii (typically ±10-50 meters)
- Multiple locations can share similar names but should have unique identifiers
- Deleted locations cannot be recovered; ensure data backup if needed
2. Fencing Rule List Management
Fencing Rule Overview
The Fencing Rule List tab manages geo-fencing rules applied to locations.

Table Columns:
- Rule Name: Name identifier for the geo-fencing rule (e.g., "office", "office2").
- Geo Locations: Associated locations for the rule (e.g., "Office", "Office 1, new office new").
- Weightage: Priority or importance value for the rule (e.g., 10, 6).
- Fencing Applicable On: Devices and punch types where rule applies:
- Desktop icon: Punch In, Punch Out
- Mobile icon: Punch In, Punch Out
- Status: Toggle switch showing rule activation status (blue = active).
- Action: User management icon, Edit icon, and Delete icon.
Adding a Geo-Fencing Rule
Rule Creation Process:
- Click Add Button: Click the "+ Add" button in the top-right corner.
- Configure Rule Details: Complete all required fields.
- Set Advanced Options: Expand "Advanced Options" for detailed configuration.
- Submit Rule: Click "Submit" to activate the geo-fencing rule.
Add Geo-Fencing Rule Form
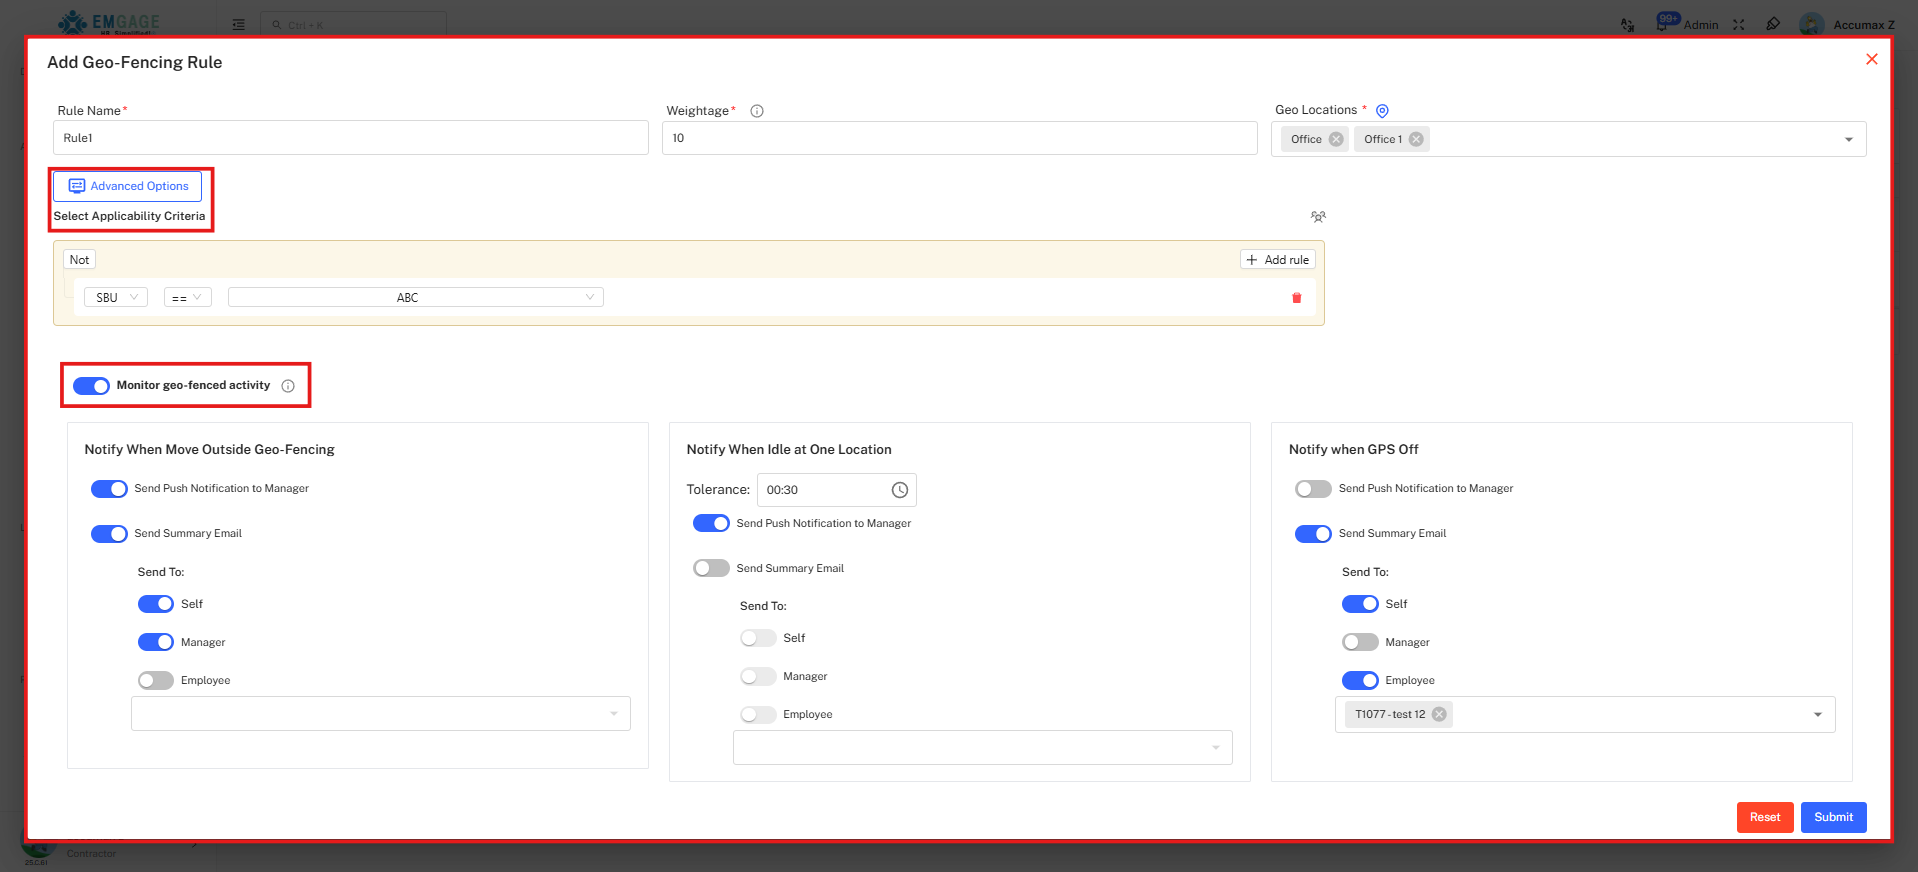
Basic Configuration:
-
Rule Name* (Required):
-
Unique identifier for the rule
-
Examples: "Office Fencing", "Branch Rule", "Field Work Policy"
-
Weightage* (Required):
-
Numeric value indicating rule priority
-
Higher numbers = higher priority when multiple rules apply
-
Typical range: 1-100
-
Geo Locations* (Required):
-
Multi-select dropdown of configured locations
-
Shows location names with "+" indicator for multiple selections
-
Example: "office , Office , Office 1 , +1"
-
Can select multiple locations for a single rule
Advanced Options
Fencing Applicable On:
Defines which devices and punch types the rule applies to:
Desktop Configuration:
- PUNCH IN: Apply rule to desktop check-in
- PUNCH OUT: Apply rule to desktop check-out
- BOTH: Apply rule to both desktop punch in and out
- NONE: No desktop geo-fencing
Mobile Configuration:
- PUNCH IN: Apply rule to mobile app check-in
- PUNCH OUT: Apply rule to mobile app check-out
- BOTH: Apply rule to both mobile punch in and out
- NONE: No mobile geo-fencing (selected as default for flexible policies)
Allow Punch From Outside the Geofence:
Controls whether attendance is permitted outside defined boundaries:
Desktop Permissions:
- PUNCH IN: Allow desktop check-in outside fence
- PUNCH OUT: Allow desktop check-out outside fence
- BOTH: Allow both punches outside fence
- NO: Strictly enforce geo-fence for desktop (selected as default)
Mobile Permissions:
- PUNCH IN: Allow mobile check-in outside fence
- PUNCH OUT: Allow mobile check-out outside fence
- BOTH: Allow both punches outside fence
- NO: Strictly enforce geo-fence for mobile (selected as default)
Monthly Instance Limit for Punches Outside the Geofence:
Sets monthly allowance for out-of-fence punches:
-
Punch-In Limit: Number of allowed check-ins outside geo-fence per month
-
Numeric input field
-
Example: 5 allowed exceptions per month
-
Punch-Out Limit: Number of allowed check-outs outside geo-fence per month
-
Numeric input field
-
Example: 5 allowed exceptions per month
-
Total Punch Limit: Combined limit for all outside punches
-
Numeric input field (e.g., 0 for strict enforcement)
-
Overrides individual limits if lower
Monitoring and Notifications
Monitor Geo-Fenced Activity:
Toggle switch to enable real-time monitoring of employee location activity.
Notification Categories:
1. Notify When Move Outside Geo-Fencing:
Alerts when employees exit the geo-fenced area:
-
Send Push Notification to Manager: Enabled (toggle on)
-
Real-time mobile notification to reporting manager
-
Send Summary Email: Enabled (toggle on)
-
Daily/periodic email summary of geo-fence violations
-
Send To:
-
Self: Employee receives notification (toggle on)
-
Manager: Reporting manager receives notification (toggle on)
-
Employee: Specific employee dropdown (e.g., "FCI45-RODRIGUES ALOYSIUS")
-
Searchable employee selector
-
Multiple employees can be added
2. Notify When Idle at One Location:
Alerts for prolonged inactivity at a single location:
-
Tolerance: Time duration before triggering alert
-
Format: HH:MM (e.g., 00:30 for 30 minutes)
-
Adjustable based on work requirements
-
Send Push Notification to Manager: Toggle option (disabled by default)
-
Send Summary Email: Toggle option (disabled by default)
-
Send To:
-
Self: Employee notification option
-
Manager: Manager notification option
-
Employee: Specific employee selection dropdown
3. Notify When GPS Off:
Alerts when employee's GPS is disabled:
-
Send Push Notification to Manager: Toggle option (disabled by default)
-
Send Summary Email: Toggle option (disabled by default)
-
Send To:
-
Self: Employee notification
-
Manager: Manager notification
-
Employee: Specific employee selection
Form Actions
- Reset: Clear all form fields and selections (red button)
- Submit: Save and activate the geo-fencing rule (blue button)
Rule Management Actions
Editing Rules:
- Click Edit Icon: Click the pencil icon in the Action column
- Modify Configuration: Update rule parameters
- Save Changes: Click "Submit" to update the rule
Managing Rule Users:
- Click User Icon: Click the group icon in the Action column
- View Assigned Users: See employees affected by the rule
- Modify Assignments: Add or remove employees as needed
Deleting Rules:
- Click Delete Icon: Click the trash icon in the Action column
- Confirm Deletion: System prompts for confirmation
- Rule Removed: Rule is deactivated and deleted
Activating/Deactivating Rules:
- Toggle Status Switch: Click the blue toggle in the Status column
- Blue (on) = Rule is active
- Gray (off) = Rule is inactive but preserved
Best Practices
** Geo-Fencing Optimization Tips** Effective Location Management:
- Test Before Deployment: Verify location accuracy with test punches
- Appropriate Radii: Set realistic punch radii considering GPS accuracy (±10-50m typical)
- Gradual Rollout: Start with lenient rules, tighten based on actual usage data
- Communication: Inform employees about geo-fencing policies before activation
- Exception Handling: Configure monthly limits for legitimate out-of-fence scenarios
- Regular Review: Periodically audit rules and adjust based on work patterns
- Multiple Locations: Create separate locations for different work sites
- Rule Priority: Use weightage effectively when multiple rules may apply
- Notification Balance: Avoid notification fatigue; focus on critical alerts
Example:
Use Case Scenarios
Scenario 1: Office-Based Employees
Configuration:
- Location: "Head Office"
- Punch Radius: 100 meters
- Fencing Radius: 500 meters
- Rule: Strict geo-fencing, no outside punches allowed
- Monitoring: Enabled with manager notifications
Scenario 2: Field Workers
Configuration:
- Multiple Locations: Client sites, service areas
- Punch Radius: 200-500 meters (flexible based on site size)
- Fencing Radius: 1000-2000 meters
- Rule: Allow outside punches with monthly limits
- Monitoring: GPS-off notifications priority
Scenario 3: Hybrid Work Model
Configuration:
- Location: "Office" + "Work From Home" virtual location
- Punch Radius: 100 meters (office), unlimited (home)
- Rule: Different rules for different days/shifts
- Monitoring: Idle location alerts for productivity tracking