Mail Event
Last Updated: Oct 13, 2025. Document Version: 1.0 Prepared for: Emgage HRMS Implementation Team
Mail Event
Automated Email Events Configuration
Set up automated emails for birthdays, work anniversaries, wedding anniversaries, and custom events. Configure separate templates for employees and staff.
Overview
Mail Event has two tabs:
- Event Tab - Create and manage email events
- Template Tab - Create and manage email templates
1. Event Tab
Manage email events that send automatically based on triggers like birthdays and anniversaries.
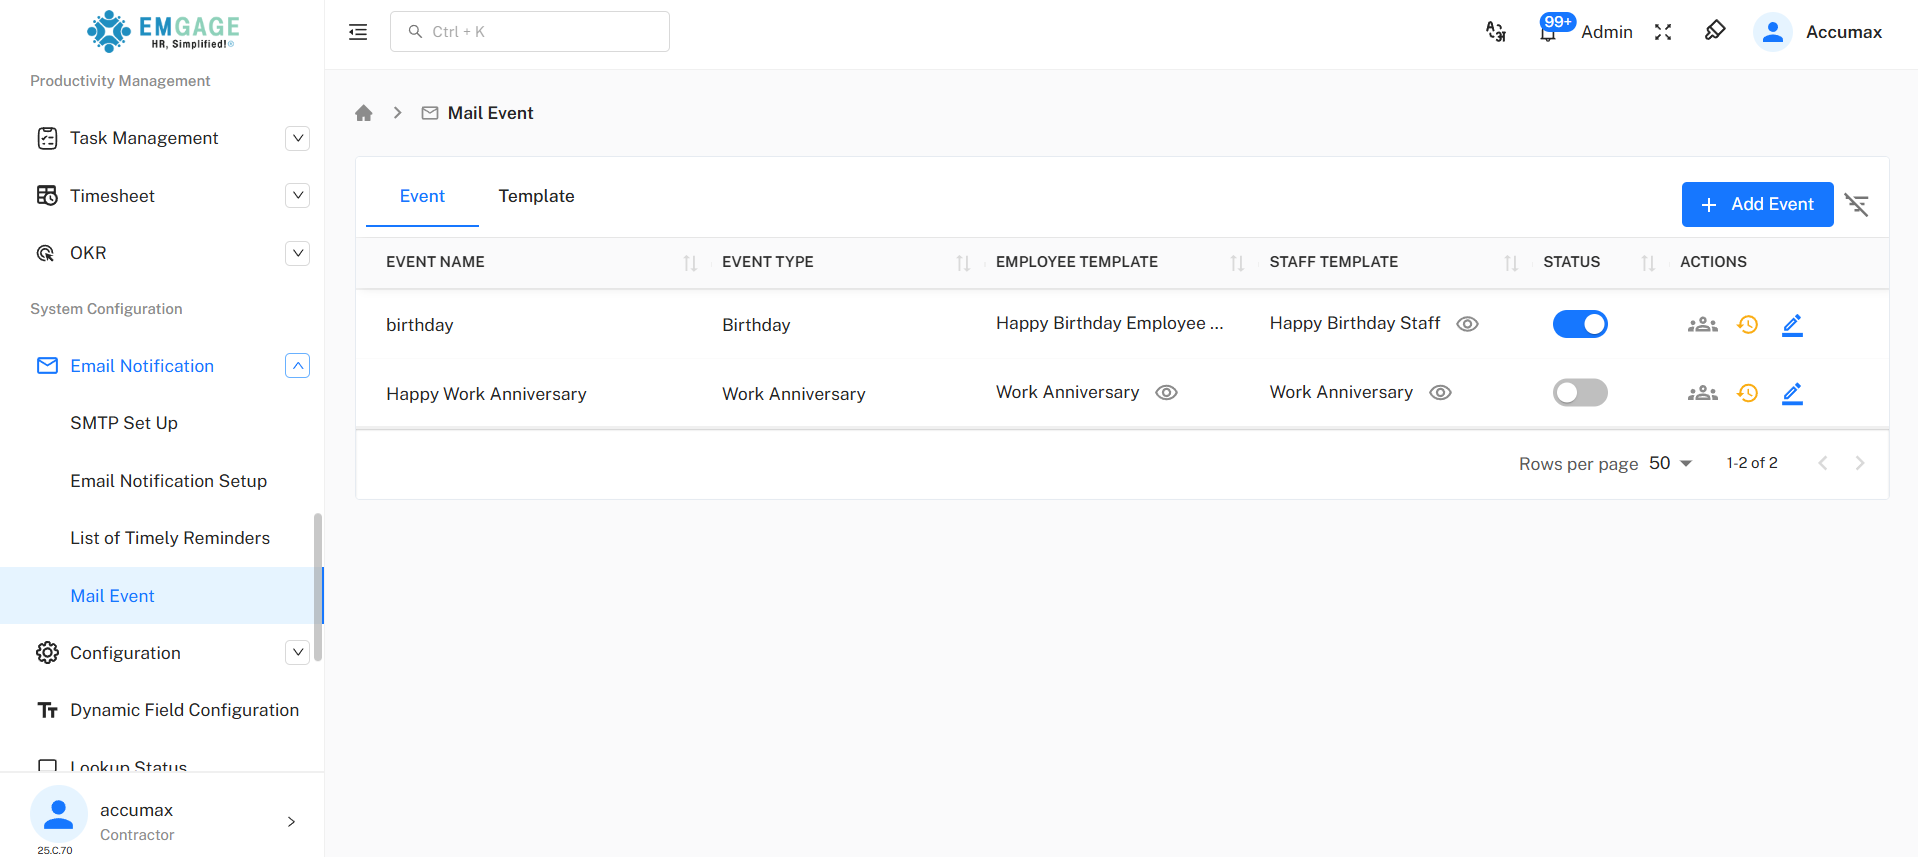
Event List Columns
| Column | Description |
|---|---|
| EVENT NAME | Name of the email event |
| EVENT TYPE | Birthday, Work Anniversary, Wedding Anniversary, Other |
| EMPLOYEE TEMPLATE | Template for employees (👁️ to view) |
| STAFF TEMPLATE | Template for staff (👁️ to view) |
| STATUS | Blue = Active, Gray = Inactive |
| ACTIONS | 👥 Veiw Employee | ⏰ History | ✏️ Edit | |
Action Icons
| Icon | Purpose |
|---|---|
| 👥 View Employee | View list of employees/staff who will receive this email |
| ⏰ History | View the history logs |
| ✏️ Edit | Modify event configuration |
Creating New Event (Event Tab)
Quick Steps
- Click + Add Event button (top right, blue)
- Fill required fields (marked with *)
- Click Submit
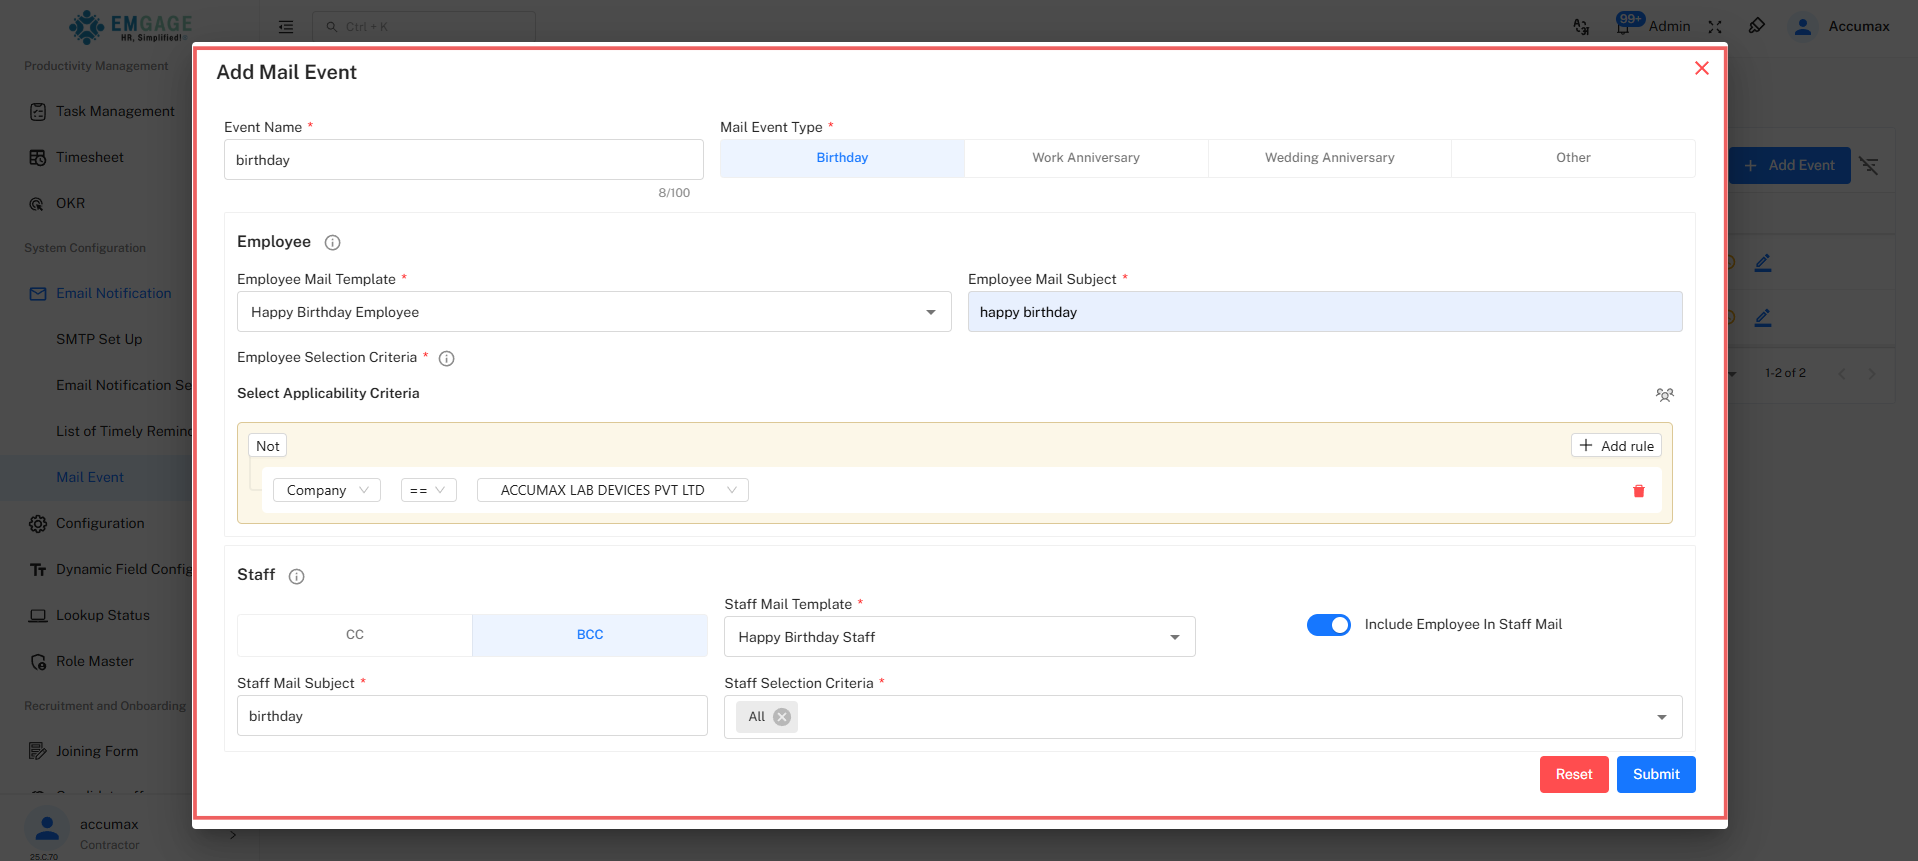
Required Fields
| Field | What to Enter |
|---|---|
| Event Name | Descriptive name |
| Mail Event Type | Click button: Birthday | Work Anniversary | Wedding Anniversary | Other |
| Employee Mail Template | Select from dropdown |
| Employee Mail Subject | Email subject line |
| Employee Selection Criteria | Click + Add rule → Select criteria |
| Staff Mail Template | Select from dropdown |
| Staff Mail Subject | Staff email subject |
| Staff Selection Criteria | Select who gets notified |
Key Fields Explained
Mail Event Type*
Four buttons to choose from:
| Button | When Triggered | Use For |
|---|---|---|
| Birthday | Employee's birth date | Birthday wishes |
| Work Anniversary | Joining date anniversary | Congratulate on tenure |
| Wedding Anniversary | Marriage date anniversary | Personal wishes |
| Other | Custom/Manual | Password reset, Promotions, Custom events |
Employee Section (Email sent TO employees)
Employee Mail Template*
- What: Pre-designed email layout for employees
- Source: Created in Template Tab
- Tip: Must match event type (Birthday template for Birthday event)
Employee Mail Subject*
- What: Subject line employee sees in inbox
- Tips: Keep short, use emojis, be personal
- Example: "🎉 Happy Birthday [Name]!"
Employee Selection Criteria*
- Purpose: Define WHO receives the email
- How:
- Click + Add rule button
- Click Select field dropdown
- Choose field (Department, Designation, Location, etc.)
- Select value
- Add multiple rules if needed
- Toggle Not to exclude
Staff Section (Notification TO managers/staff)
CC / BCC Tabs
- CC = Staff email visible to employee
- BCC = Staff email hidden (Recommended for privacy)
Staff Mail Template*
- What: Email layout for staff notification
- Tip: Usually shorter, informational
Staff Mail Subject*
- What: Subject line staff sees
- Example: "Employee Birthday Today - [Name]"
Staff Selection Criteria*
- Purpose: Which staff members get notified
- Options: Reporting Manager, Department Head, HR Team, All Managers
Include Employee In Staff Mail Toggle
- OFF (Gray) = Only staff receives (Recommended)
- ON (Blue) = Employee also receives staff notification
Action Buttons
| Button | Purpose |
|---|---|
| Reset (Red) | Clear all fields and start over |
| Submit (Blue) | Save event configuration |
After Submit: Event appears in Event list. Turn Status ON (blue) to activate.
2. Template Tab
Create reusable email templates for different event types.
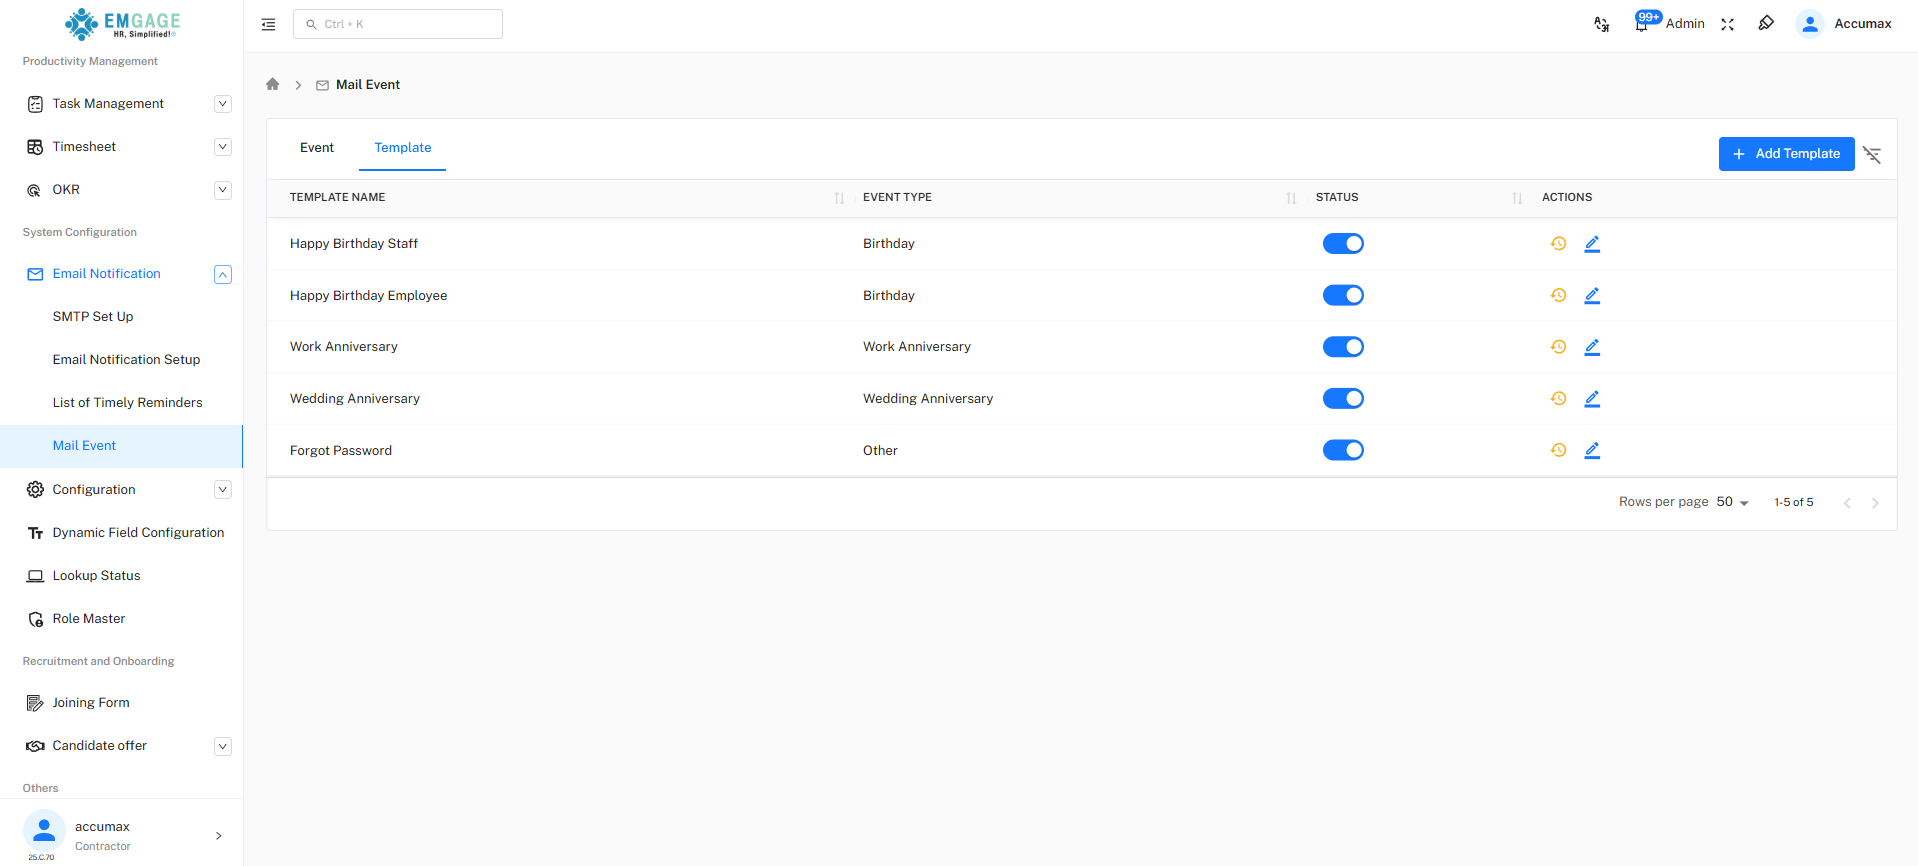
Template List Columns
| Column | Description |
|---|---|
| TEMPLATE NAME | Email template name |
| EVENT TYPE | Birthday, Work Anniversary, Wedding Anniversary, Other |
| STATUS | Blue = Active, Gray = Inactive |
| ACTIONS | ⏰ History | ✏️ Edit |
Creating Email Template (Template Tab)
Quick Steps
- Click + Add Template button (top right, blue)
- Fill template details (3 fields)
- Design email using drag-and-drop editor
- Click Submit
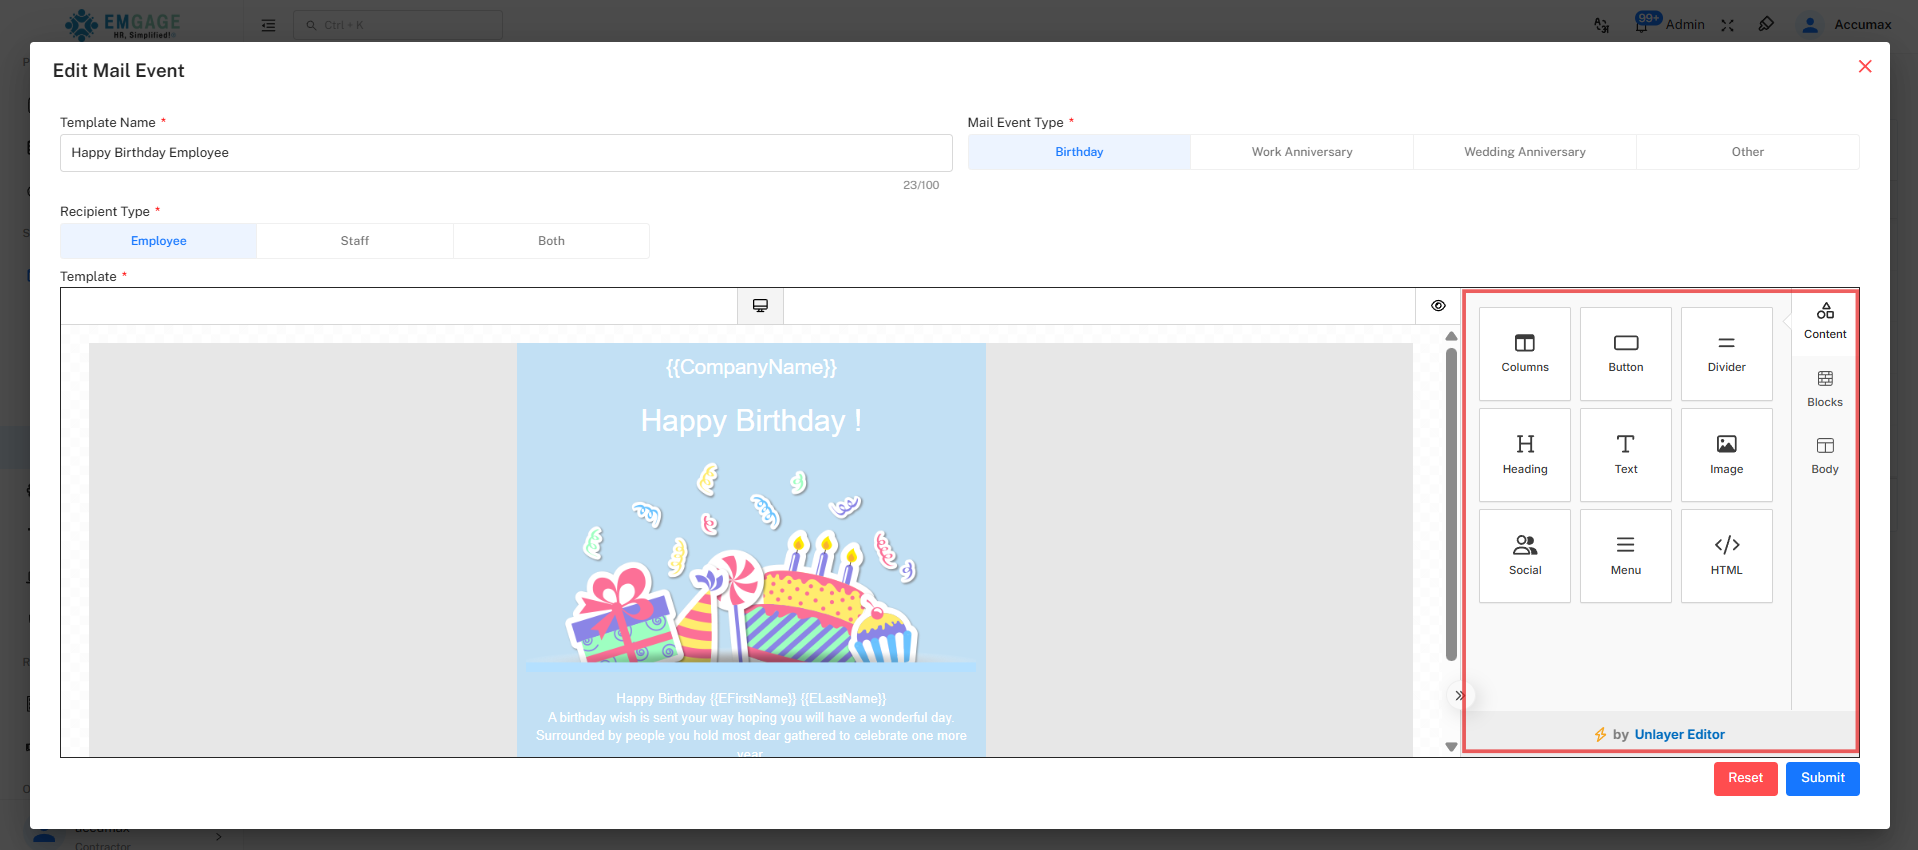
Step 1: Fill Template Details
| Field | What to Enter |
|---|---|
| Template Name* | Template name |
| Mail Event Type* | Click: Birthday | Work Anniversary | Wedding Anniversary | Other |
| Recipient Type* | Click: Employee | Staff | Both |
Recipient Type Explained:
- Employee = Template for emails sent to employees
- Staff = Template for staff notifications
- Both = Can be used for either
Step 2: Design Email Template
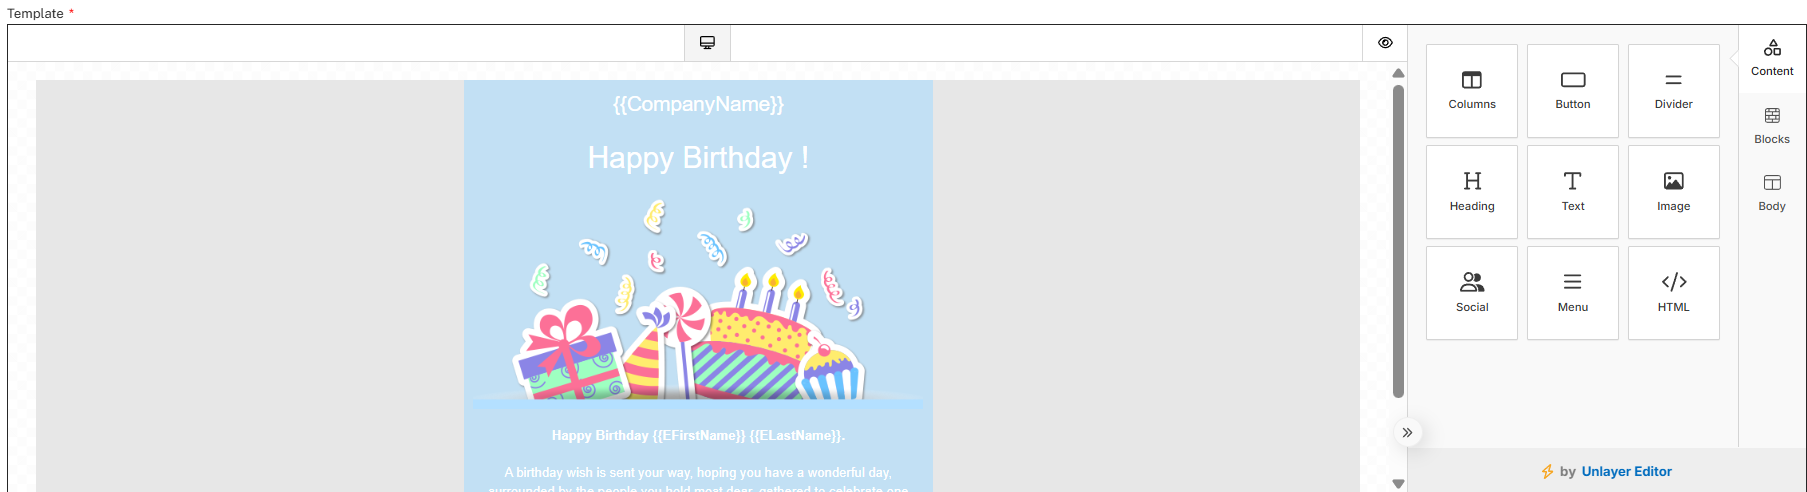
Unlayer Editor - Drag-and-drop email builder
Canvas Area (Center):
- Empty state shows: "No content here. Drag content from right."
- Drop elements here to build email
Content Blocks (Right Panel):
| Block | Icon | Use For |
|---|---|---|
| Columns | ⚏ | Start here - add 1 or 2 column layout |
| Button | ▭ | Add clickable button |
| Divider | ─ | Add horizontal line separator |
| Heading | H | Add title/heading text |
| Text | T | Add paragraph/body text |
| Image | 🖼️ | Add logo, banner, photos |
| Body | ▢ | Configure background, colors |
| Social | 👥 | Add social media icons |
| Menu | ≡ | Add navigation menu |
| HTML | </> | Add custom HTML code |
Quick Email Design Steps
Basic Birthday Template (5 minutes):
-
Drag Columns → Choose 1 column (simple layout)
-
Drag Image → Upload company logo
- Click image after dropping
- Click "Upload" → Select logo file
- Adjust size and alignment
-
Drag Heading → Type "Happy Birthday!"
- Click heading to edit
- Change font size, color, alignment
-
Drag Text → Write birthday message
- Example: "Wishing you a wonderful year filled with joy and success!"
- Format: Bold, italic, colors
-
Drag Button (Optional) → Add "View Profile"
- Set button text
- Add link URL
- Customize colors
-
Drag Divider → Separate sections visually
- Customize line style and color
-
Drag Social (Optional) → Add company social links
- Select icons (Facebook, Twitter, LinkedIn)
- Add URLs
Editing Elements:
- Click any element to edit
- Right panel shows element settings
- Top toolbar for text formatting
- Delete = Click element + press Delete key
Preview:
- Click 👁️ Preview icon (top toolbar)
- Check desktop/mobile view
- Close to continue editing
Step 3: Submit Template
| Button | Purpose |
|---|---|
| Reset (Red) | Clear entire template design |
| Submit (Blue) | Save template for use |
After Submit: Template appears in Template tab list and Event dropdown. Turn Status ON to use.
Quick Actions Reference
Activate/Deactivate Event or Template
- Click Status Toggle in list
- Blue = Active (sends emails)
- Gray = Inactive (paused)
Edit Event/Template
- Click ✏️ Edit icon
- Modify any field
- Click Submit
View Recipients (Event only)
- Click 👥 Recipients icon
- See who will receive email
Before Going Live Checklist
✓ SMTP Setup configured (Email Notification → SMTP Set Up)
✓ Template created and Status = ON
✓ Template design tested with Preview
✓ Event created with correct type
✓ Selection criteria verified
✓ Recipients list checked (👥 icon)
✓ BCC selected for staff (not CC)
✓ Include Employee = OFF
✓ Event Status = ON
Troubleshooting
| Problem | Quick Fix |
|---|---|
| Email not sending | Check Event Status is ON (blue) |
| Template not in dropdown | Activate template (Status ON) |
| Wrong people receiving | Review Selection Criteria, check Recipients |
| Emails go to spam | Verify SMTP Setup is configured |
| Cannot submit | Fill all fields marked with * |
| Template broken | Use Columns block first, then add content |
| Staff sees employee email | Check BCC is selected, Include toggle OFF |