Polls & Surveys
Overview
The Polls & Surveys module lets HR administrators collect opinions and feedback from employees.
| Poll | Survey | |
|---|---|---|
| Purpose | Ask one question and get a quick vote | Ask several questions in one form |
| Answer types | Single choice, or multiple choice | MCQ, Multiselect, Textbox, Rating (out of 5), Yes/No |
| Live results | Can be shown to employees as vote percentages | Seen by administrators in Detailed Results |
Administrators can choose who sees each poll or survey, when it opens and closes, whether responses are anonymous, and whether employees can edit a response after submitting it.
Where to find it
Open Employee Engagement → Polls & Surveys from the menu, or type poll in the search bar at the top (Ctrl + K).
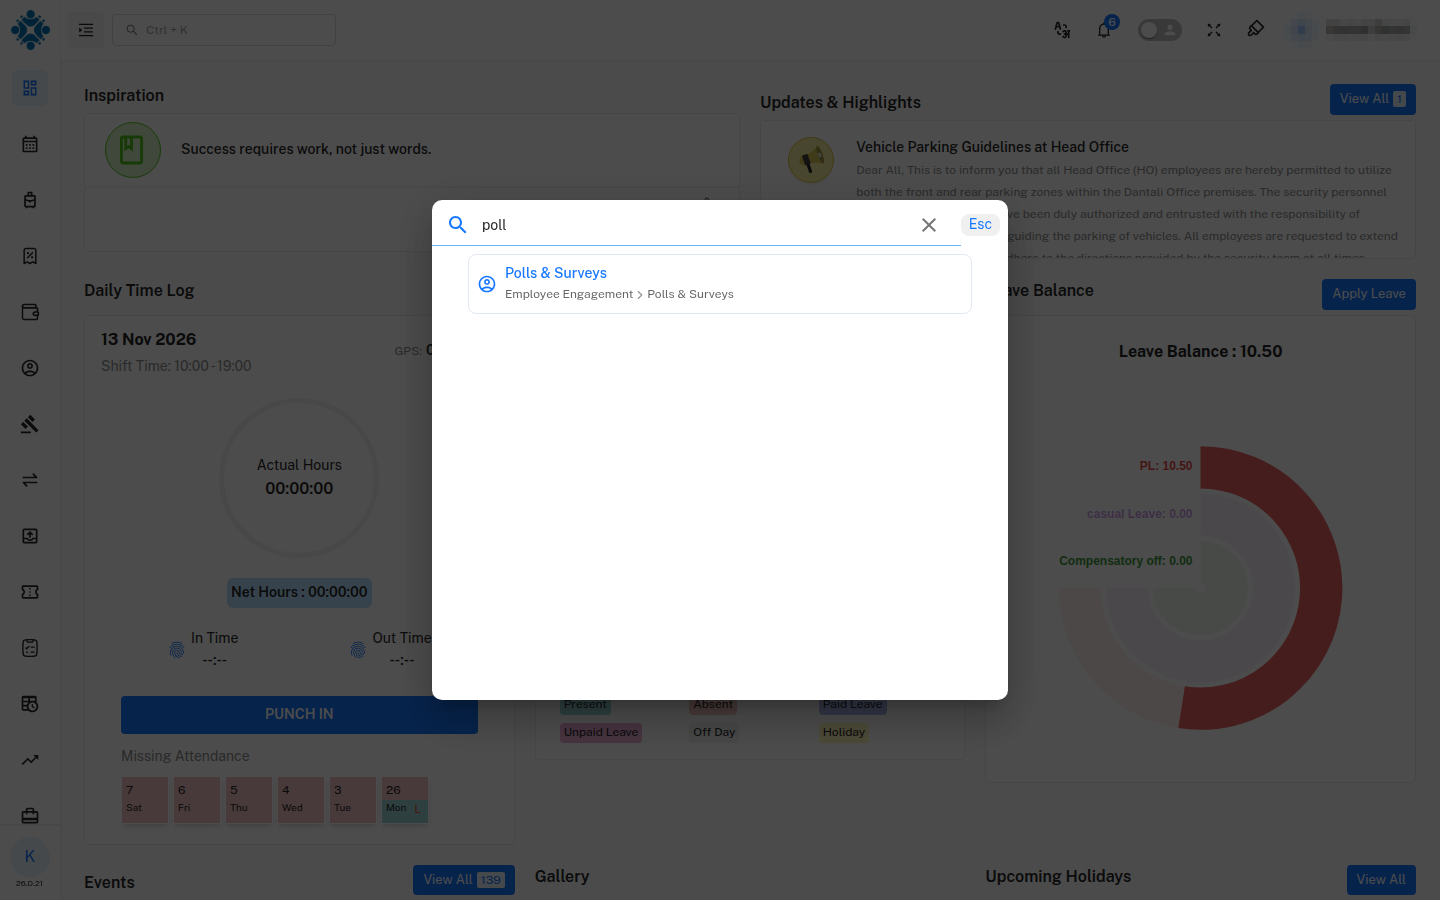
The module appears only if your role has the Polls And Surveys permission. Creating and managing polls and surveys needs edit access. Employees with view access can respond and see their own responses. If the page shows 403 – Access Denied or the menu item is missing, ask your administrator to enable the permission for your role under Role Master.
1. The Polls & Surveys Page
The page has two tabs, Polls and Surveys. The number beside a tab is the count of items currently active for you.
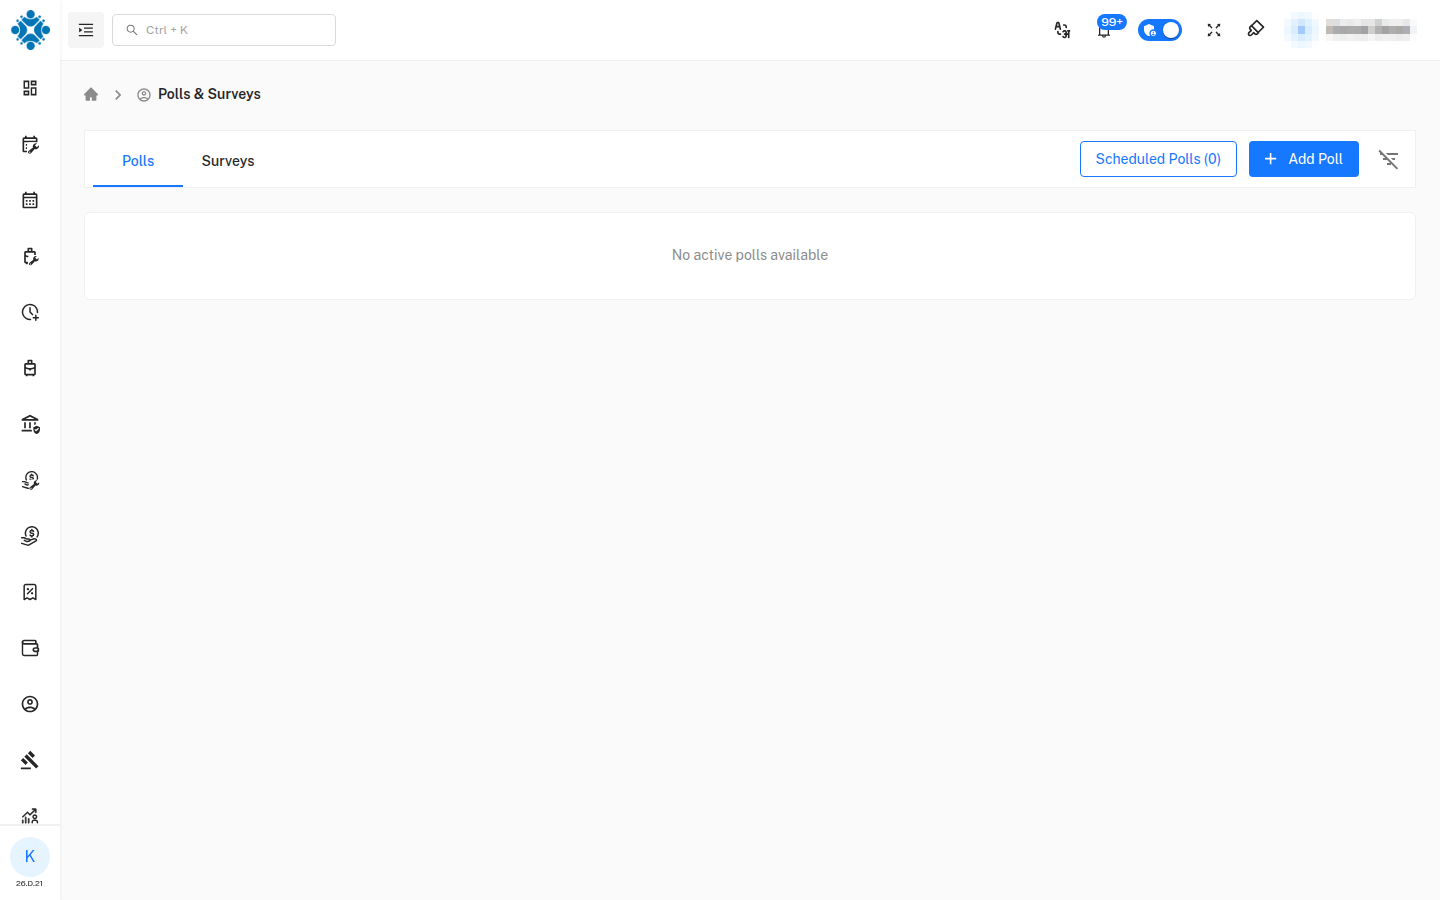
| Control | What it does |
|---|---|
| Polls / Surveys tabs | Switch between the two types |
| Scheduled Polls (n) / Scheduled Surveys (n) | Opens the list of items that are set to start in the future |
| Add Poll / Add Survey | Opens the creation form (administrators only) |
| Filter icon | Filters the list by status and anonymity |
| Cards | Each active poll or survey appears as a card |
| Inactive & Closed table | Below the cards: deactivated and expired items |
When nothing is active, the page shows No active polls available (or No active surveys available).
2. Create a Poll (Administrator)
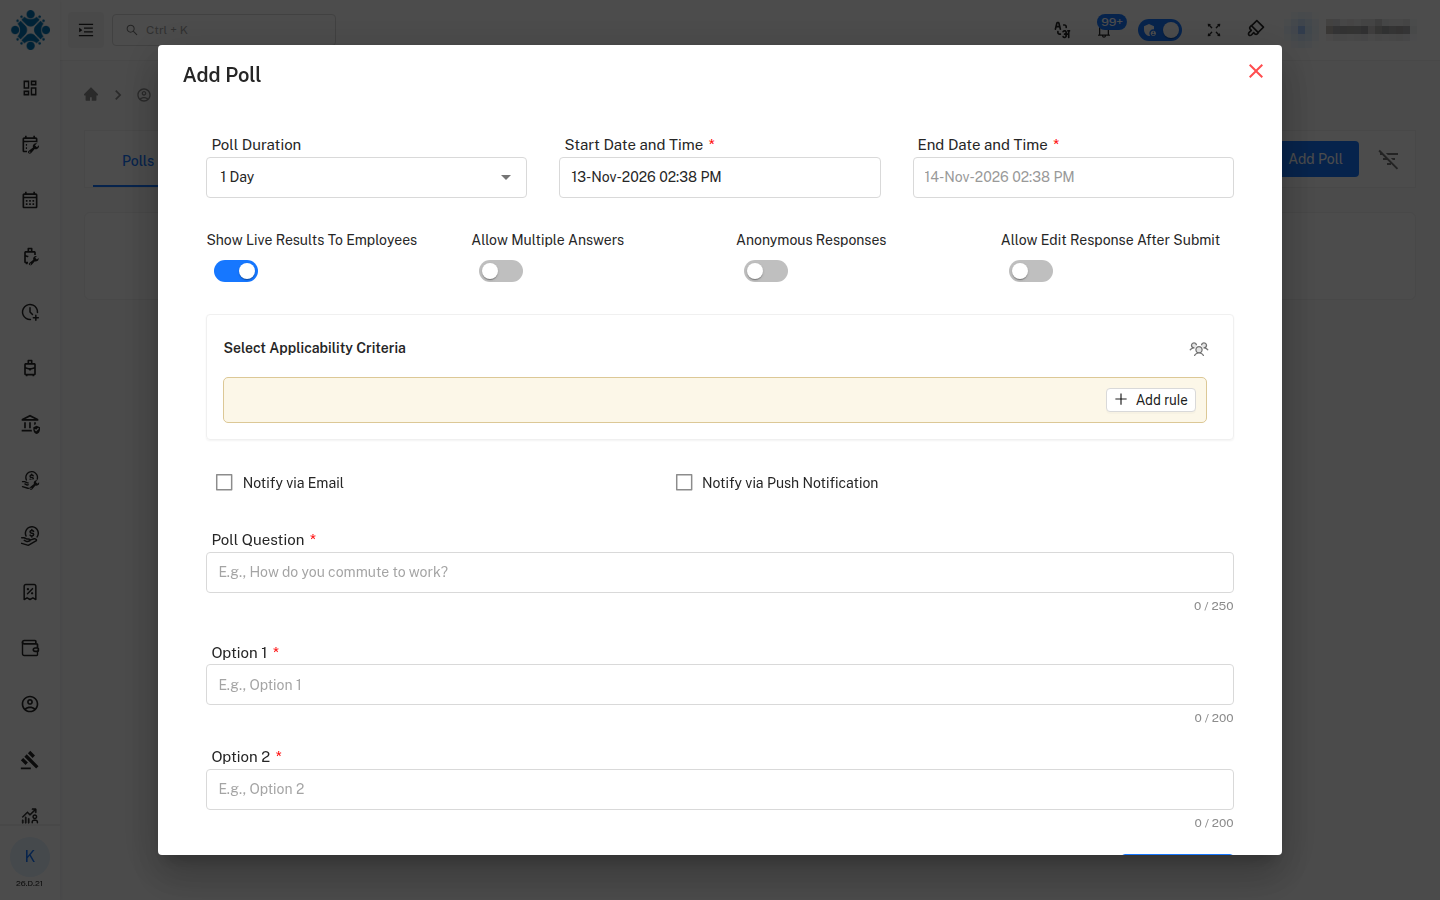
Click Add Poll. The form opens in a pop-up window.
2.1 Duration
| Field | Description |
|---|---|
| Poll Duration | A shortcut for the closing time: 1 Day, 2 Days, 3 Days, 4 Days, 1 Week, 2 Weeks, 1 Month or Custom |
| Start Date and Time * | When the poll opens to employees |
| End Date and Time * | When the poll closes. It must be at least 5 minutes after the start |
Choosing a duration fills in the end date automatically. Pick Custom to enter your own end date and time. The start time must not be in the past, and the field is outlined in red if it is.
2.2 Poll settings
| Setting | Effect |
|---|---|
| Show Live Results To Employees | Employees see vote percentages next to each option (on by default) |
| Allow Multiple Answers | Employees can pick more than one option |
| Anonymous Responses | Hides who voted for what in the results |
| Allow Edit Response After Submit | Employees can change their answer after submitting |
2.3 Applicability Criteria – who can respond
Use Add rule to choose which employees receive the poll.
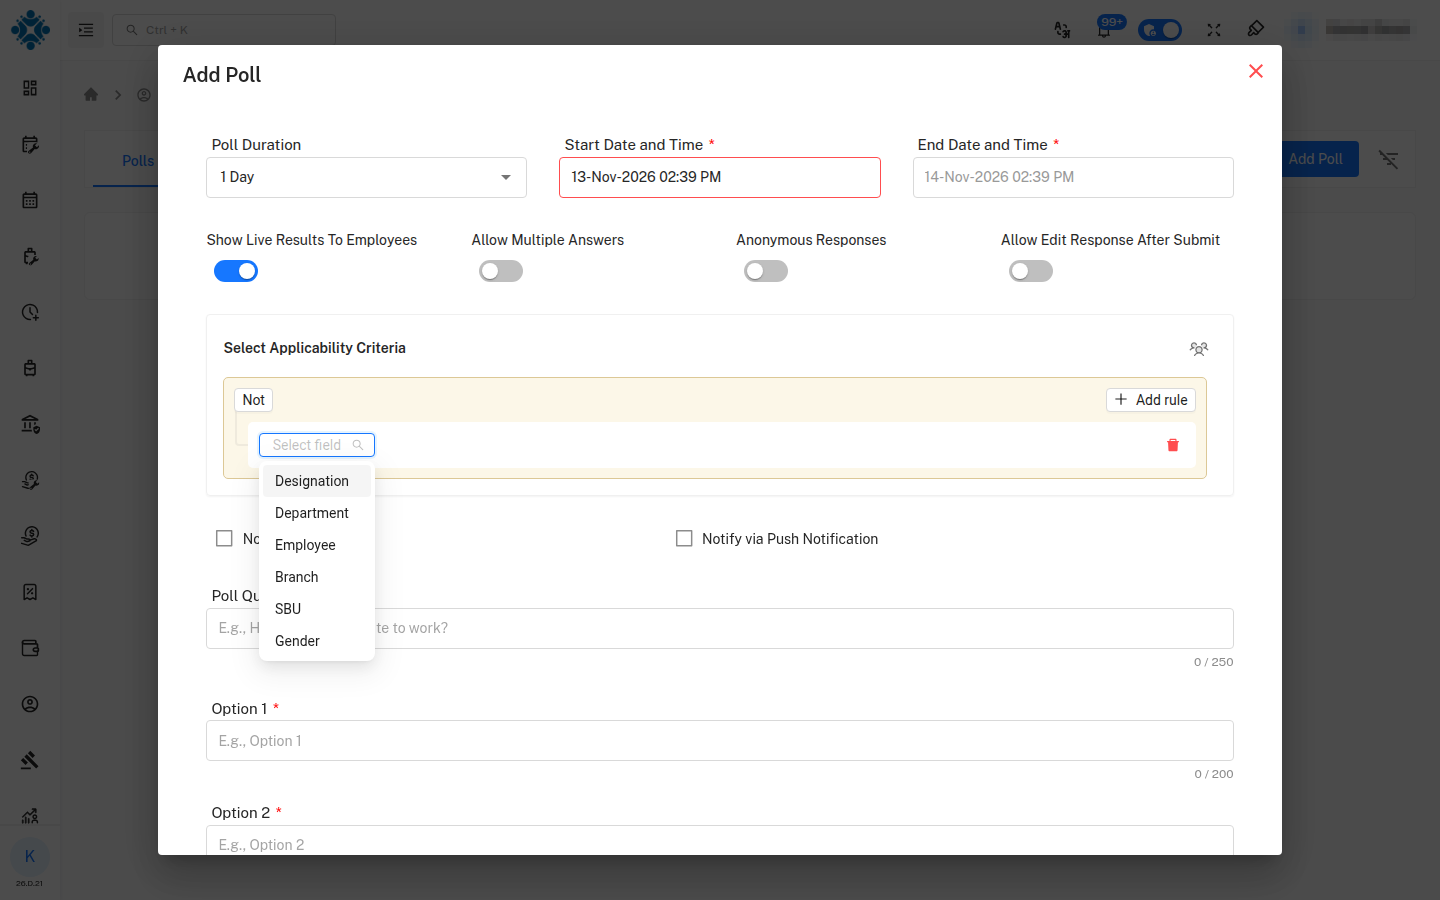
A rule is built from three parts: a field, a condition (for example Any in) and one or more values.
| Field available | Example value |
|---|---|
| Designation | Deputy Manager |
| Department | Human Resources |
| Employee | One or more employees, searched by ID or name |
| Branch | – |
| SBU | – |
| Gender | – |
Use Add rule to add more conditions, or Add group to group them. The red bin icon removes a rule.
2.4 Notifications
Tick Notify via Email and/or Notify via Push Notification to alert eligible employees when the poll is posted. When email is selected you can choose how recipients are addressed: To, CC or BCC. BCC does not reveal other recipients' email addresses.
2.5 Question and options
| Field | Limit |
|---|---|
| Poll Question * | 250 characters |
| Option 1, Option 2 … * | 200 characters each. At least two options are required |
Click Add Option for more choices. The bin icon beside an option removes it.
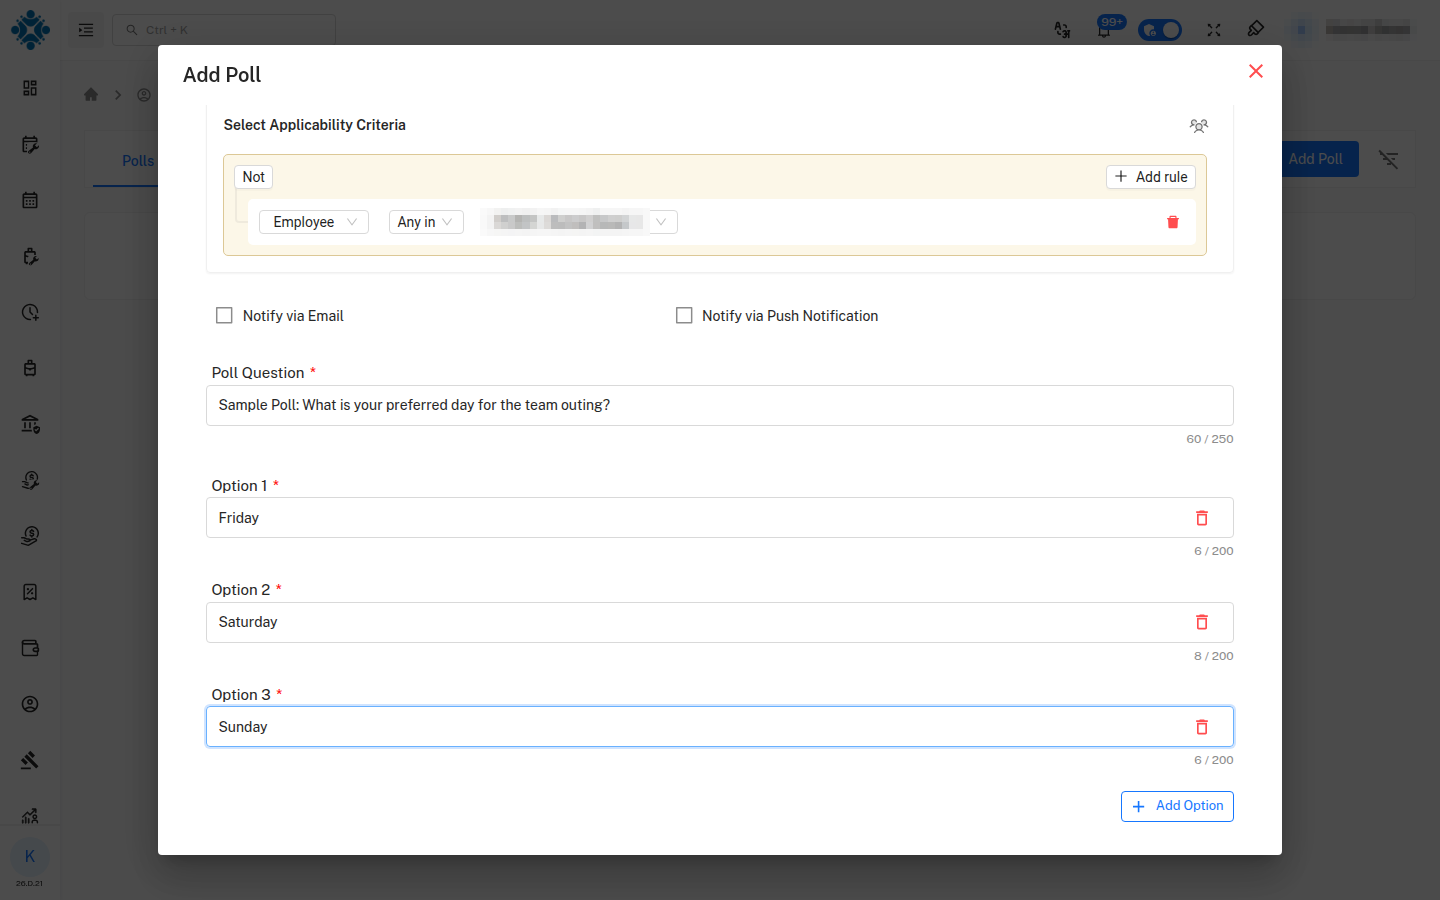
Click Reset to clear the form, or Preview to continue.
3. Preview and Post a Poll
Preview shows the poll the way employees will see it, with the start and end time at the top. Use the pencil icon to go back and edit.
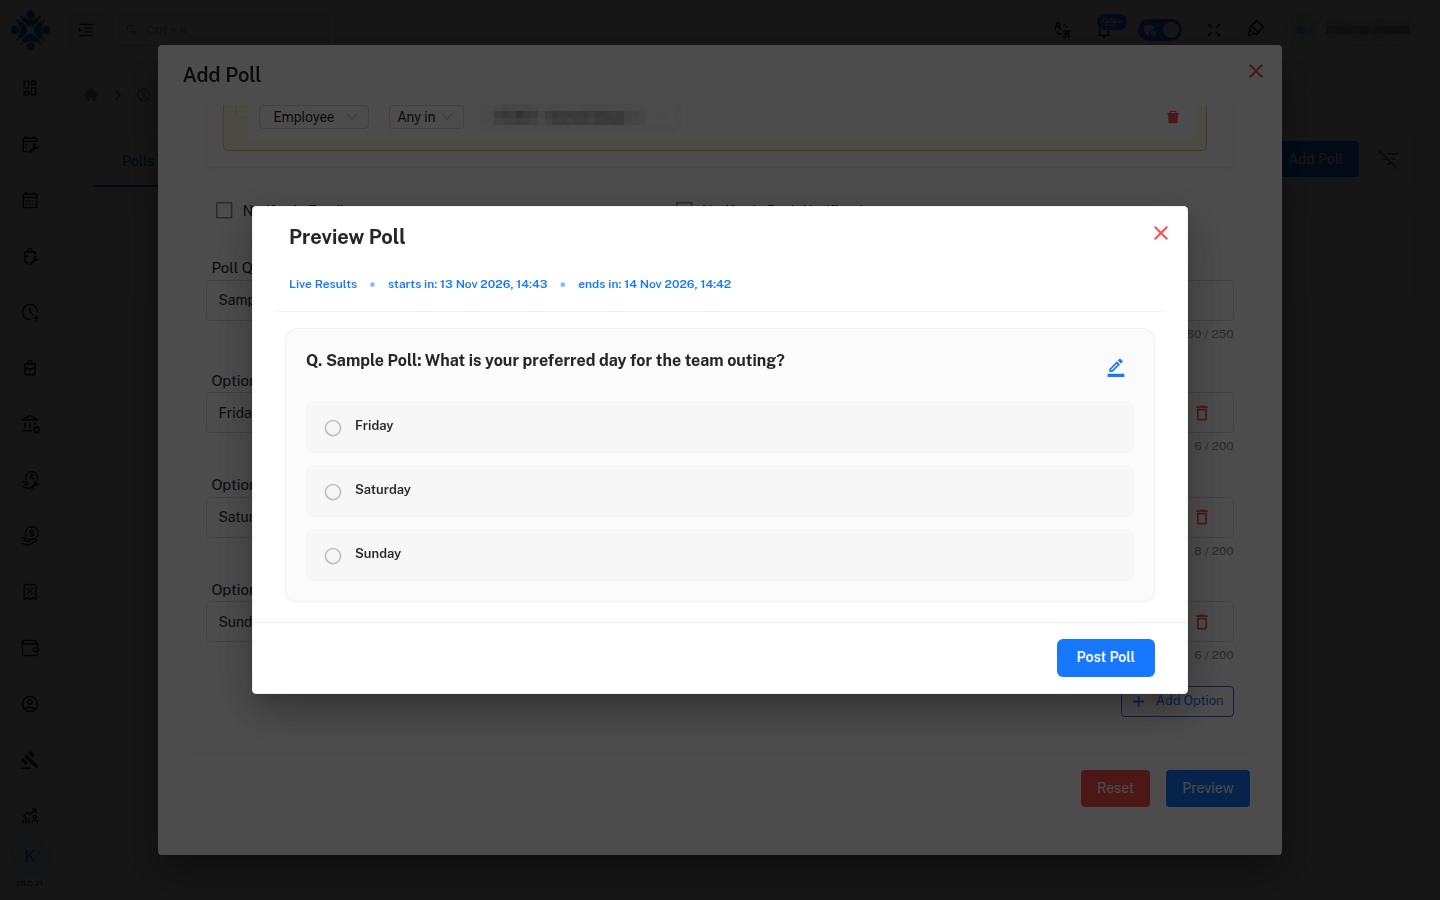
Click Post Poll to open the final confirmation.
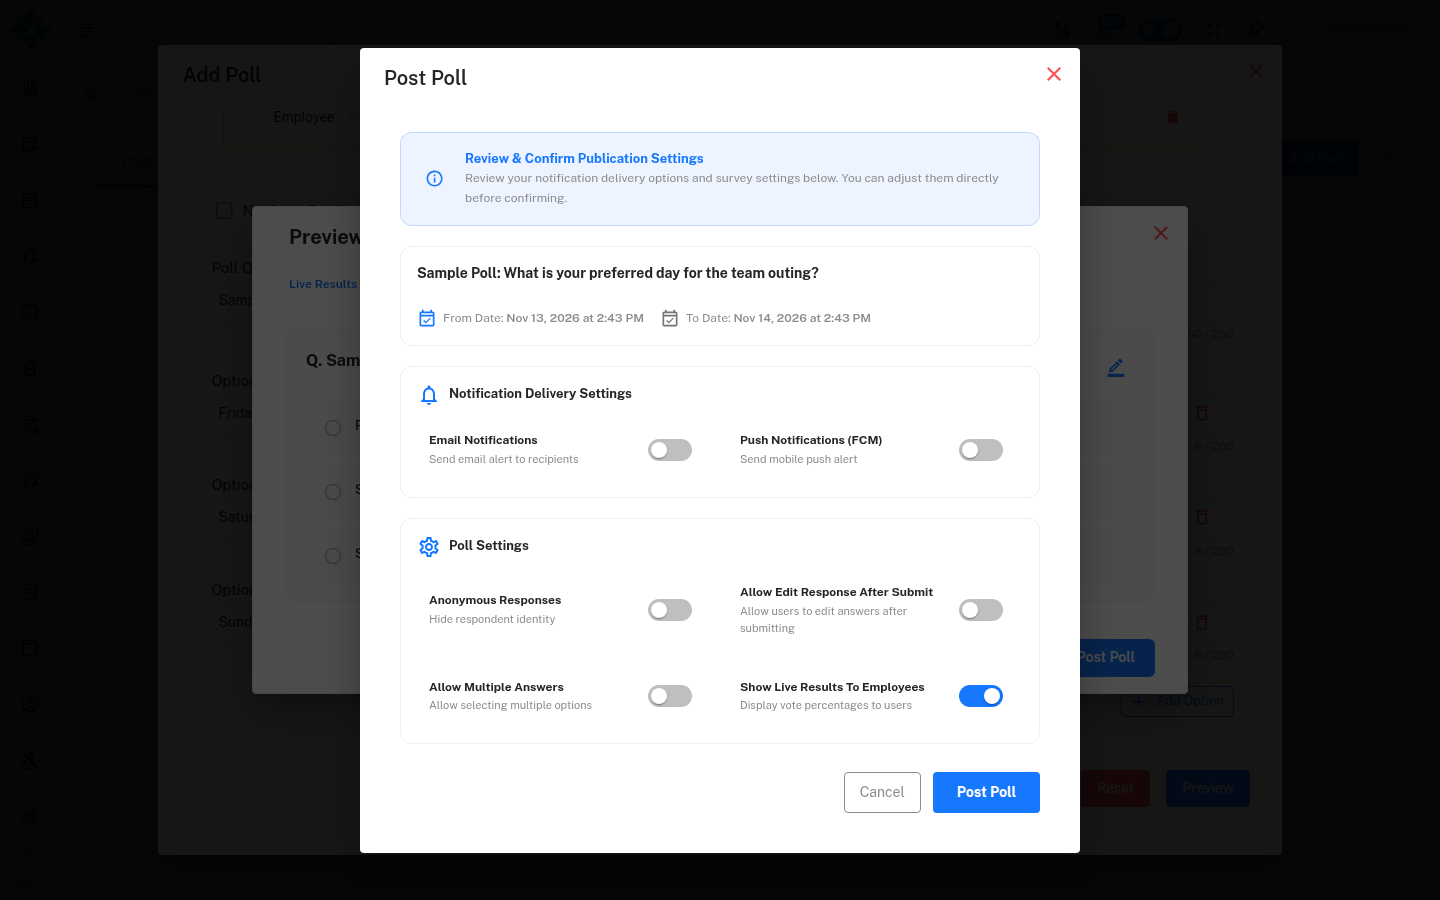
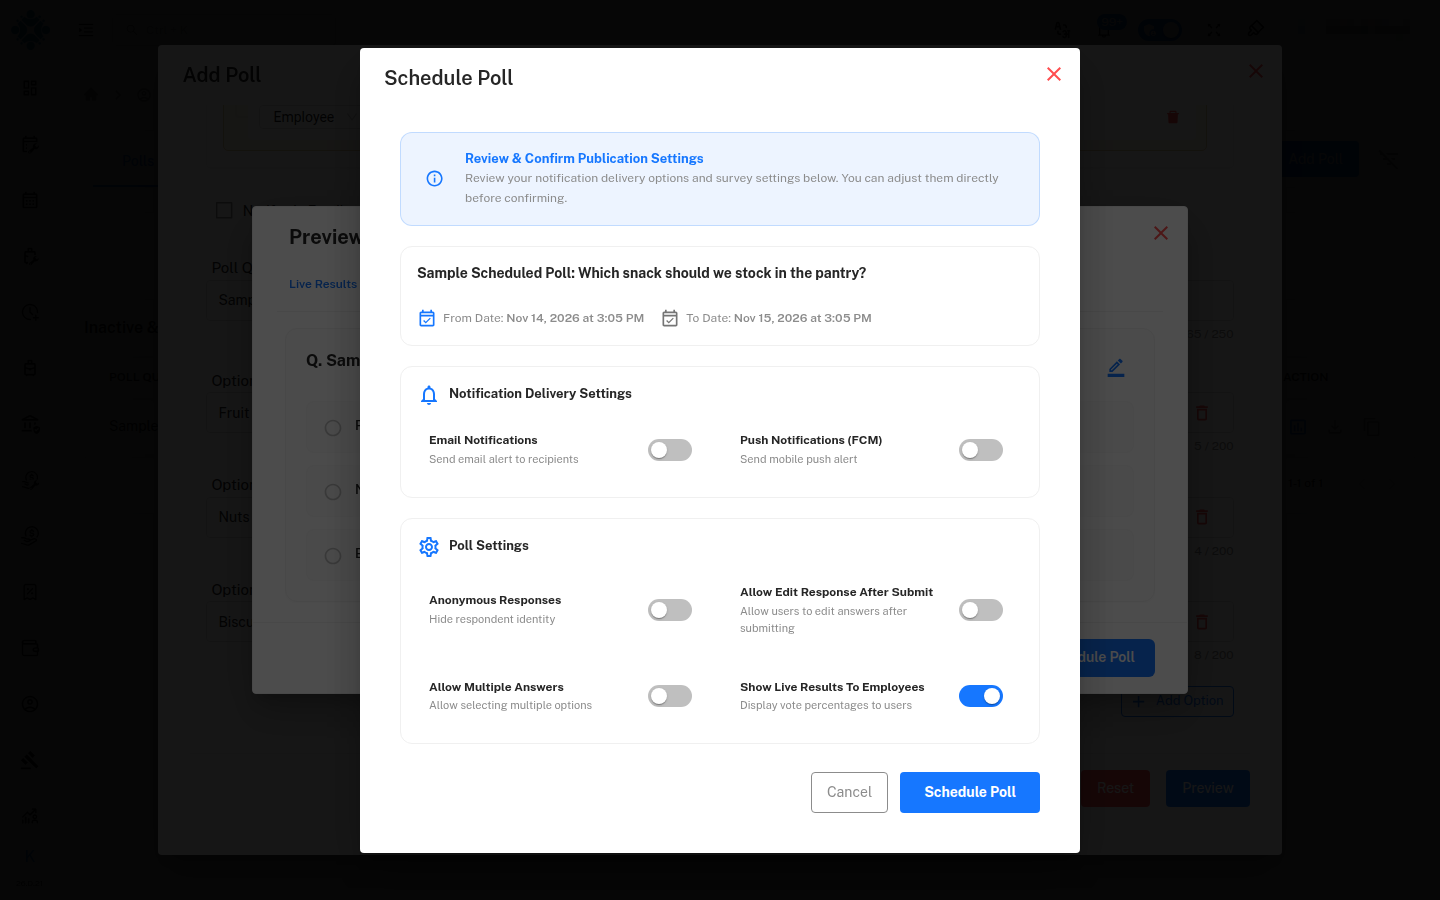
This window lets you review the dates and adjust the settings once more:
- Notification Delivery Settings – Email Notifications and Push Notifications (FCM)
- Poll Settings – Anonymous Responses, Allow Edit Response After Submit, Allow Multiple Answers, Show Live Results To Employees
Click Post Poll to confirm. A Poll created successfully message appears and the poll shows as a card on the page.
Set a Start Date and Time in the future and the poll is scheduled instead of posted immediately. The Preview shows a starts in countdown and the final button reads Schedule Poll. See Scheduled Polls and Surveys.
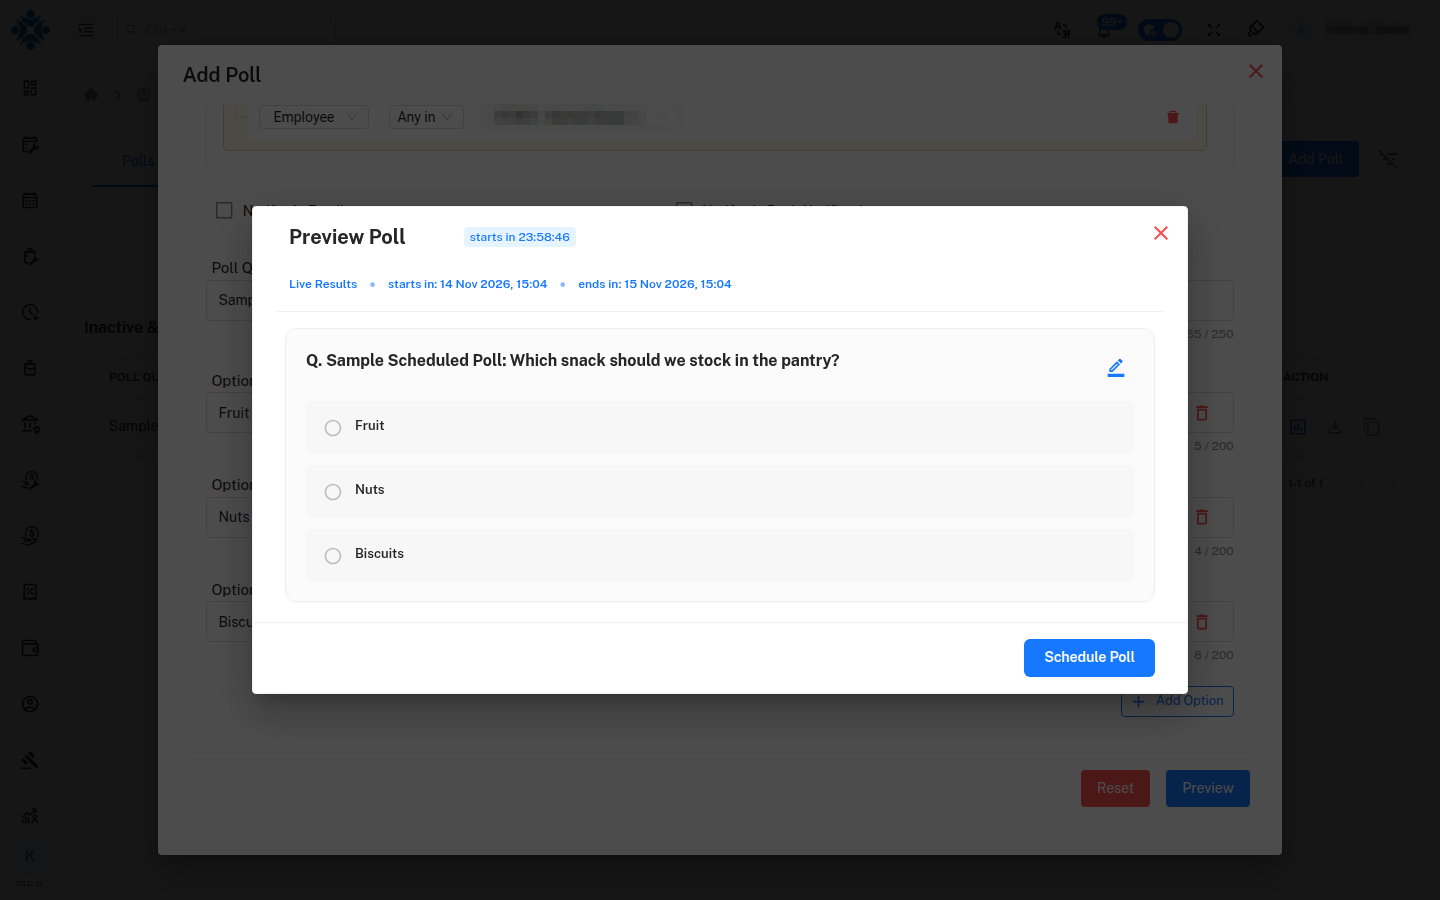
The confirmation window is the same as for posting, but its button reads Schedule Poll.
4. Manage a Poll (Administrator)
4.1 The poll card
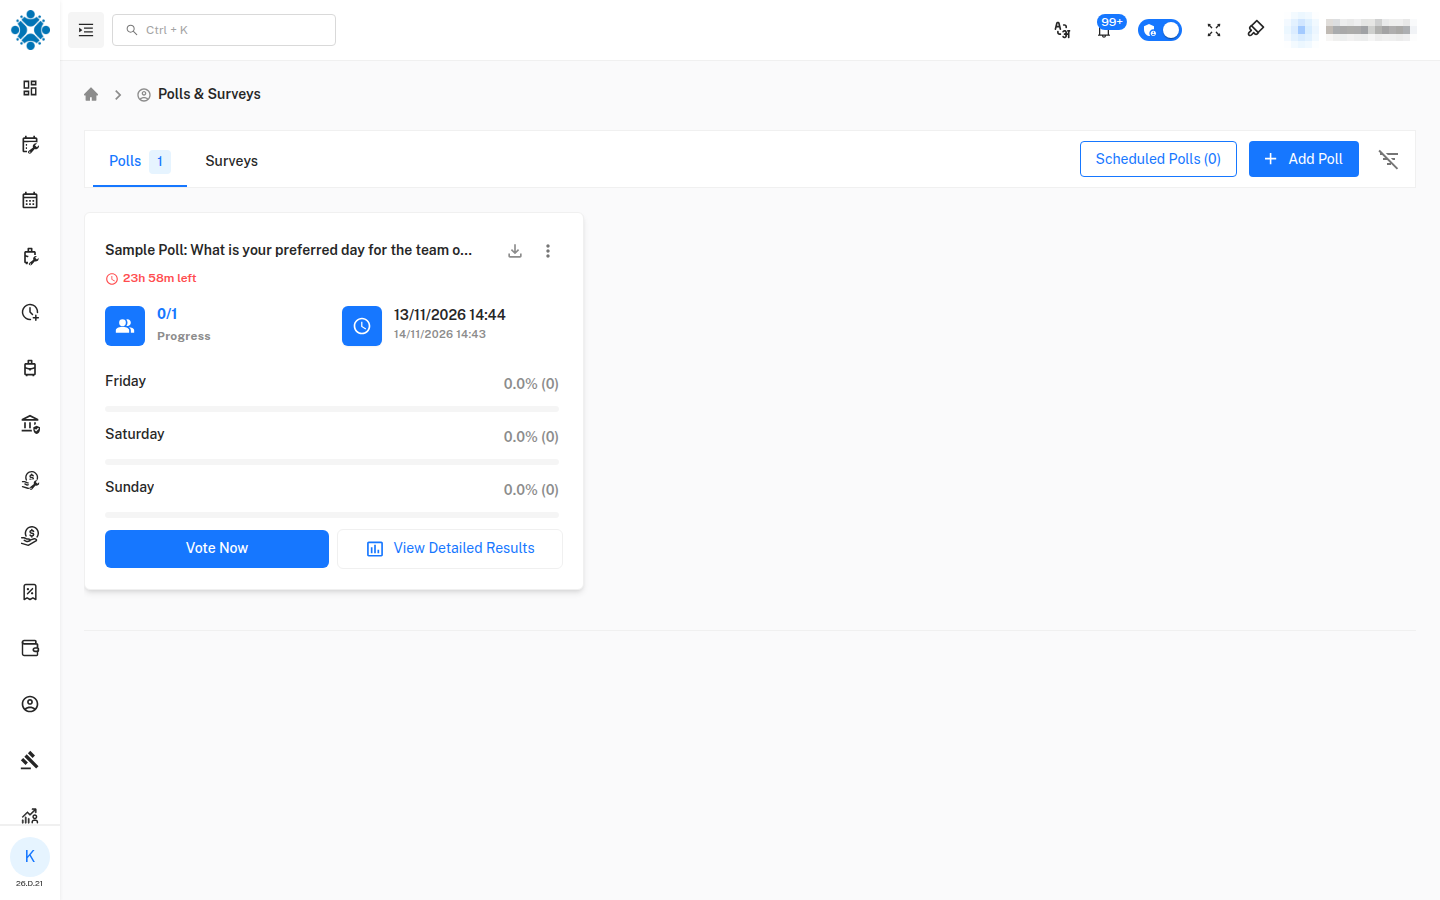
| Item | Meaning |
|---|---|
| Title | The poll question |
| Submitted badge | You have already responded |
| Time left | Remaining time until the poll closes (shown in red) |
| Progress (for example 0/1) | Employees who responded out of those eligible. Click it to see who |
| Date block | Start and end date and time |
| Option bars | Votes and percentage for each option |
| Vote Now / View Response | Respond to the poll, or review your response |
| View Detailed Results | Opens the results window |
| Download icon | Downloads the Excel report |
| ⋮ menu | Copy, Extend or Deactivate |
4.2 Card menu
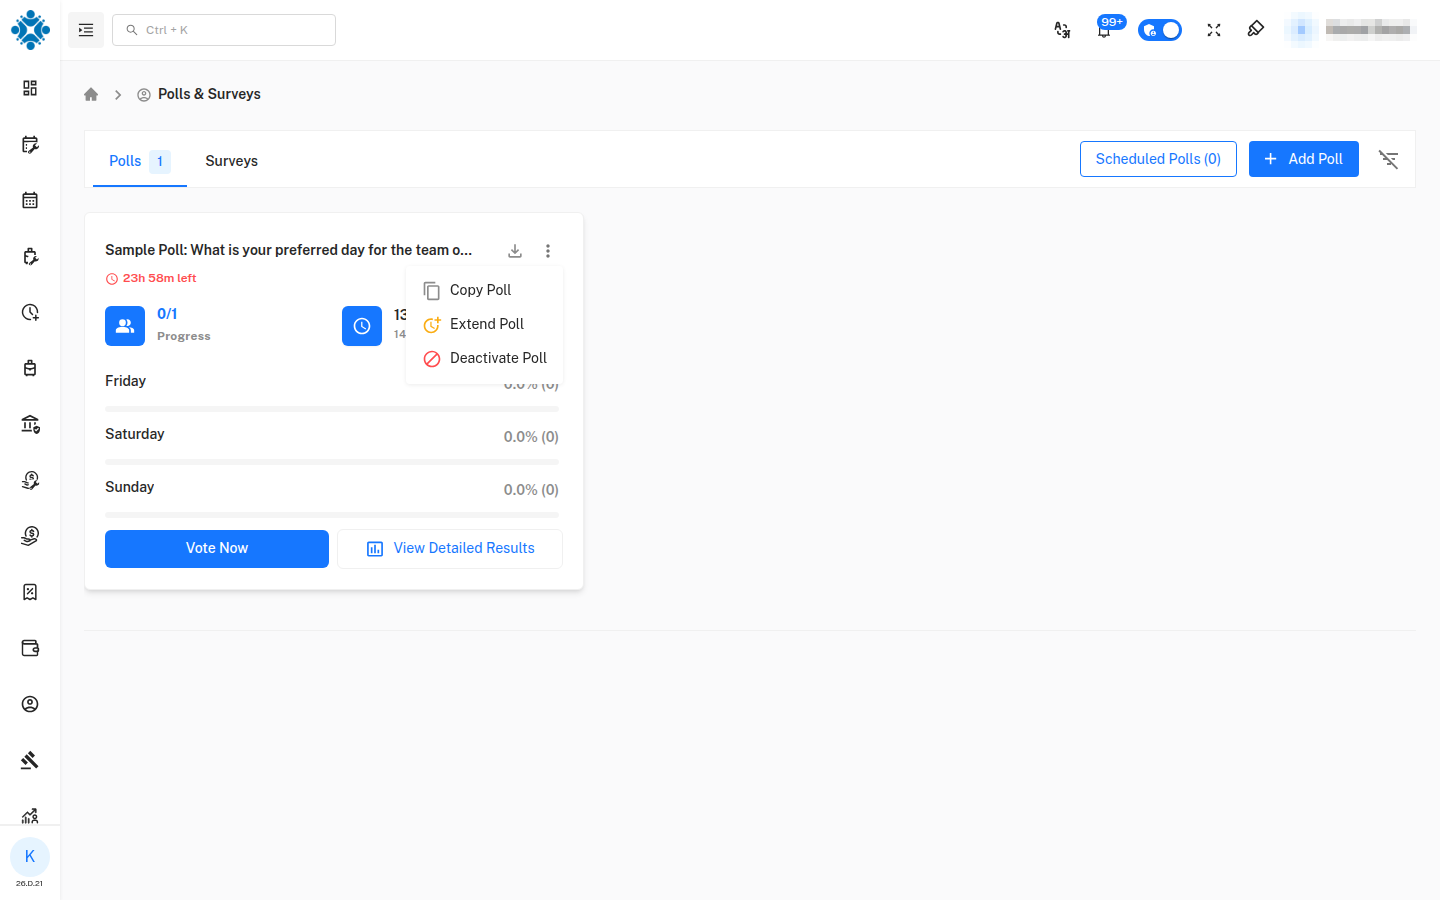
| Option | Use it to |
|---|---|
| Copy Poll | Start a new poll pre-filled with the same question, options and settings |
| Extend Poll | Change the closing date and time |
| Deactivate Poll | Withdraw the poll from employees |
4.3 Eligible Employees Status
Click the progress number (for example 0/1) on a card to see who was targeted and who has responded.
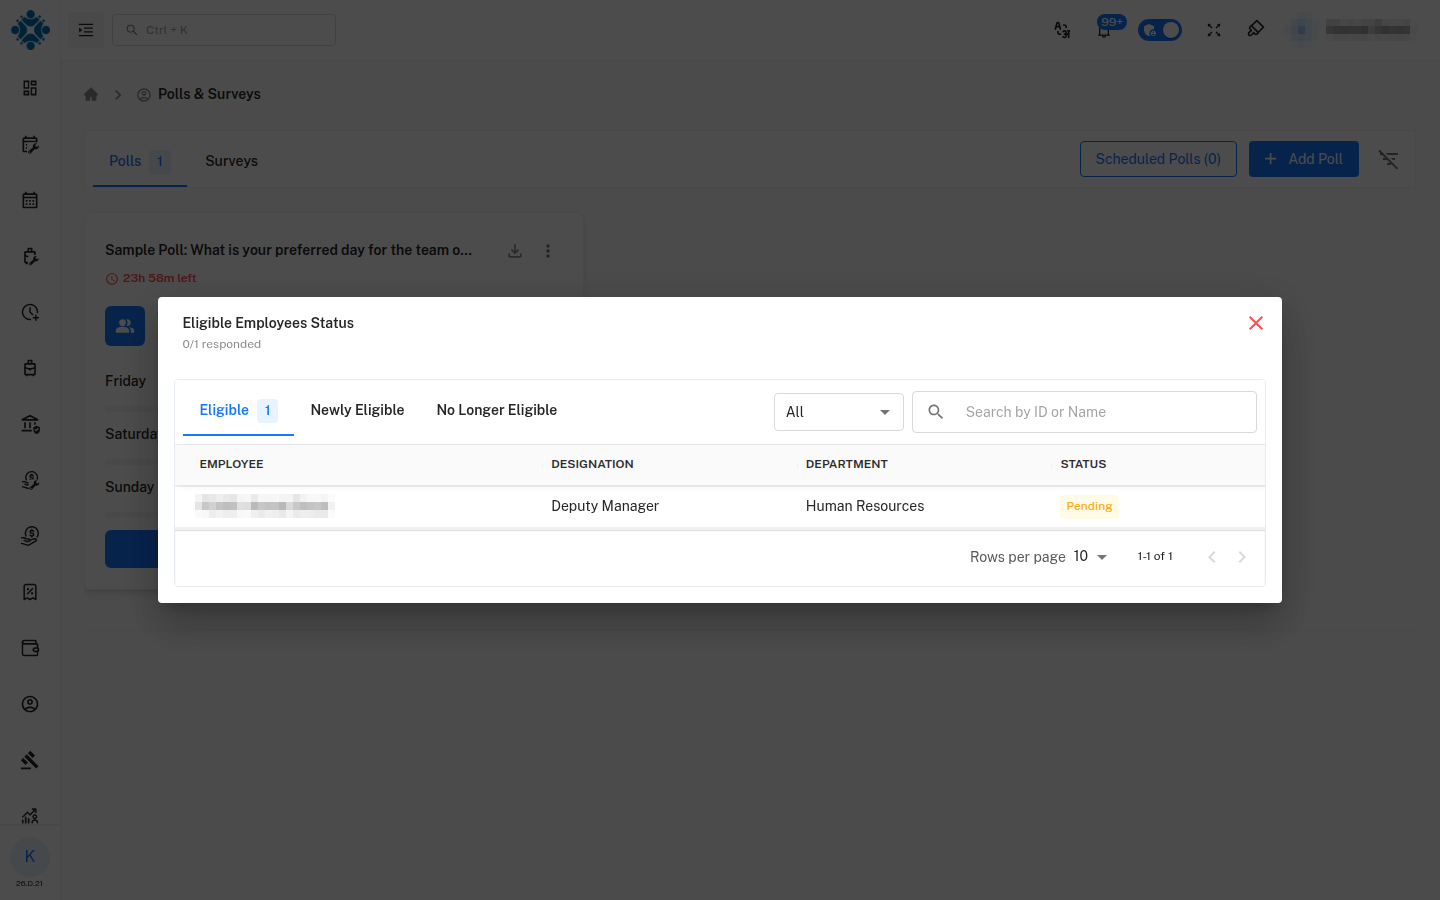
| Tab | Shows |
|---|---|
| Eligible | All employees who currently qualify, with designation, department and status (Pending or responded) |
| Newly Eligible | Employees who became eligible after the poll was created (for example, new joiners or transfers) |
| No Longer Eligible | Employees who no longer meet the criteria |
Use the status filter (All) and the Search by ID or Name box to narrow the list.
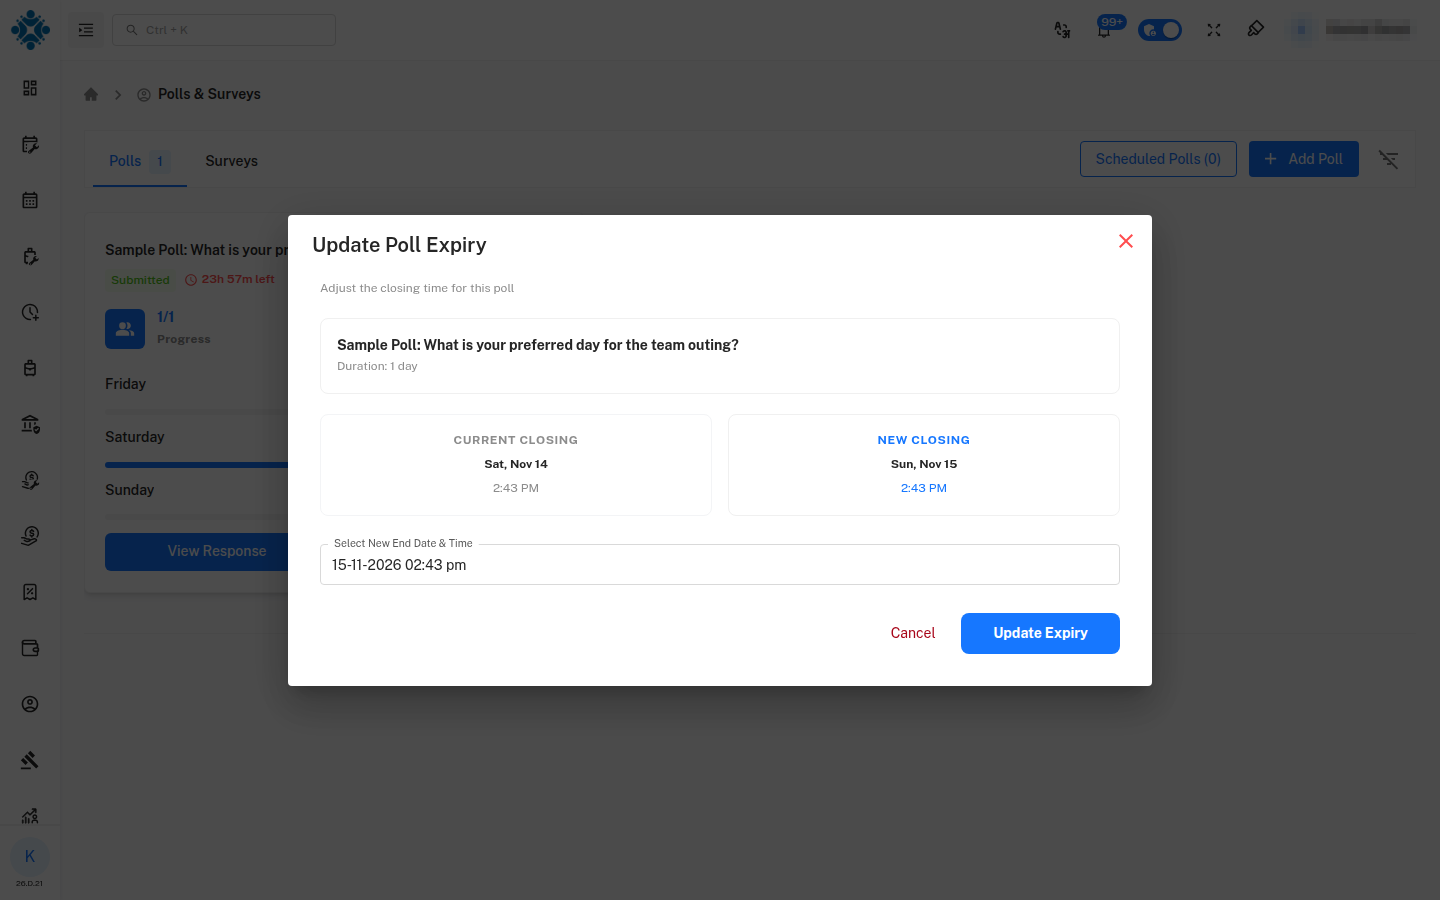
4.4 Extend a poll
Extend Poll shows the current closing time and a proposed new closing time. Choose a new end date and time and click Update Expiry. You are asked to confirm the change.
4.5 Deactivate a poll
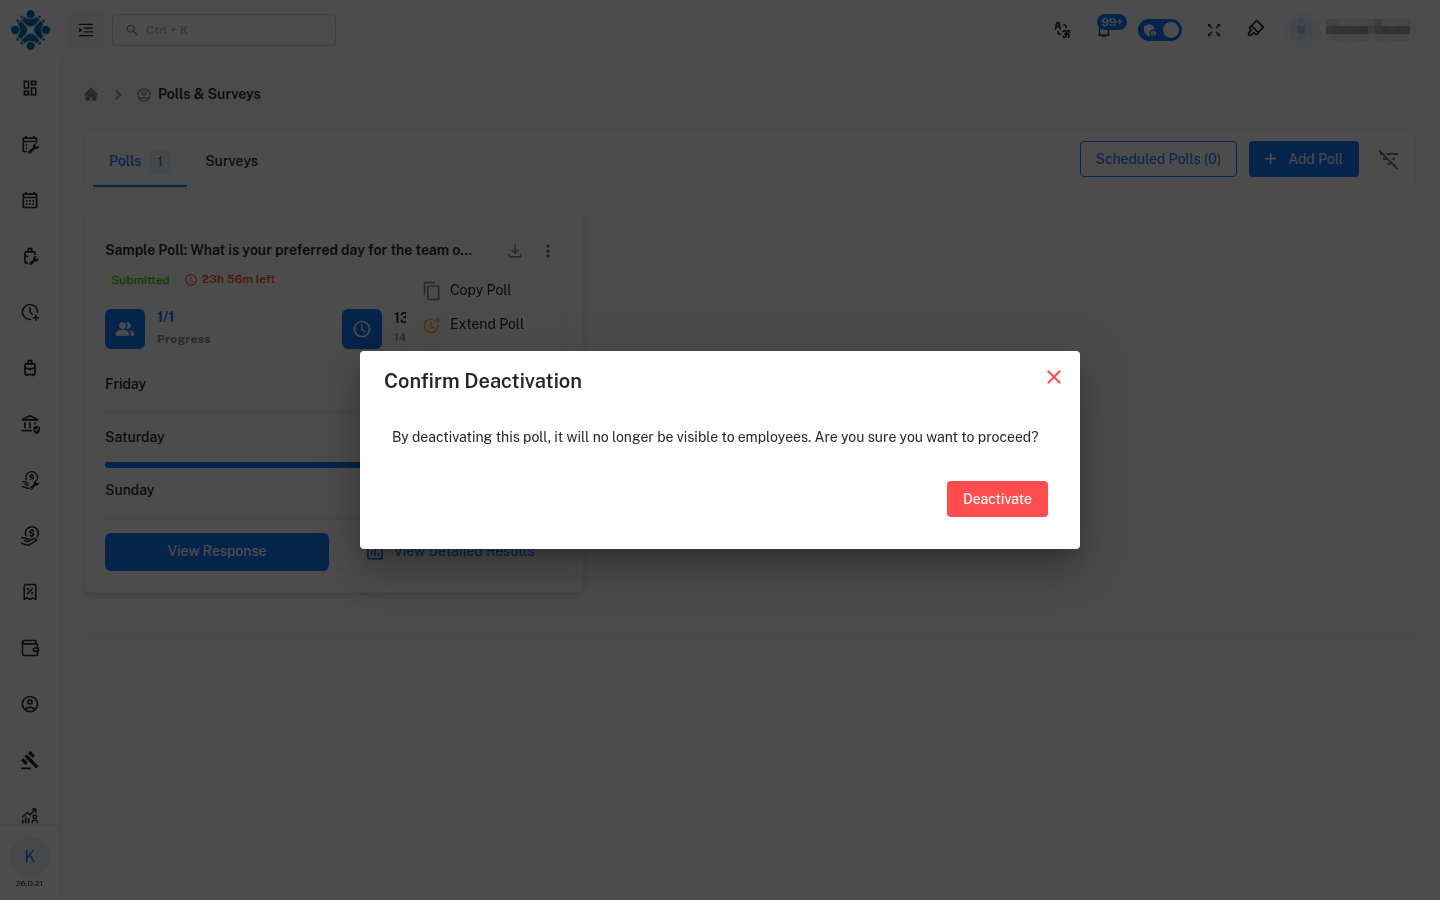
Deactivating a poll means it no longer appears to employees. Results collected so far are kept. Click Deactivate to confirm.
4.6 Inactive & Closed polls
Deactivated and expired polls move to the Inactive & Closed Polls table at the bottom of the page.
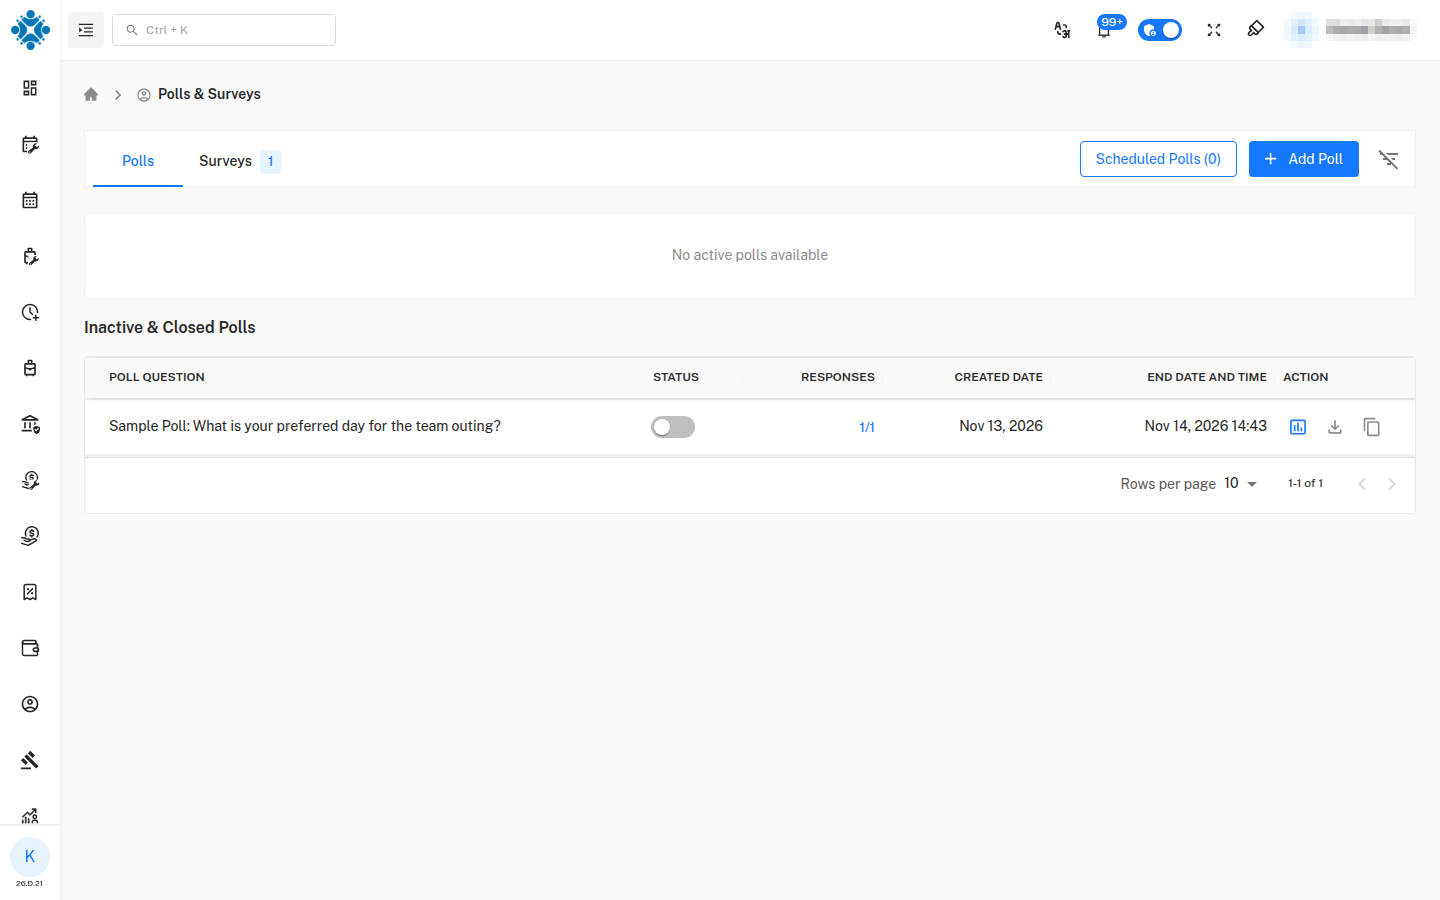
| Column / action | Description |
|---|---|
| Status toggle | Turn it on to reactivate the poll (you are asked to confirm) |
| Responses | Number of responses out of those eligible |
| Created Date / End Date and Time | When the poll was created and when it closes |
| Chart icon | Open detailed results |
| Download icon | Download the Excel report |
| Copy icon | Create a new poll from this one |
5. Filter the List
Click the Filter icon at the top right of the page.
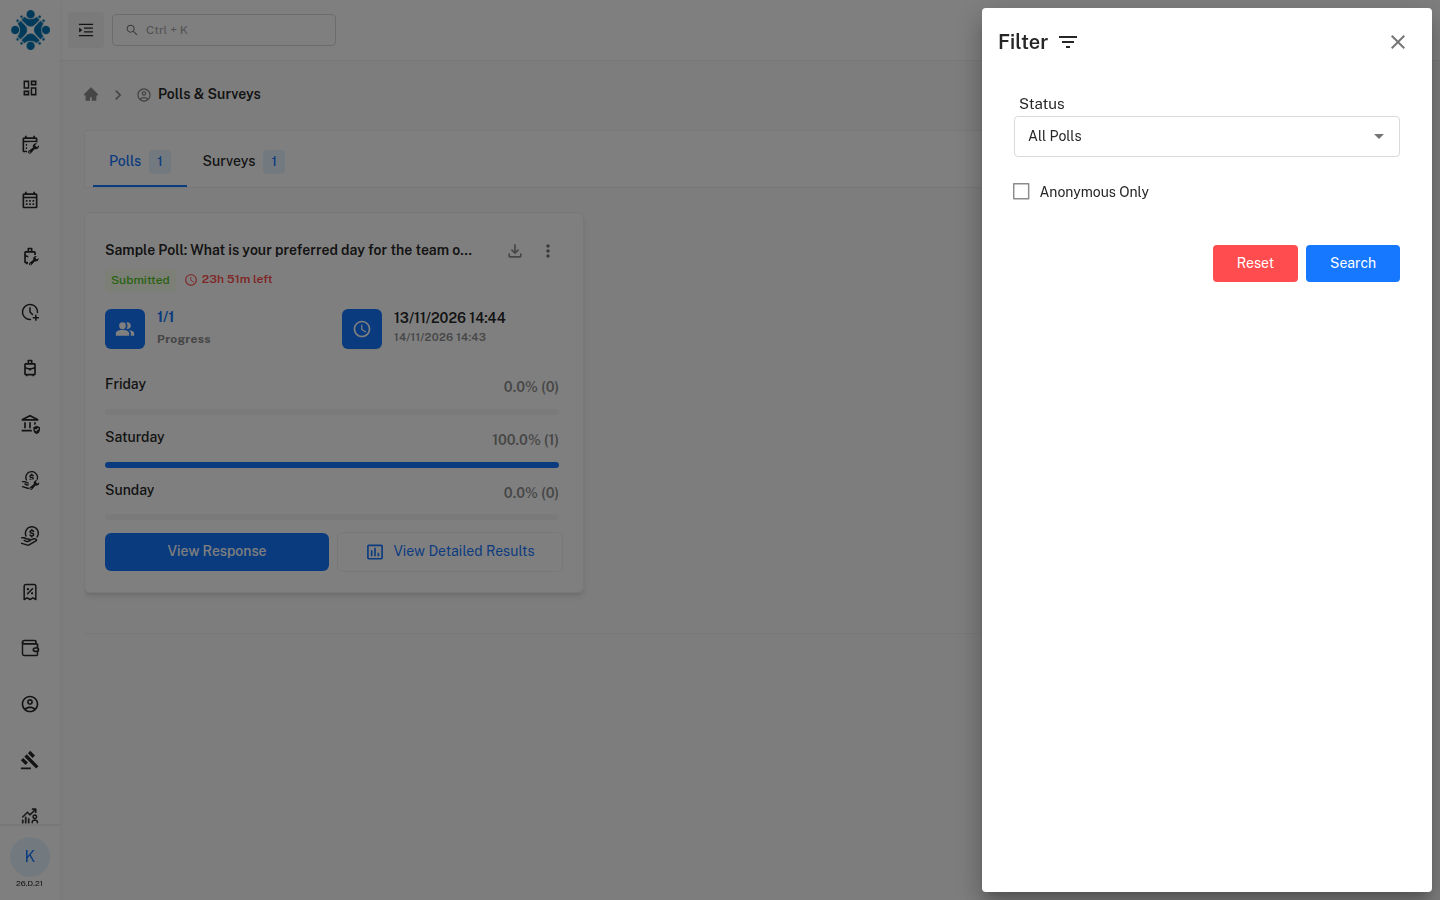
| Filter | Description |
|---|---|
| Status | All Polls (or All Surveys), or a specific status |
| Anonymous Only | Show only anonymous polls or surveys |
Click Search to apply, or Reset to clear.
6. Scheduled Polls and Surveys
A poll or survey with a future start date is not shown to employees yet. It waits in the scheduled list and opens automatically at its start time.
Click Scheduled Polls (n) (or Scheduled Surveys (n)) to open the list. n is the number of items waiting to start.
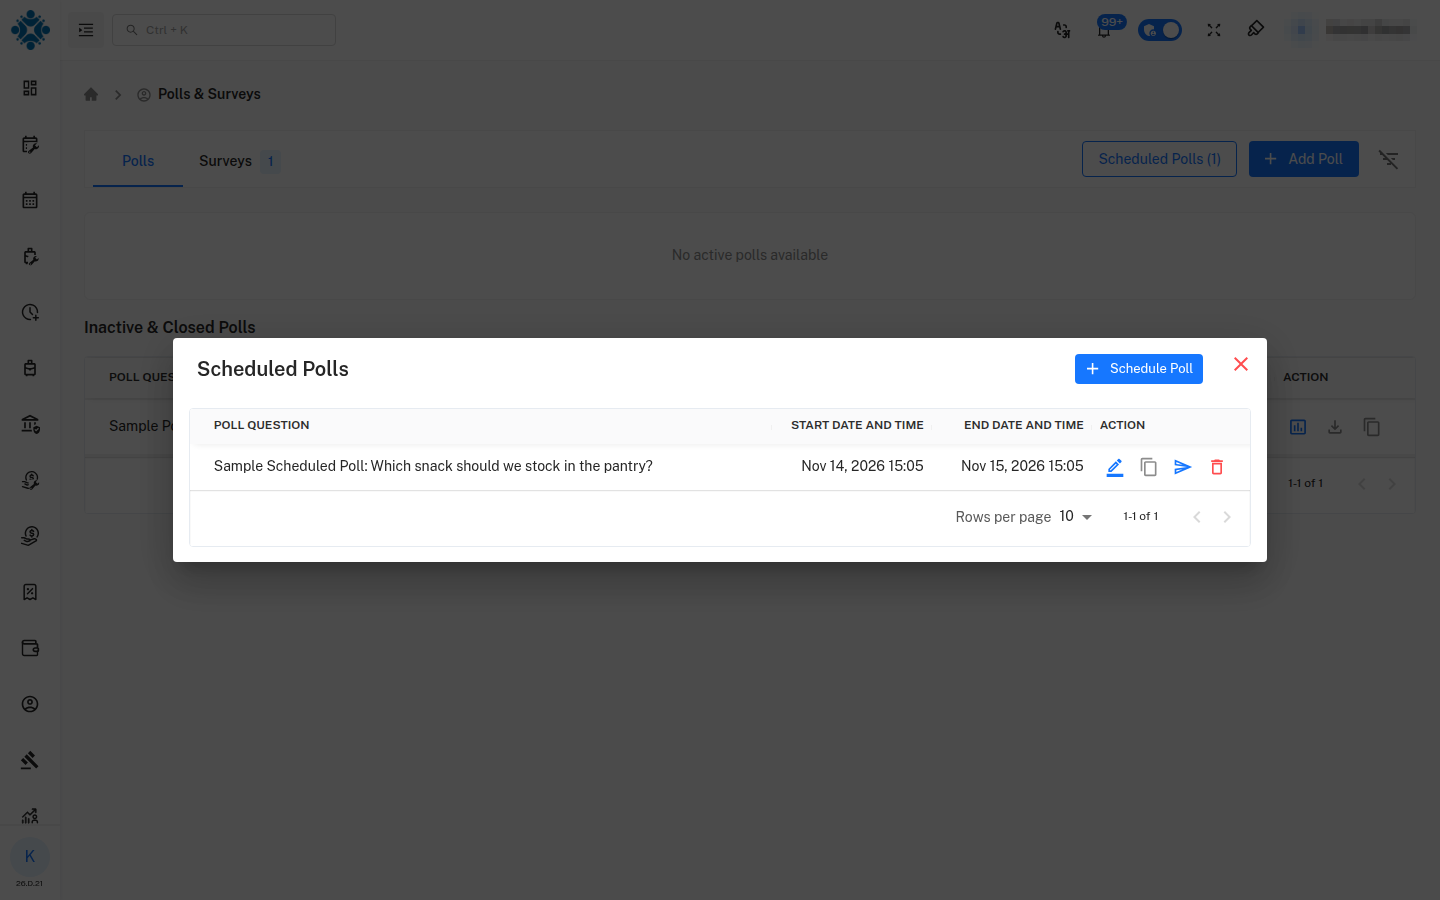
Each row shows the question, Start Date and Time, End Date and Time and four actions:
| Icon | Action | What it does |
|---|---|---|
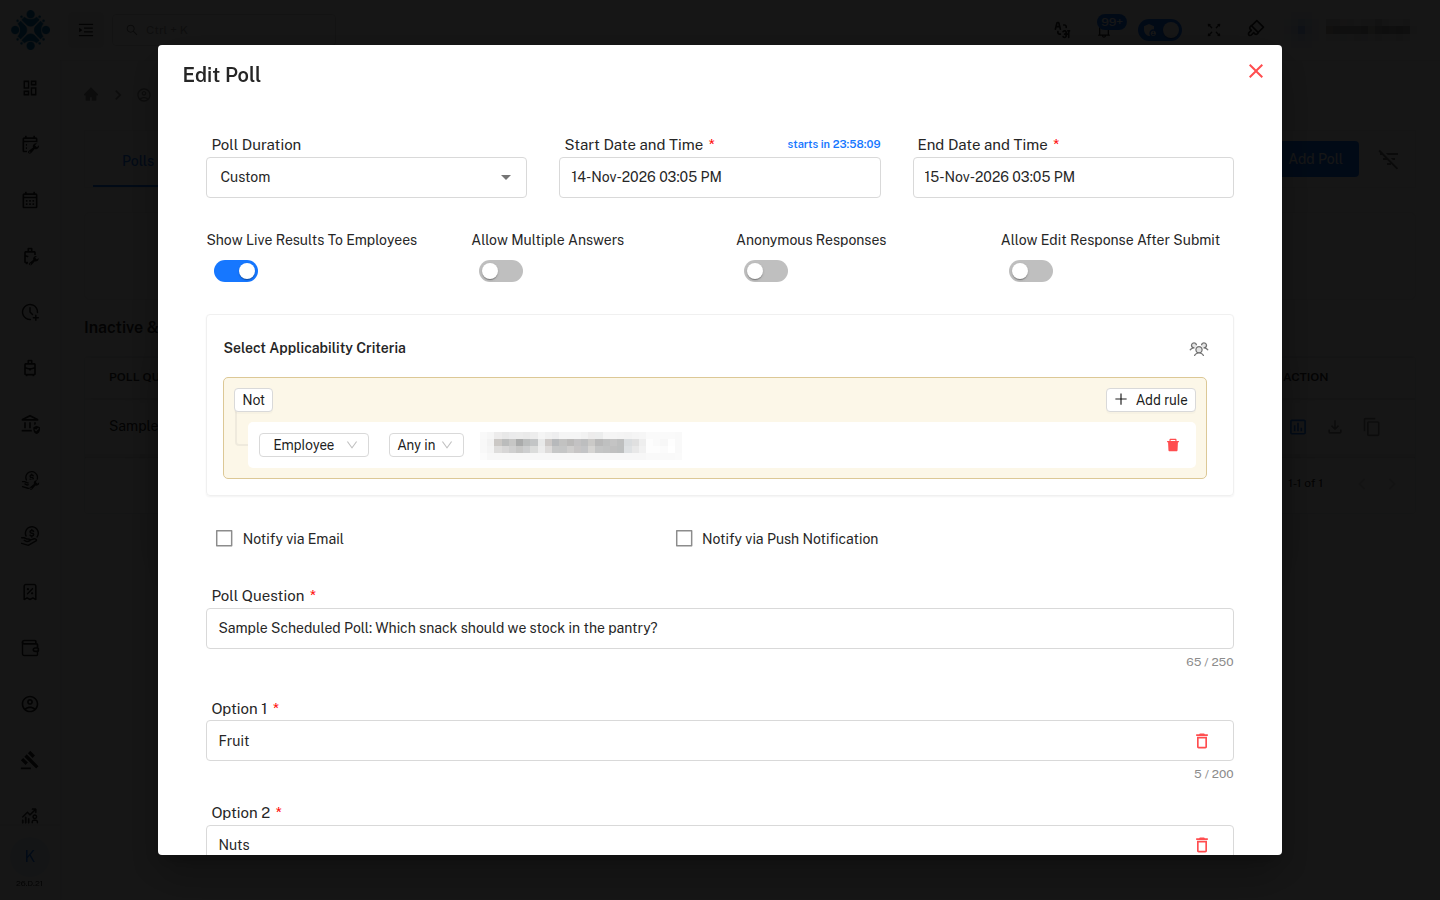
| Pencil | Edit | Reopens the form so you can change the dates, audience, settings, question or options |
| Copy | Copy | Starts a new poll or survey pre-filled from this one |
| Send | Post Now | Publishes it immediately, without waiting for the start time |
| Bin | Delete | Permanently removes it |
Use Schedule Poll (or Schedule Survey) at the top of the window to add another scheduled item.
6.1 Edit a scheduled item
The form opens with the existing details. The duration shows as Custom, and a starts in countdown appears above the start date.
6.2 Post it now
Post Now asks you to confirm with Post Poll Immediately? The window compares the original Scheduled time with the new Posting At time.
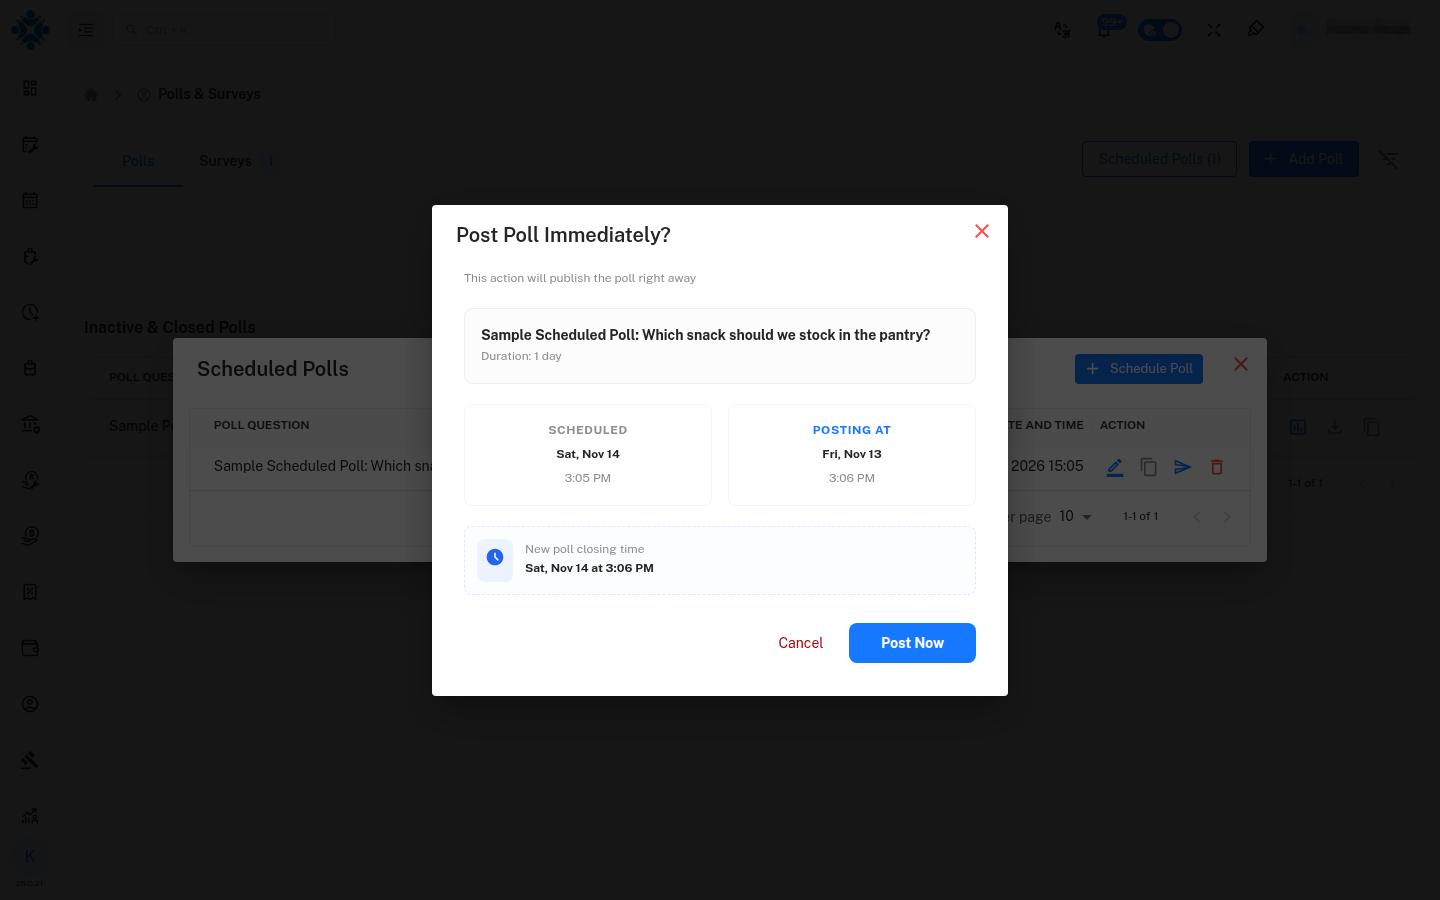
The poll keeps its original duration. The window shows a New poll closing time so you can see when it will now close. For example, a 1-day poll posted now closes 1 day from now, not at the original end time.
6.3 Delete a scheduled item
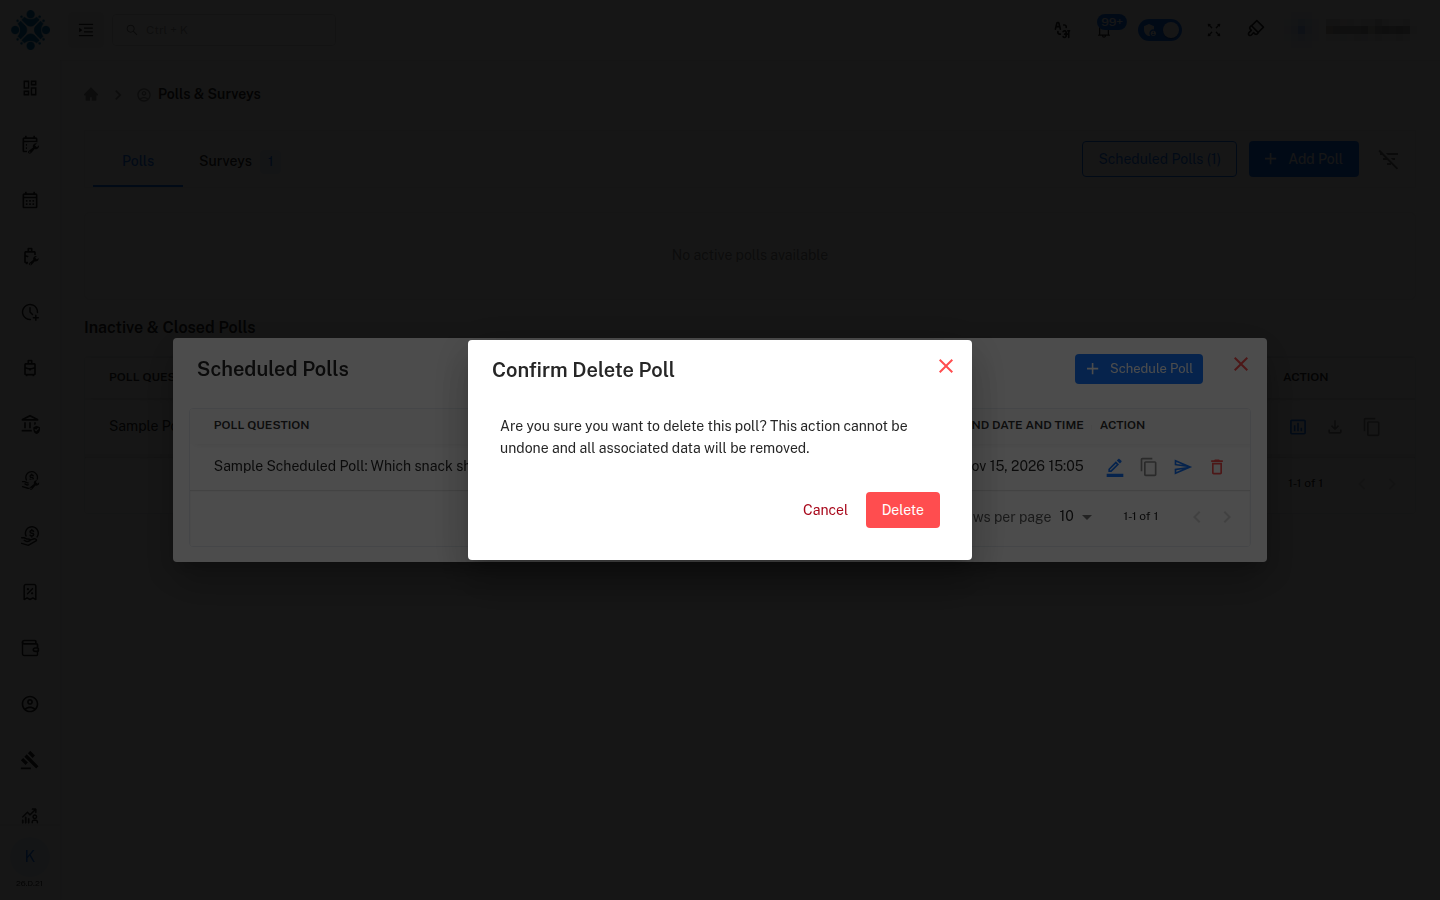
Deleting is permanent. The item and all data associated with it are removed. Successfully deleted appears and the scheduled count goes down by one.
Deleting only applies to scheduled items. Once a poll or survey is live, use Deactivate instead (see Deactivate a poll), which keeps the collected data.
7. Respond to a Poll (Employee)
Employees see the polls addressed to them on the Polls tab.
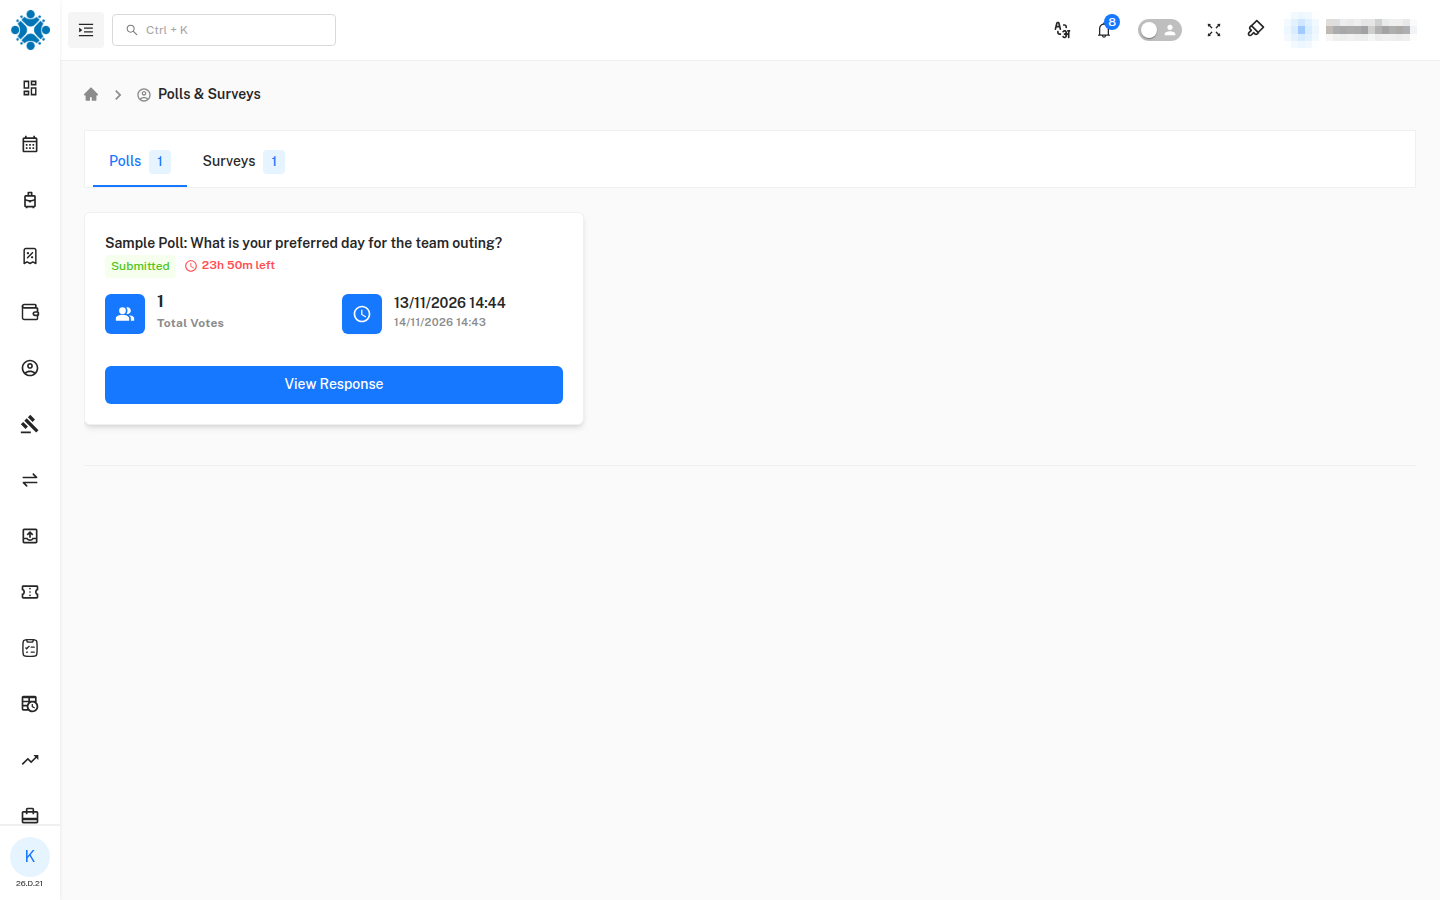
- Click Vote Now.
- Select an option (or several, if the poll allows multiple answers).
- Click Submit.
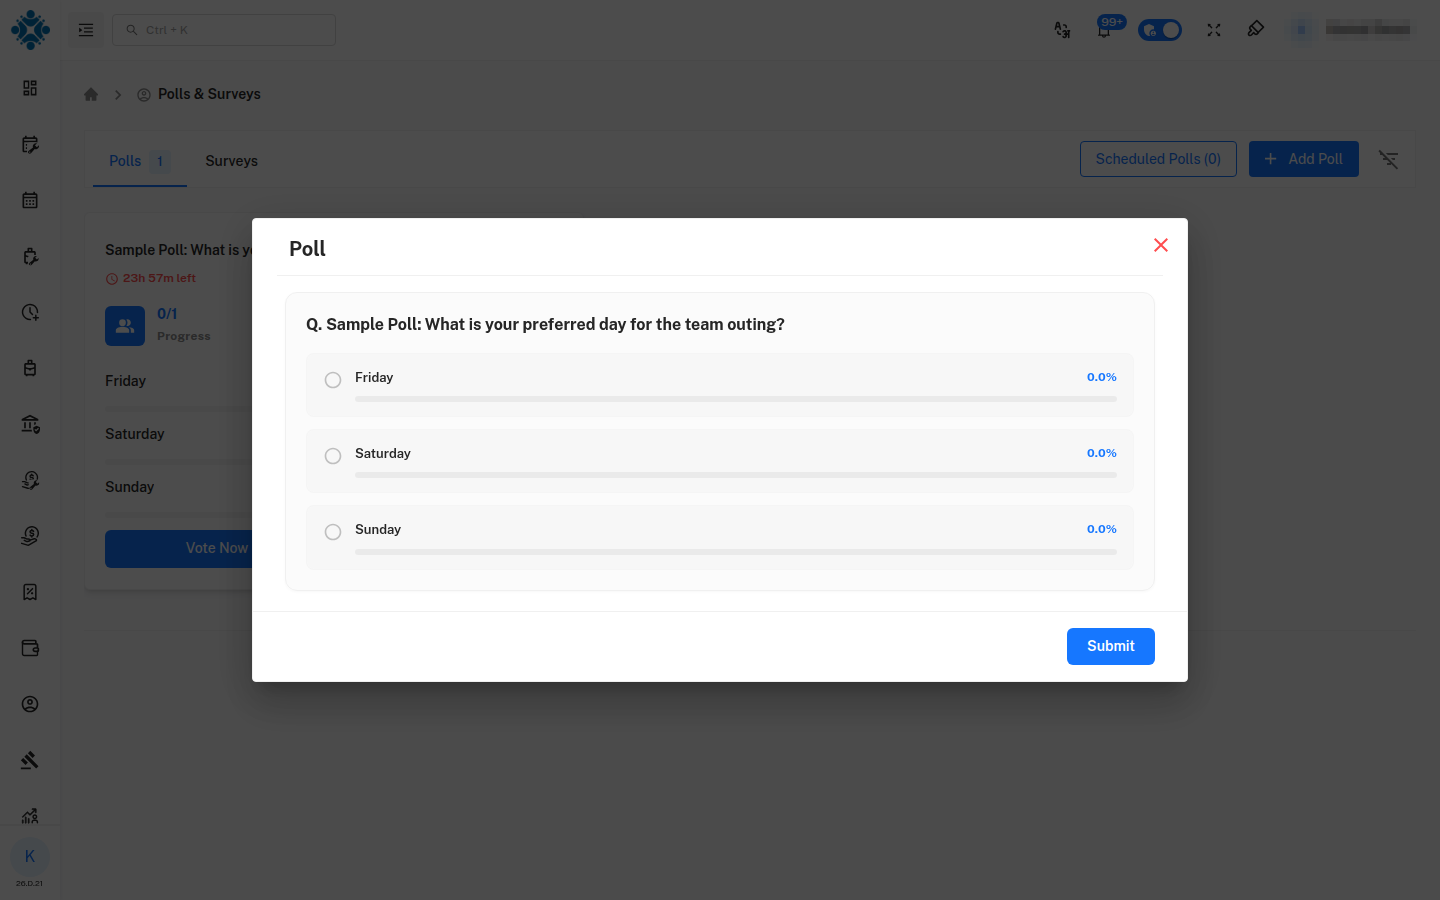
If live results are on, each option shows its current percentage. A confirmation appears and closes by itself after 10 seconds.
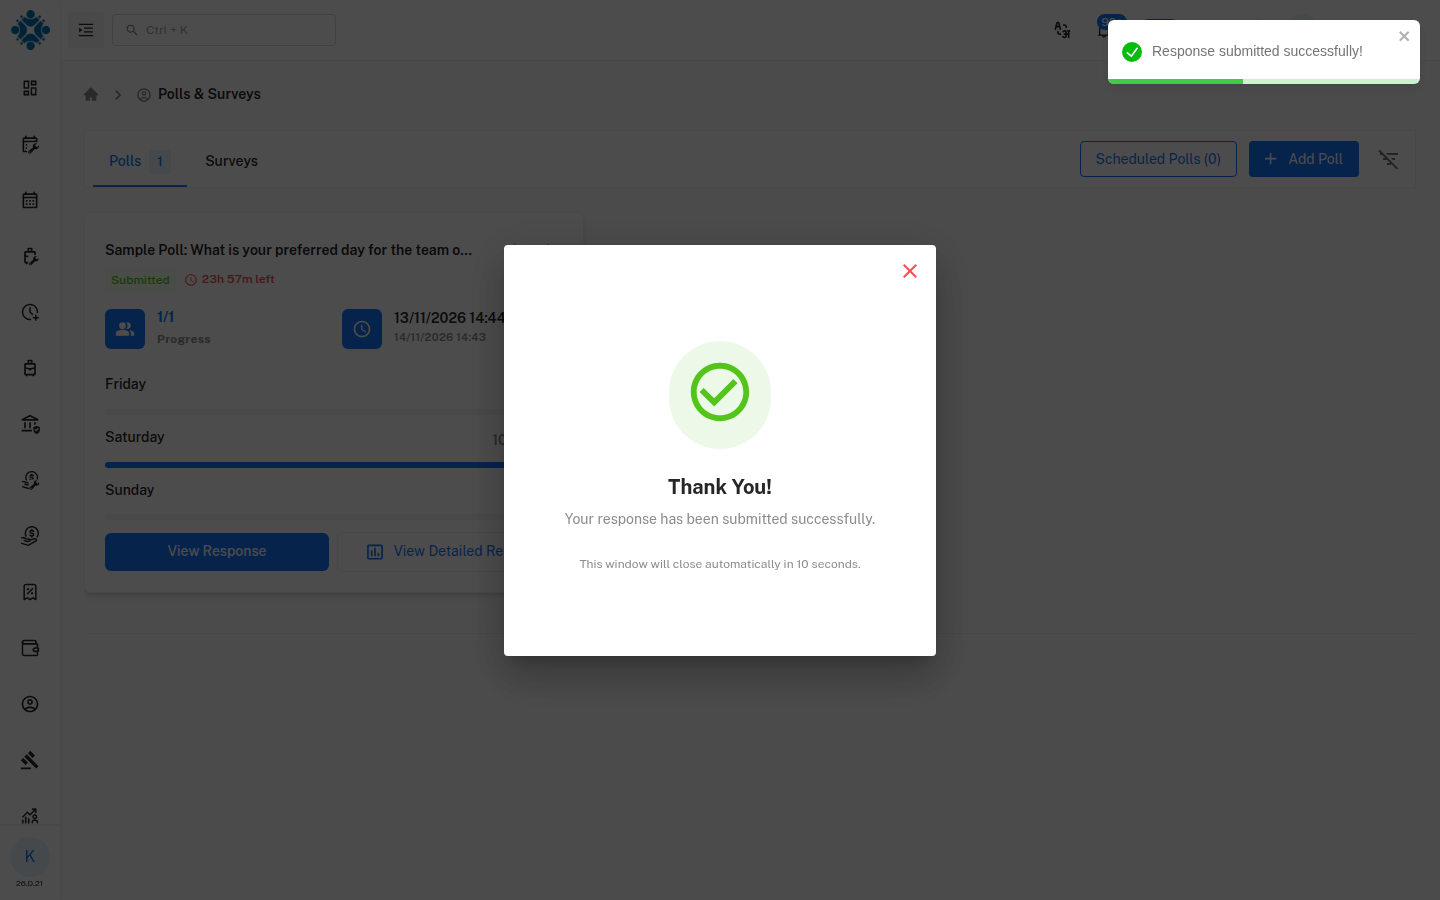
After voting, the card shows Submitted and the button changes to View Response. The employee card shows Total Votes and the closing time.
If you try to submit without choosing an option, you are asked to select one. Each employee can respond once, unless Allow Edit Response After Submit was turned on.
8. Poll Results (Administrator)
Click View Detailed Results on a poll.
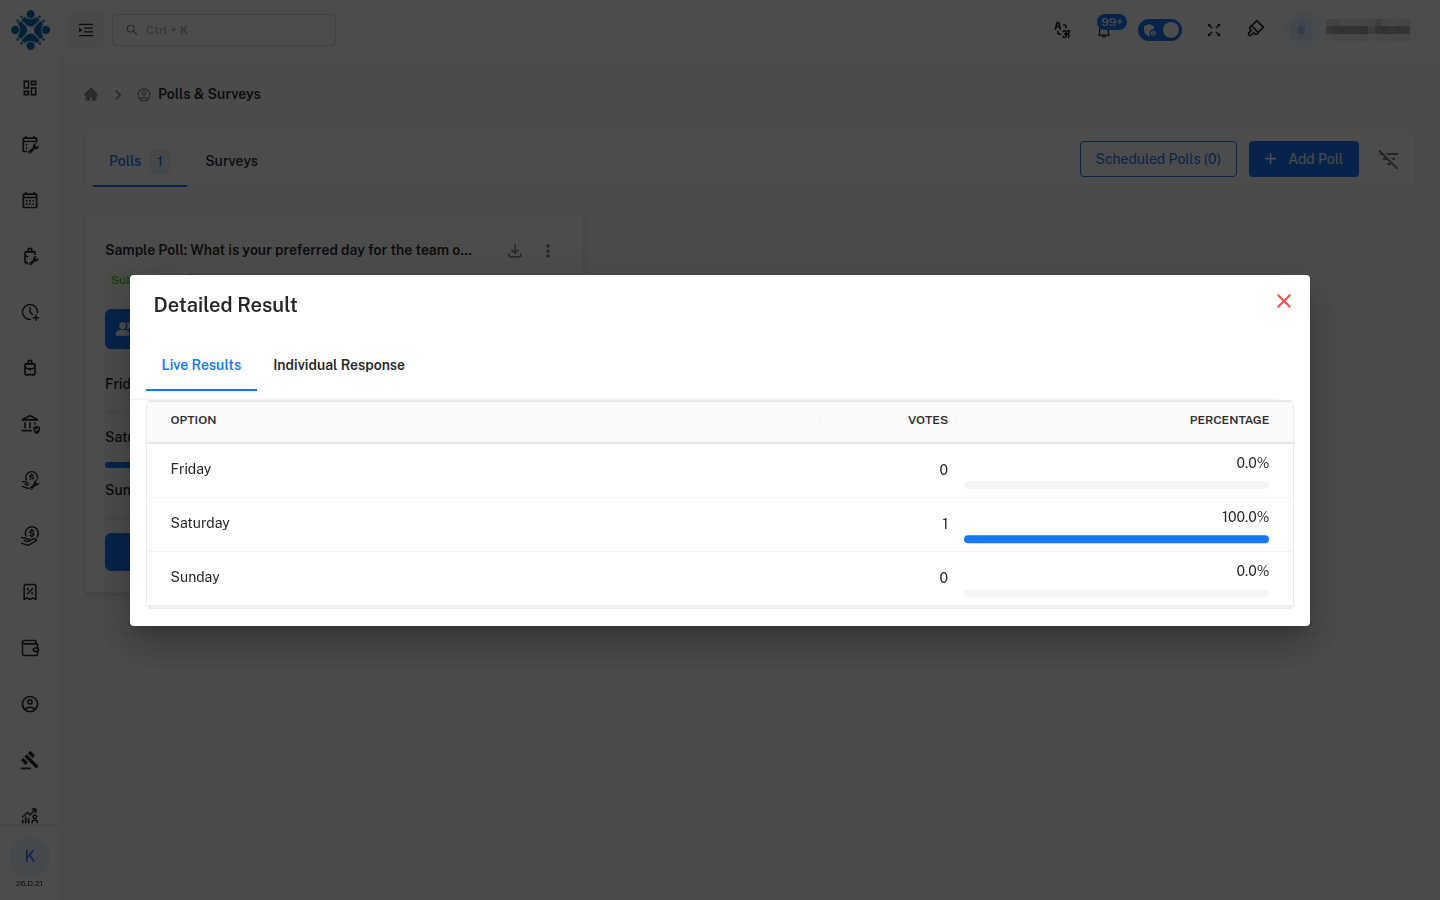
| Tab | Shows |
|---|---|
| Live Results | Votes and percentage for every option |
| Individual Response | Each respondent, their department and when they voted, with a View Response link. Names are hidden for anonymous polls |
9. Create a Survey (Administrator)
Open the Surveys tab and click Add Survey.
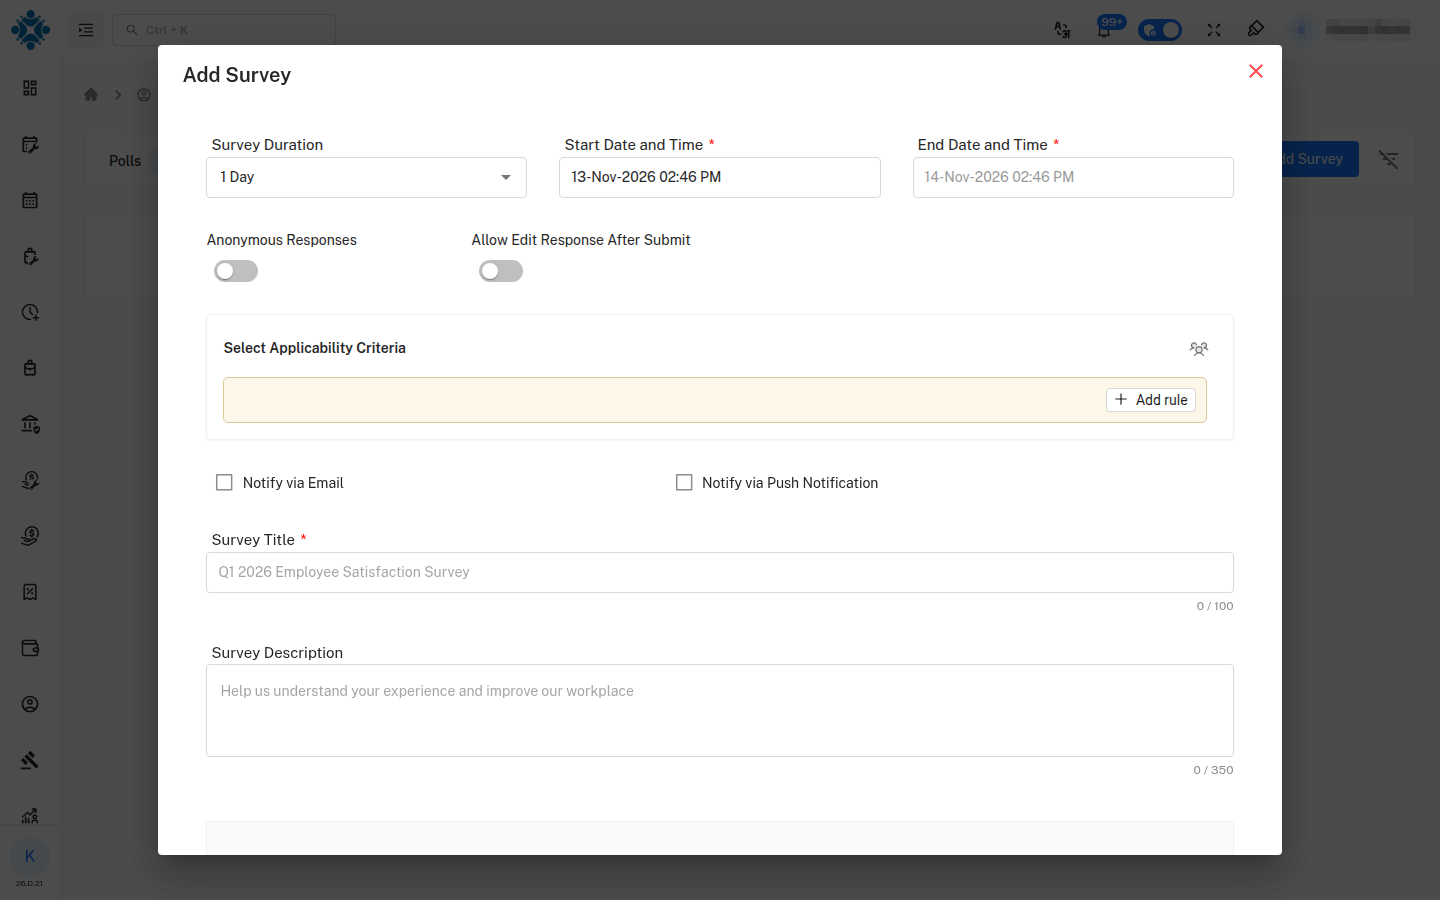
The top of the form works like a poll: Survey Duration, Start/End Date and Time, Applicability Criteria and Notifications. The settings differ slightly:
| Setting | Effect |
|---|---|
| Anonymous Responses | Hides respondent identity in the results |
| Allow Edit Response After Submit | Employees can change their answers after submitting |
| Field | Limit |
|---|---|
| Survey Title * | 100 characters |
| Survey Description | 350 characters |
| Question * | 250 characters each |
9.1 Add questions
Each question has a Question Type, the question text, and a Required switch. Click Add Question to add more. The bin icon removes a question.
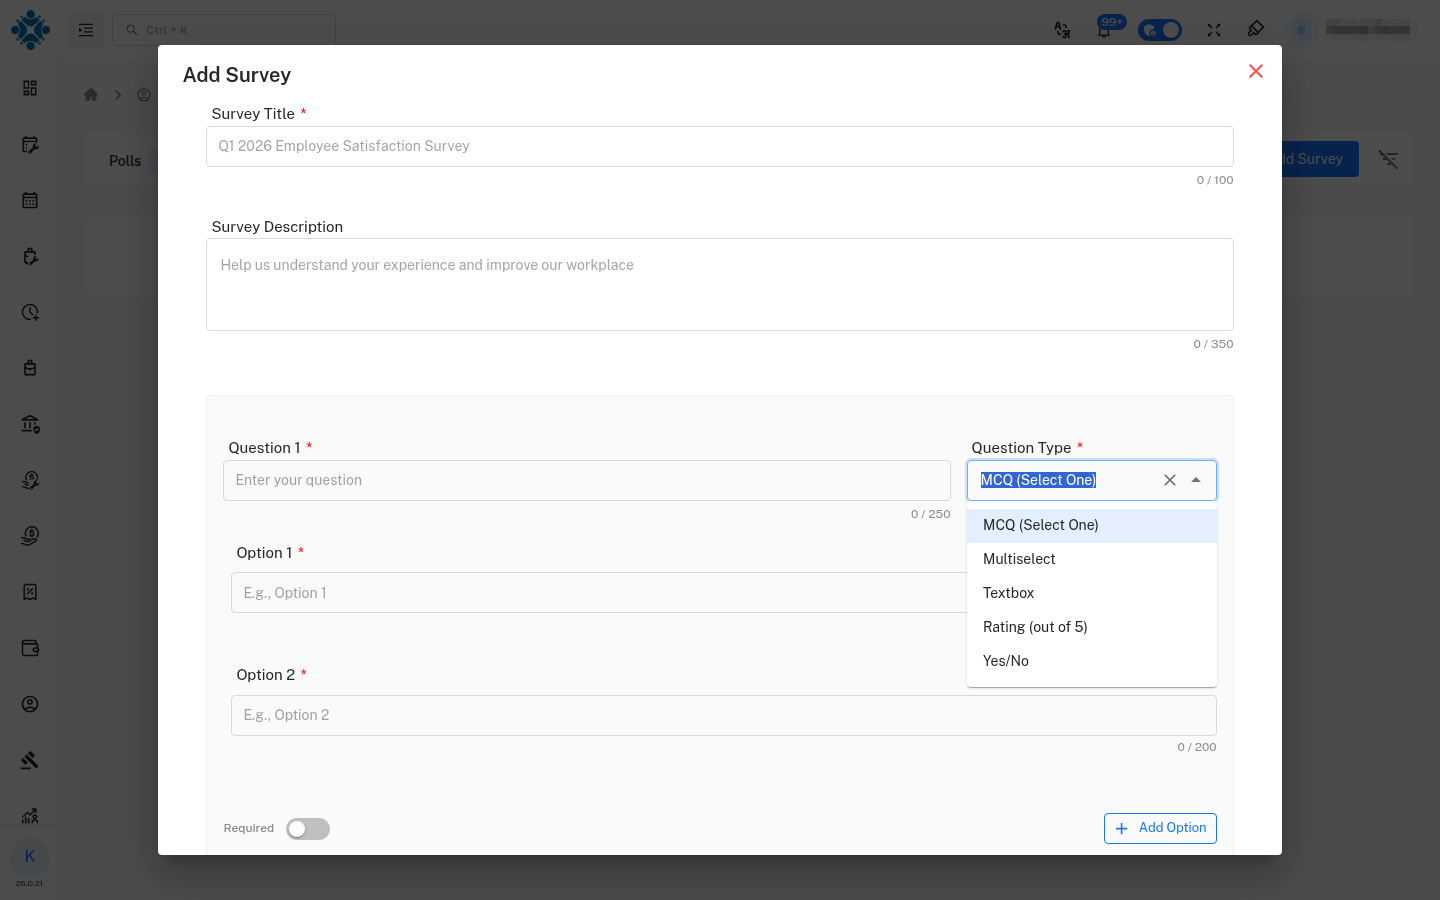
| Question Type | What employees see |
|---|---|
| MCQ (Select One) | A list of options. Pick one |
| Multiselect | A list of options. Pick one or more |
| Textbox | A multi-line text box (up to 500 characters) |
| Rating (out of 5) | Five stars. 1 is lowest, 5 is highest |
| Yes/No | Two choices |
MCQ and Multiselect questions need at least two options (200 characters each). Use Add Option to add more. Rating, Yes/No and Textbox questions need no options. The form shows a short note under each so you know what employees will see.
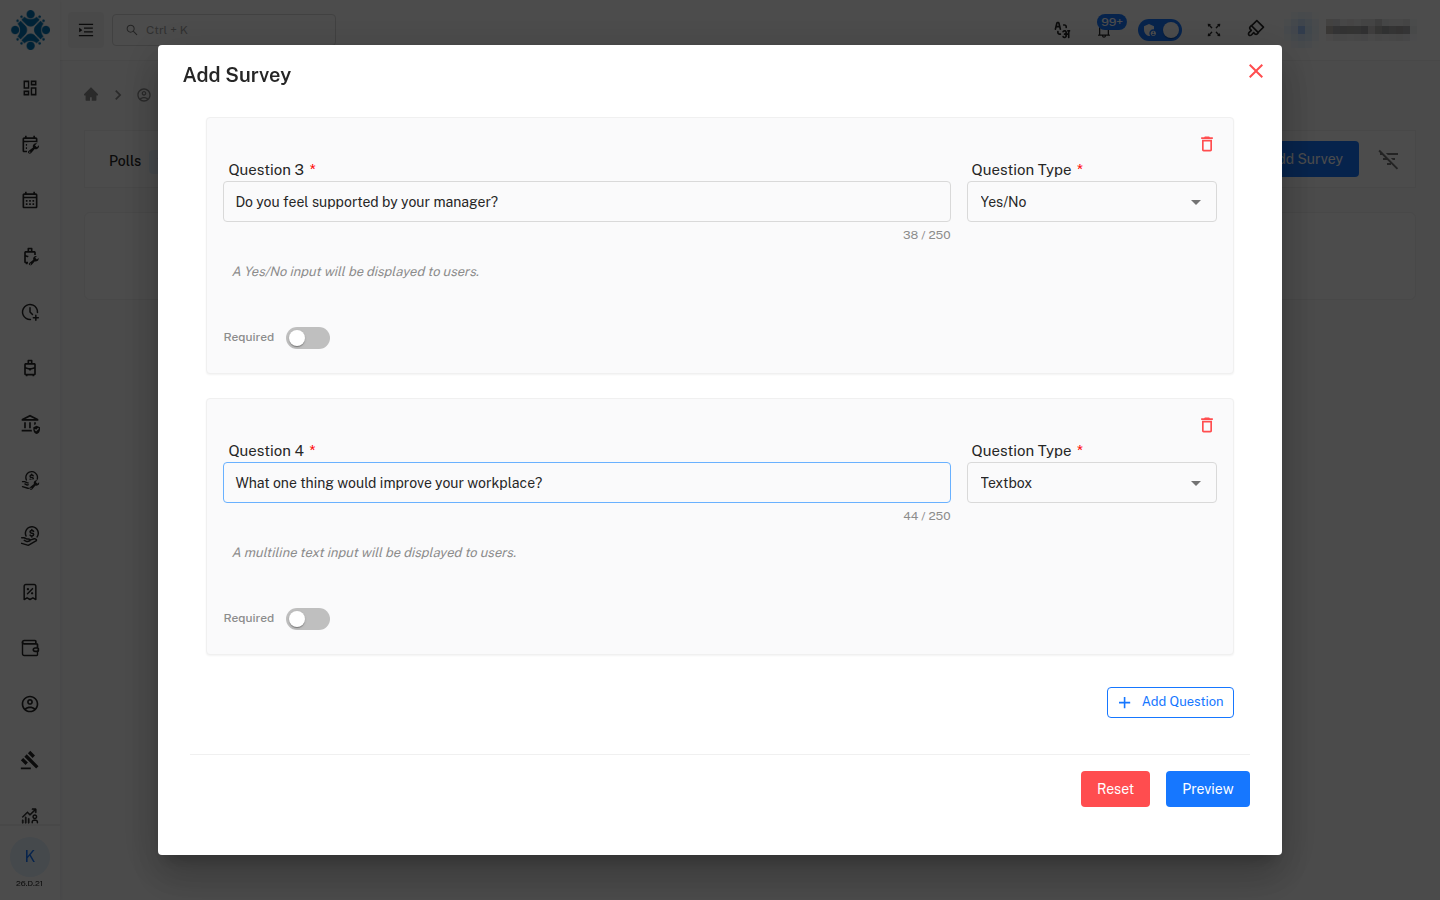
Turn on Required for any question that must be answered before the survey can be submitted. Required questions are marked with a red *.
9.2 Preview and post
Click Preview to see the full survey as employees will see it.
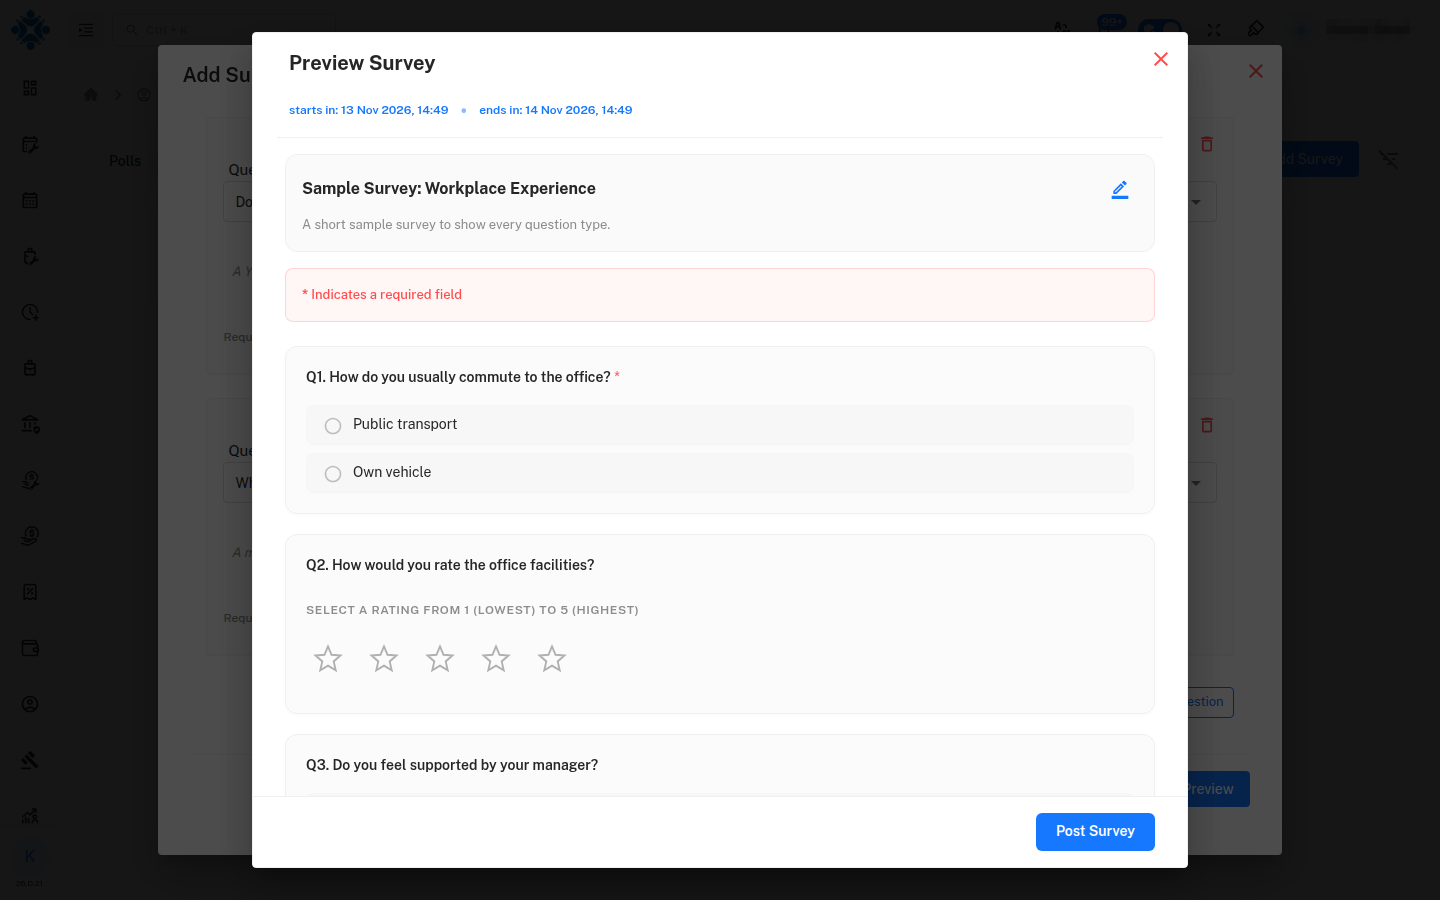
Click Post Survey, review the notification and survey settings in the confirmation window, and click Post Survey again. Survey created successfully appears and the survey shows as a card.
10. The Survey Card
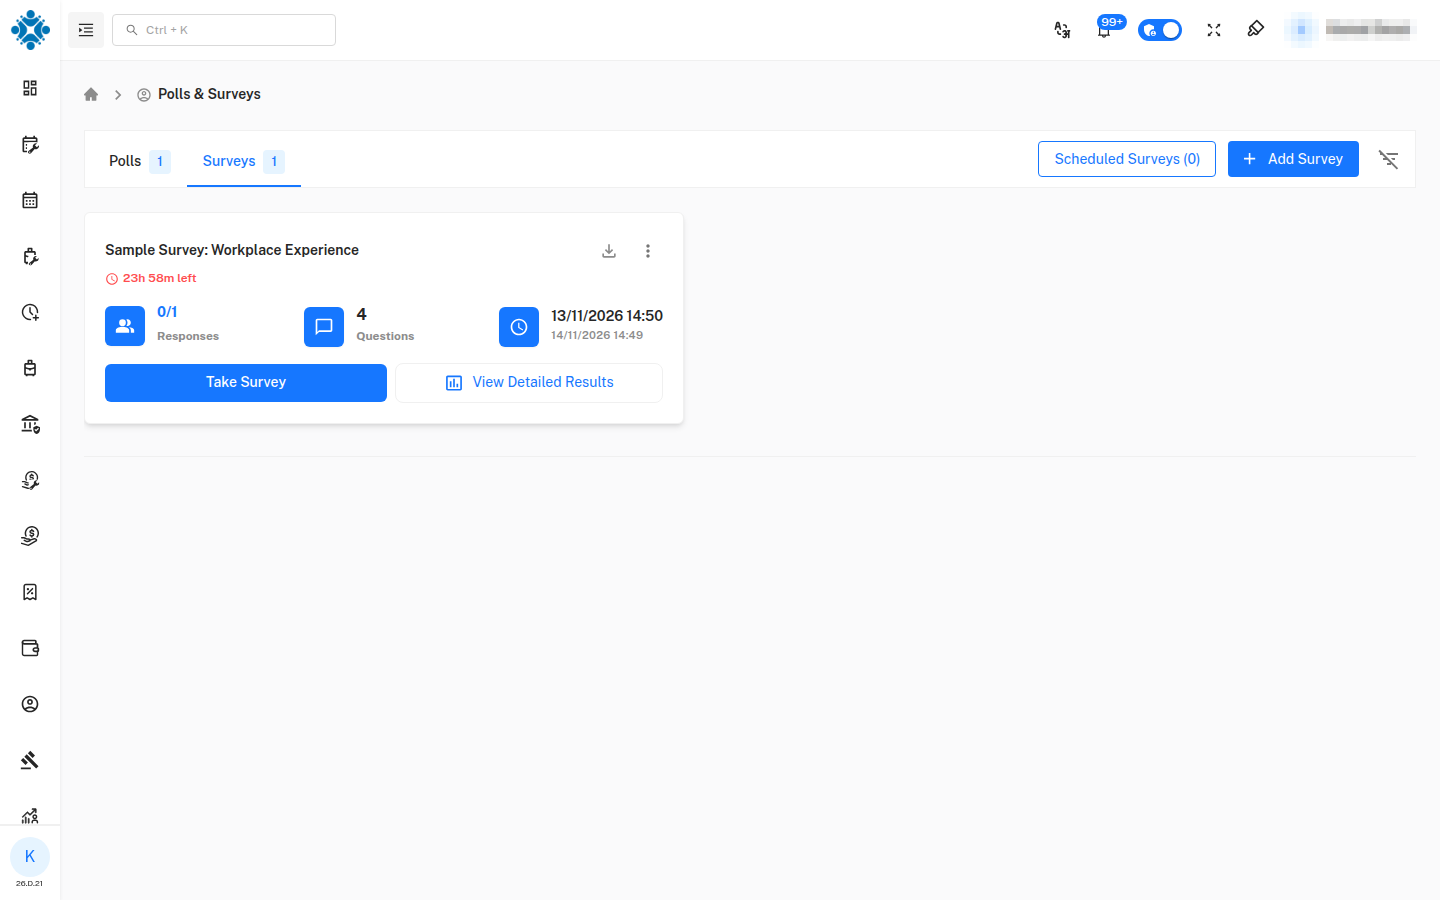
| Item | Meaning |
|---|---|
| Responses (for example 0/1) | Employees who responded out of those eligible. Click it to see who |
| Questions | Number of questions in the survey |
| Date block | Start and end date and time |
| Take Survey / View Response | Respond to the survey, or review your response |
| View Detailed Results | Opens the results window |
| Download icon | Downloads the Excel report |
| ⋮ menu | Copy, Extend or Deactivate, the same as for polls |
Eligibility, extending, deactivating, reactivating, scheduling and filtering work exactly as described for polls above.
11. Respond to a Survey (Employee)
- Click Take Survey.
- Answer the questions. The Progress bar at the top (for example 0 / 4) shows how many you have answered.
- Click Submit.
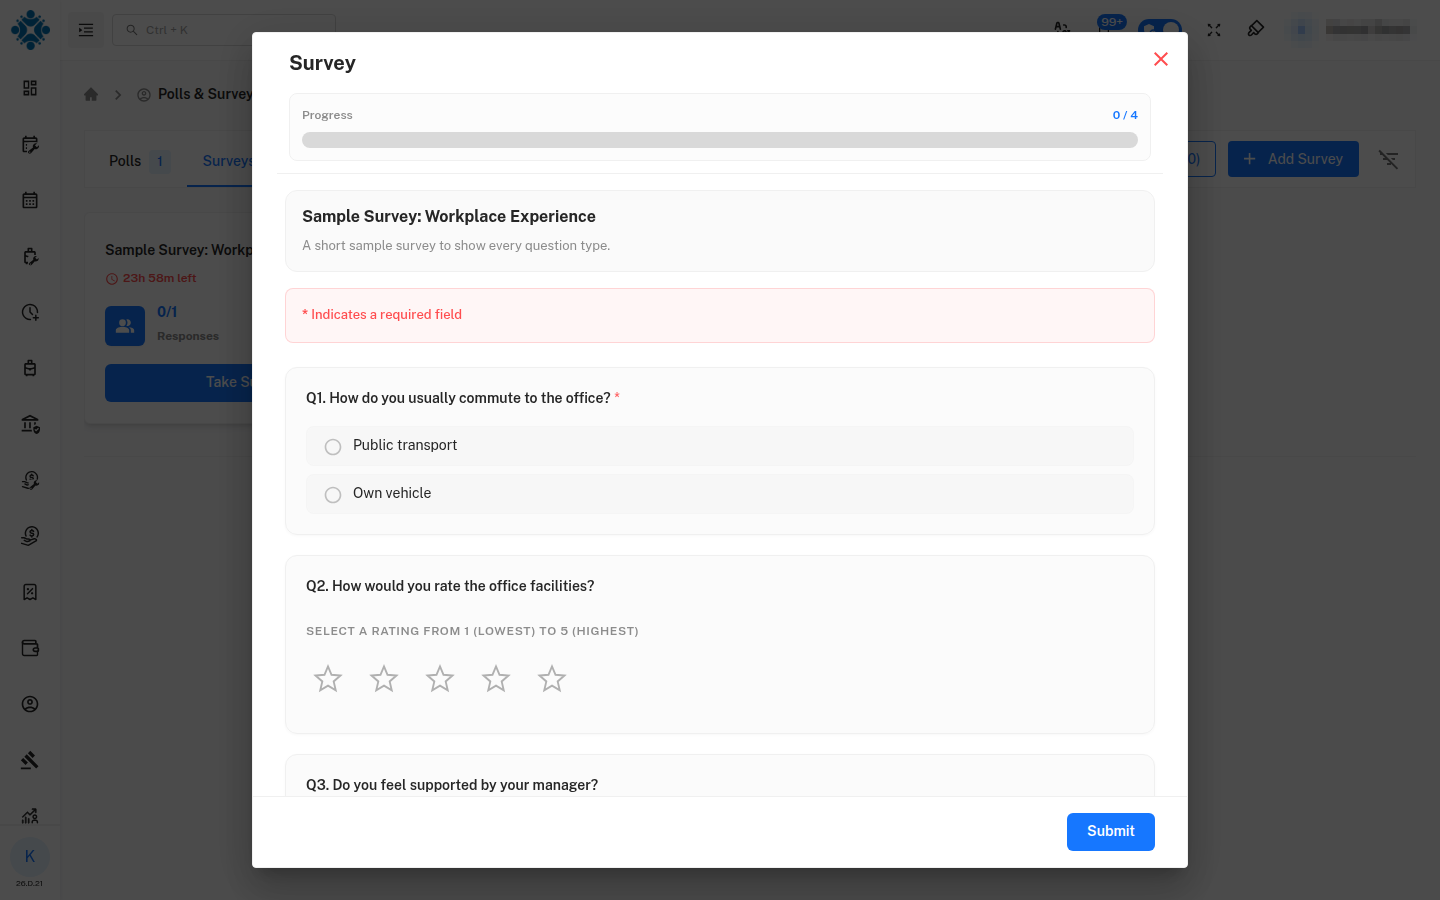
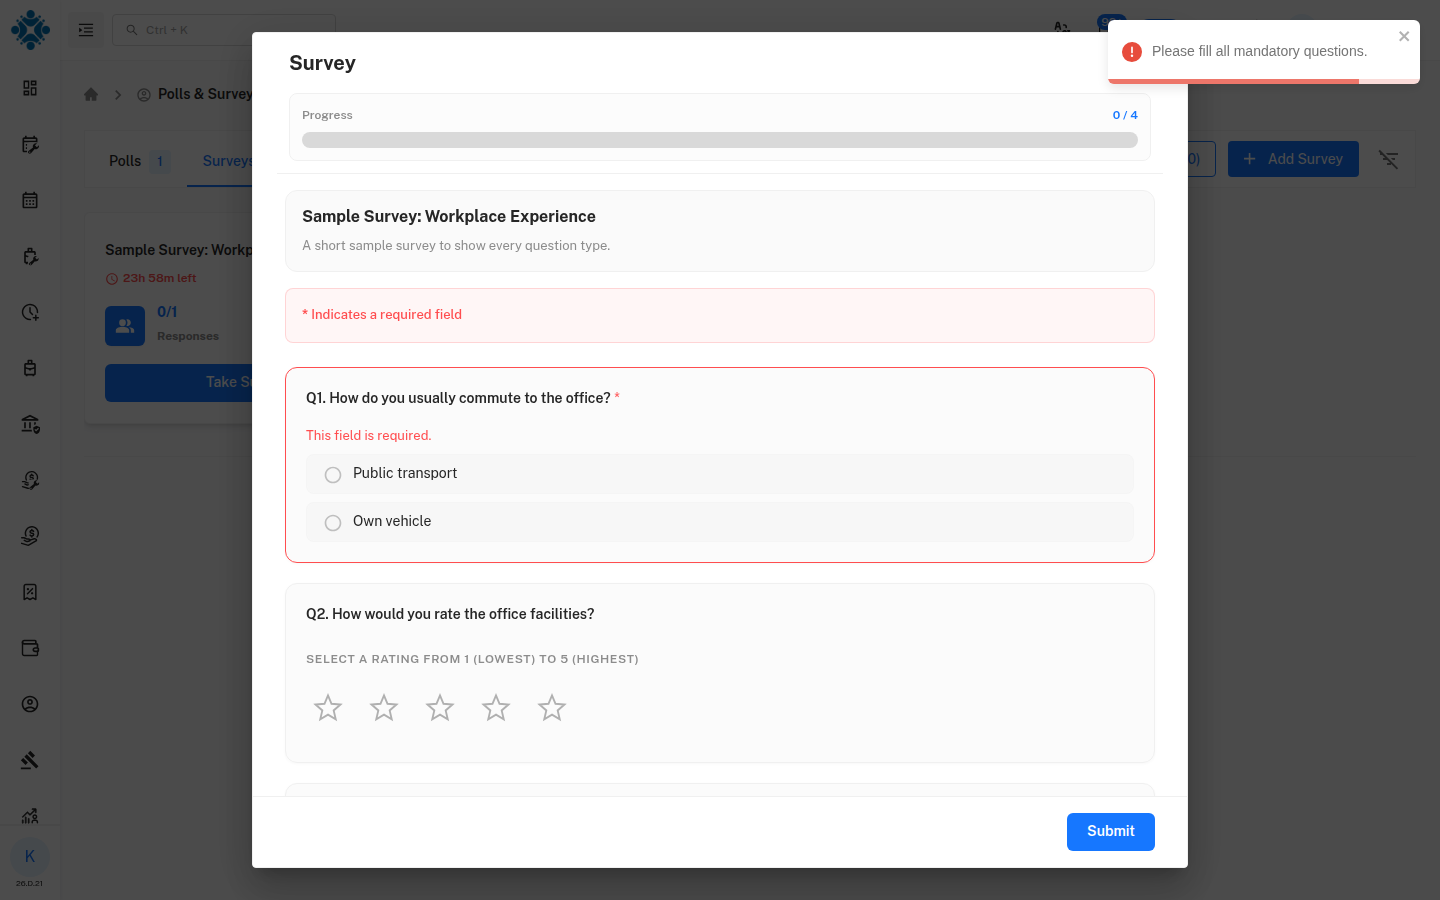
If a required question is blank, the survey is not submitted. The unanswered question is outlined in red with This field is required. and a message says Please fill all mandatory questions.
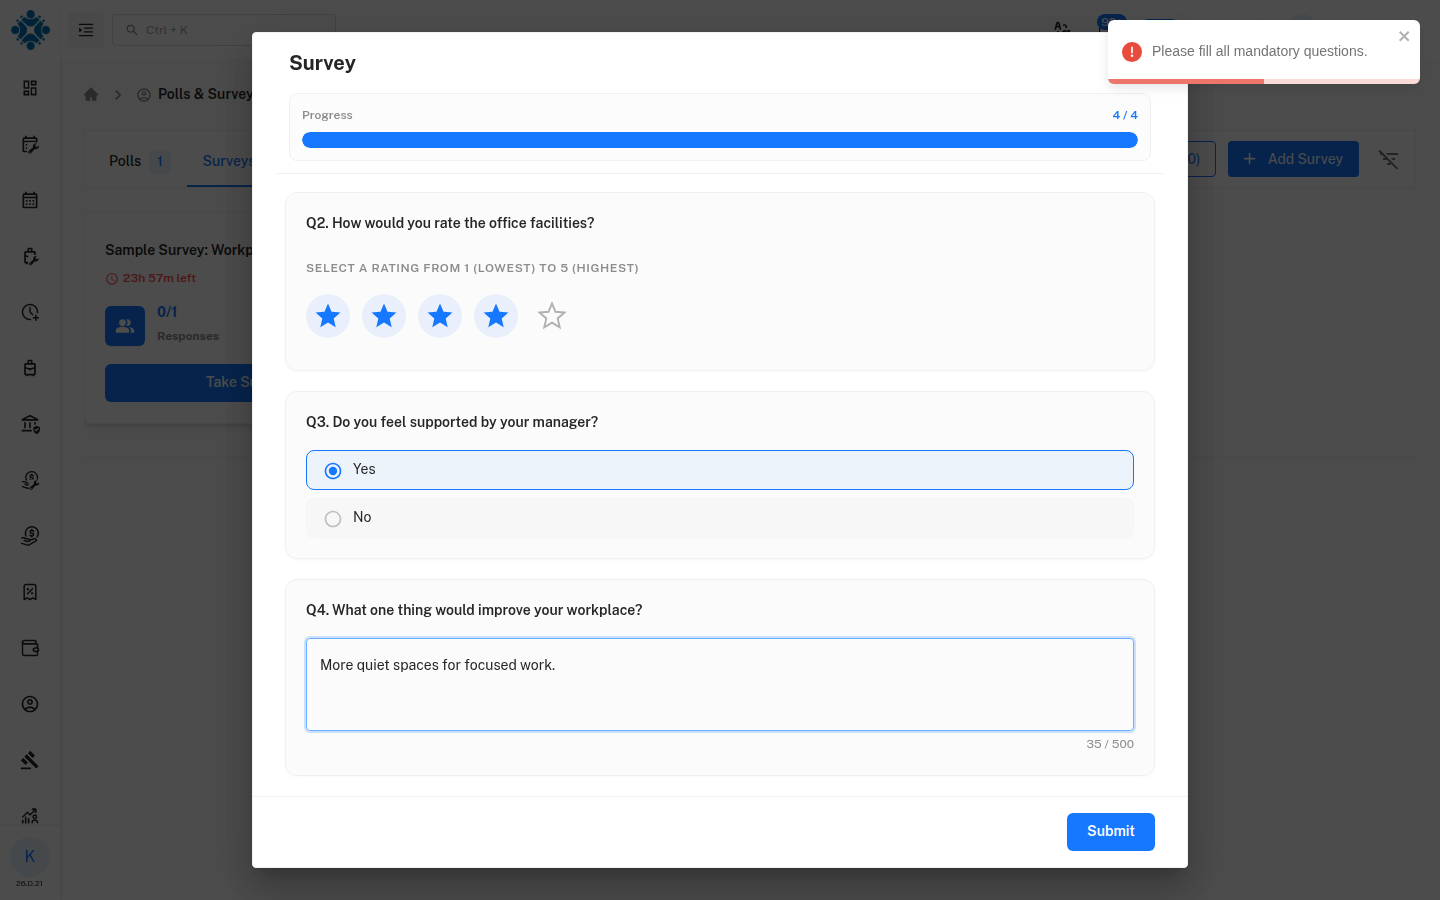
Once every question is answered, the progress bar is full and the survey can be submitted.
After submission, a Thank You! confirmation appears and the card shows Submitted with a View Response button.
12. Survey Results (Administrator)
Click View Detailed Results on a survey.
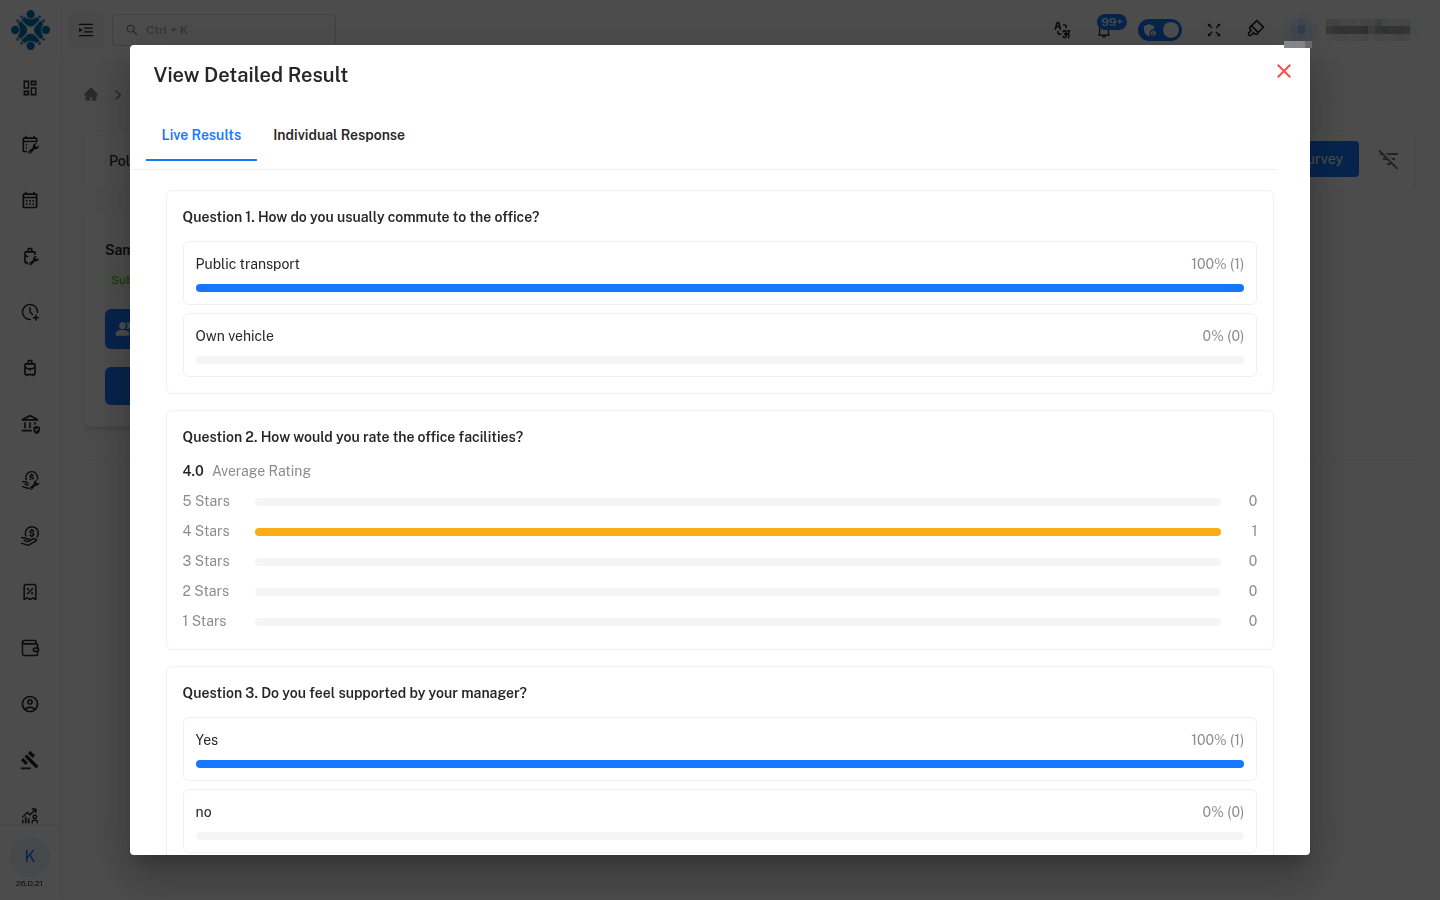
Live Results shows each question in turn:
| Question Type | Result shown |
|---|---|
| MCQ, Multiselect, Yes/No | Each option with its percentage and number of responses |
| Rating | The Average Rating and a count for each star level (5 to 1) |
| Textbox | The text answers received |
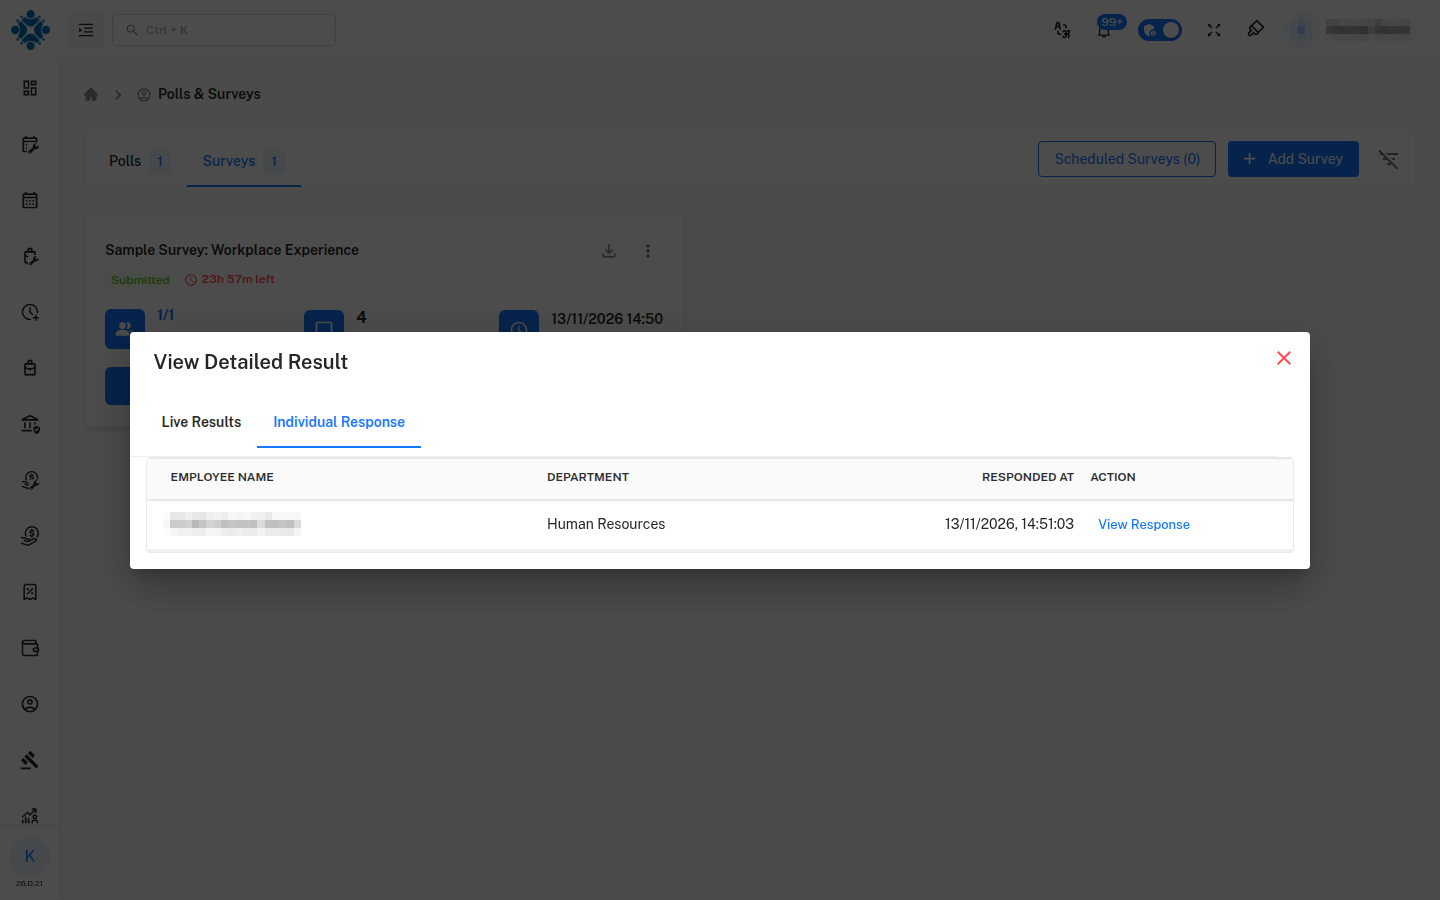
The Individual Response tab lists each respondent with their department and response time. Click View Response to read that person's answers. For anonymous surveys the respondent's identity is hidden.
13. Excel Report
Click the Download icon on a card (or in the Inactive & Closed table) to download a report for that poll or survey as an Excel (.xlsx) file.
The report contains:
- Report Metadata & Configuration – title, type, status, start and end time, total eligible employees, total responses, and the anonymity, edit, multiple-vote, live-result and notification settings
- Option Statistics & Vote Breakdown – votes and percentage for each option
- Individual Responses – serial number, employee ID and name, and the answer
Quick Reference
| I want to… | Do this |
|---|---|
| Ask a single quick question | Polls tab → Add Poll |
| Collect detailed feedback | Surveys tab → Add Survey |
| Send it to only some employees | Add an Applicability Criteria rule (Department, Designation, Branch…) |
| See who has not responded | Click the progress number on the card → Eligible tab (Pending) |
| Give people more time | ⋮ menu → Extend Poll / Extend Survey |
| Stop collecting responses | ⋮ menu → Deactivate |
| Bring an old one back | Inactive & Closed table → turn the Status toggle on |
| Reuse a previous one | ⋮ menu or the copy icon → Copy |
| Open it at a later time | Set a future Start Date and Time → Schedule Poll / Schedule Survey |
| Open a scheduled item early | Scheduled list → Post Now (send icon) |
| Remove a scheduled item that is not needed | Scheduled list → Delete (bin icon) |
| Get the data in Excel | Download icon on the card |