Inactive Employee Approval
Last Updated: September 28, 2025 Document Version: 1.0 Prepared for: Emgage HRMS Implementation Team
Employee Module – Inactive Employee Approval
Feature Overview
The Inactive Employee Approval feature is part of the Employee Module, accessible via the sidebar dropdown. It allows HR/Admin users to manage employees who have requested separation by reviewing details, approving/rejecting requests, tracking their status, and reactivating inactive employees if required.
Navigation Workflow
There are two ways to reach the Inactive Employee Approval page:
1. Sidebar Navigation
- Navigate to the Sidebar.
- Expand the Employee Module dropdown.
- Scroll down and select Inactive Employee Approval.
- The Inactive Employee Approval Page opens, displaying a table with employee records.
2. Quick Search Navigation
- Press
Ctrl + Kon any page. - A Search Bar will open.
- Type Inactive Employee Approval.
- Select it from the results to directly open the approval page.
How Employees Appear in the Inactive Employee Approval Table
Employees can appear in this table through two different workflows:
A. Separation Import
- Navigate to: Separation → Import Separation.
- Set Import Type = Import Inactive Employee.
- Download the Sample Excel Sheet.
- Modify/update the sheet with employee details.
- Upload the updated sheet.
- Click Next Step → Done → Done.
- Employees from the sheet will now appear in the Inactive Employee Approval List.
B. Via Employee Profile
- Navigate to: Employee → Employee Profile.
- Search and select the specific employee.
- Click Edit.
- Update:
- Employee Status = Inactive
- Relieving Date
- Reason (Separation reason)
- Click Submit.
- Go to Employee → Inactive Employee.
- The employee's name will now appear in the table.
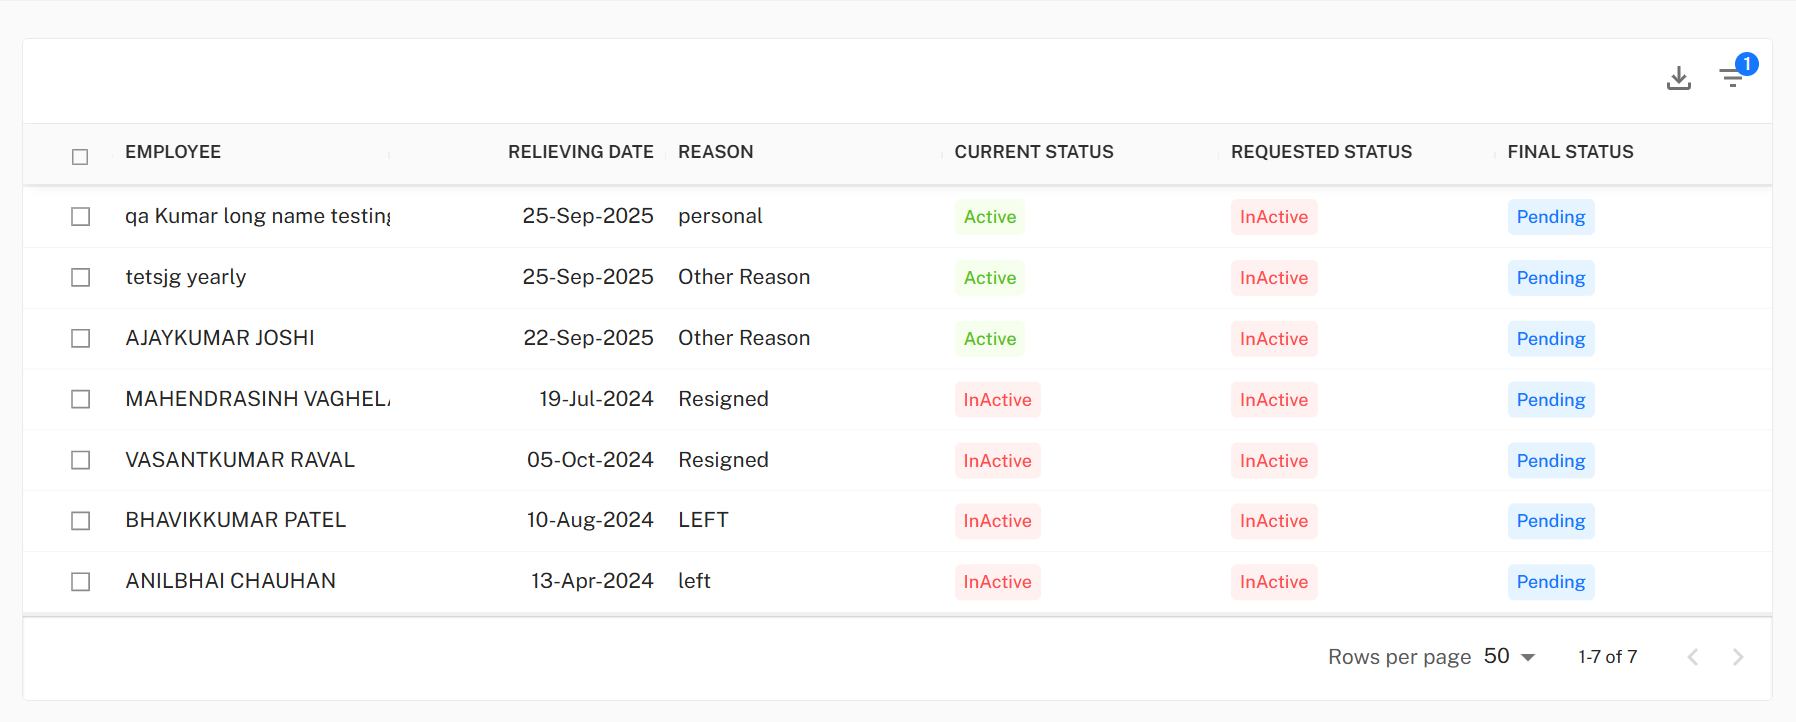
Table Fields
- Employee → Employee name who requested separation (with checkbox).
- Relieving Date → Separation / relieving date (date field).
- Reason → Separation reason: End of Contract, Resignation, Retirement, Termination.
- Current Status → Current state of the employee (Active / Inactive).
- Requested Status → Status requested in the separation request (Active / Inactive).
- Final Status → Approval stage of the request (Approved, Pending, Rejected).
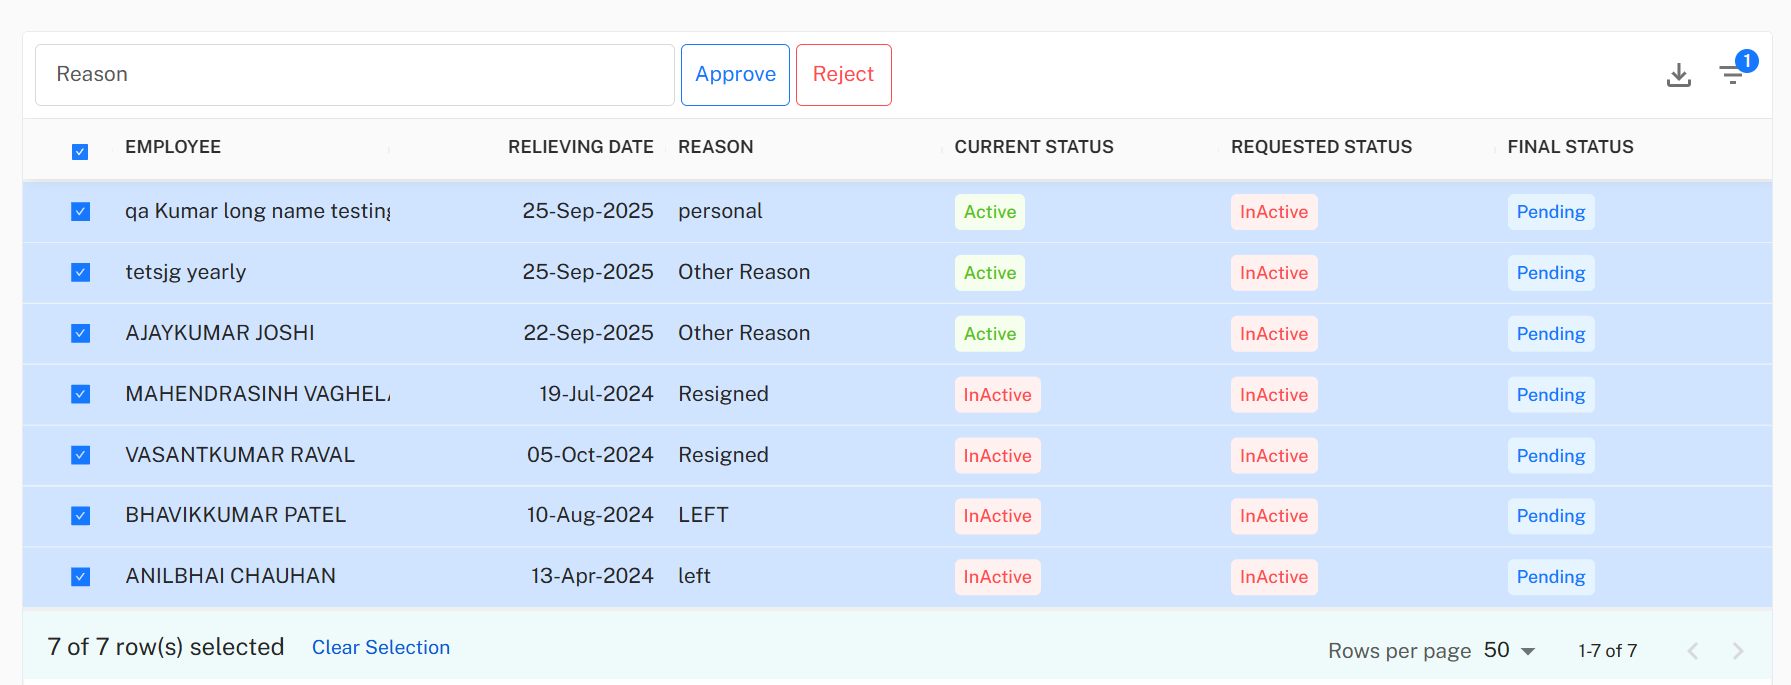
Checkbox Behavior
- Each row has a checkbox next to the employee's name.
- Selecting a checkbox reveals three additional fields/actions:
- Reason Box – Must be filled when rejecting a request (cannot be left empty).
- Approve Button – Approves the employee's request if there are no pending actions.
- Reject Button – Rejects the request (requires filling the Reason Box).
Bulk Selection
- A master checkbox at the top (header row) selects/deselects all employees at once.
- Users can also manually select individual employees.
Approval Process
When approving an employee's request, two scenarios exist:
- No Pending Actions → Request is successfully approved.
- With Pending Actions → A Pending Actions Popup appears:
- If only Warnings exist → A Process button appears to proceed with approval.
- If any Errors exist → Approval is blocked (hard stop) until issues are resolved.
Rejection Process
- User must select the employee(s).
- Reason Box must be filled (mandatory).
- On clicking Reject, the request is rejected with the given reason.
Reactivation Process
An inactive employee who has been approved can also be reactivated.
Steps:
- Go to: Employee → Inactive Employee Approval.
- Click on Filter.
- Set Final Status = Approved.
- Click Search.
- For employees where:
- Current Status = Inactive
- Requested Status = Inactive
- Final Status = Approved a Reactivate Button will appear on the far right.
Reactivation Action:
- Click the Reactivate Button for the desired employee.
- A confirmation popup appears asking for confirmation.
- Options in the popup:
- Cancel – Closes the popup without changes.
- Okay – Reactivates the employee.
Additional Options
Export Data
- Located on the top-right corner of the table.
- Options include:
- Export CSV
- Export PDF
- Export Excel

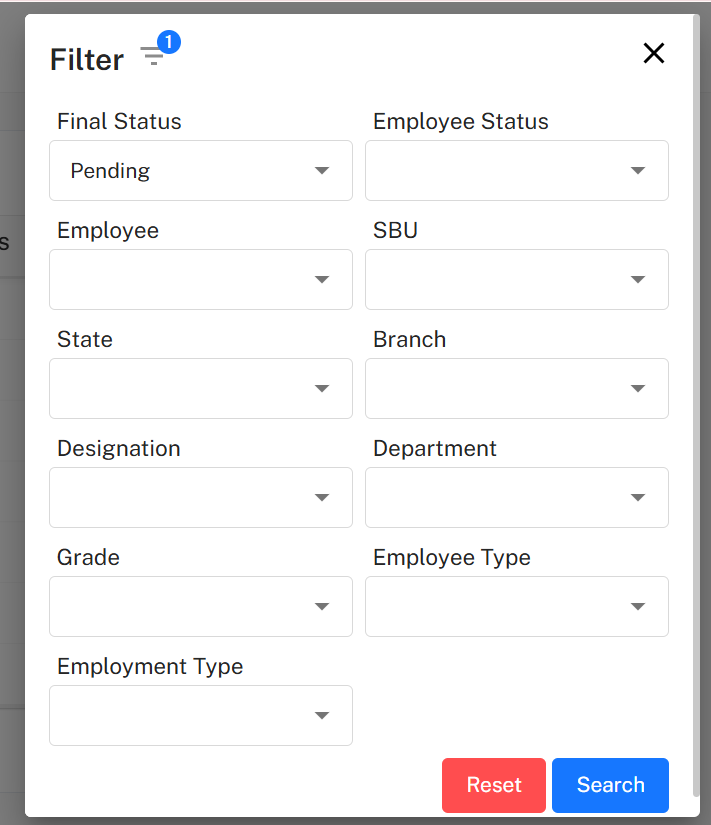
Filter Employee Data
-
Next to Export Data dropdown.
-
Clicking Filter Button opens a popup with the following fields:
-
Final Status
-
Employee Status
-
Employee
-
SBU
-
State
-
Branch
-
Designation
-
Department
-
Grade
-
Employee Type
-
Employment Type
-
Actions inside Filter Popup:
-
Search → Applies filter criteria.
-
Reset → Clears applied filters.