Live Tracking & Expense Integration
Key Benefits
- Real-time GPS Tracking
- Auto Expense Calculation
- Vehicle-wise Rate Configuration
- Route Playback
- Seamless Attendance Integration
1. Overview
The Live Tracking feature enables real-time monitoring of employee travel and automatically generates expense claims based on distance covered.
It tightly integrates the Attendance module (Punch In / Punch Out) with the Expense Management module.
Important: A Fuel Expense policy must be configured in Expense Policy before setting up Tracking with Auto Expense. This policy name is used to automatically create expense entries at punch-out.
PHASE 1 — Admin Configuration
2. Admin Configuration
Before tracking can begin, an administrator must set up the Expense Type and the Tracking Policy.
Both configurations are prerequisites for the live tracking flow to function correctly.
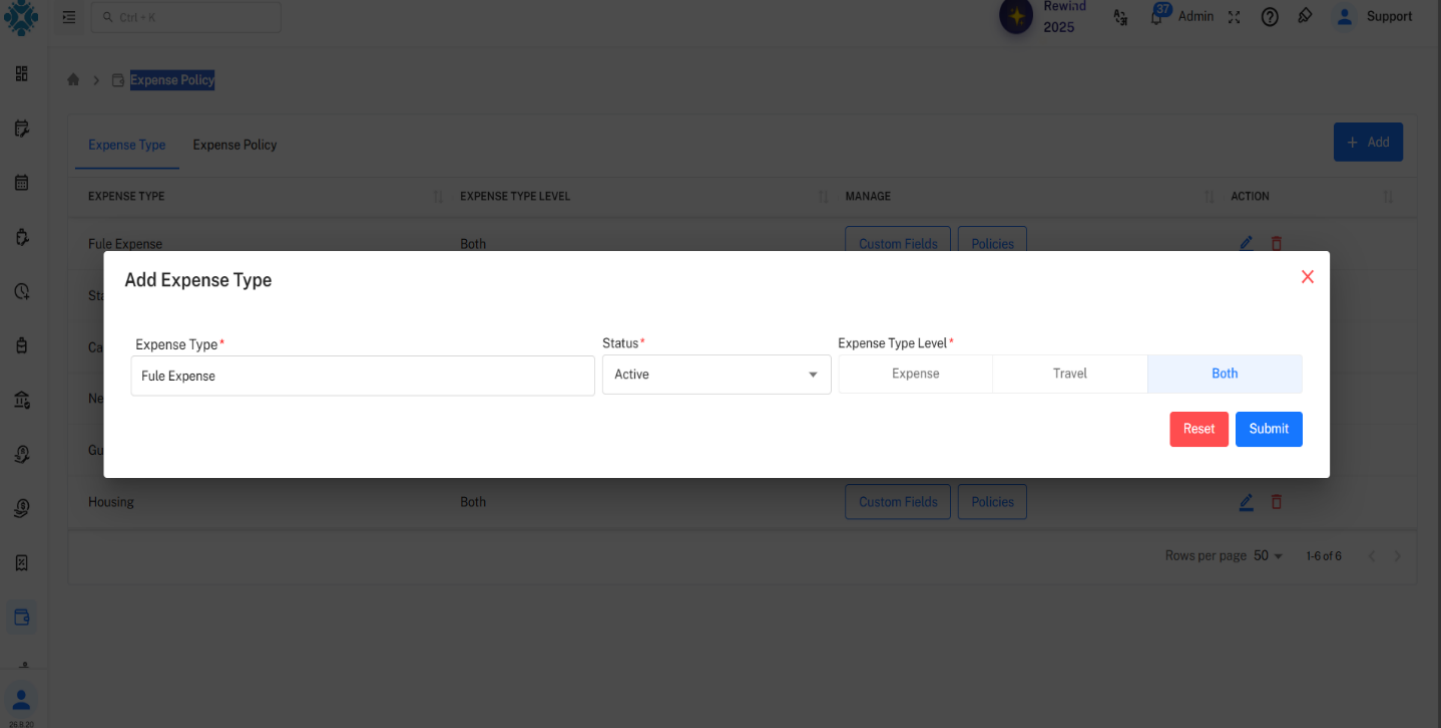
2.1 Create Expense Type (Fuel Expense)
Navigate to:
Expense Policy → Expense Type tab
Click + Add to create the tracking expense type.
| Field / Setting | Value / Description |
|---|---|
| Expense Type | Fuel Expense (or any travel-related expense name) |
| Status | Active |
| Expense Type Level | Both (covers Expense and Travel categories) |
2.2 Configure Expense Tracking Policy
Navigate to:
Attendance Setup → Expense Tracking Configuration
This is where you define who is tracked and how expenses are calculated.
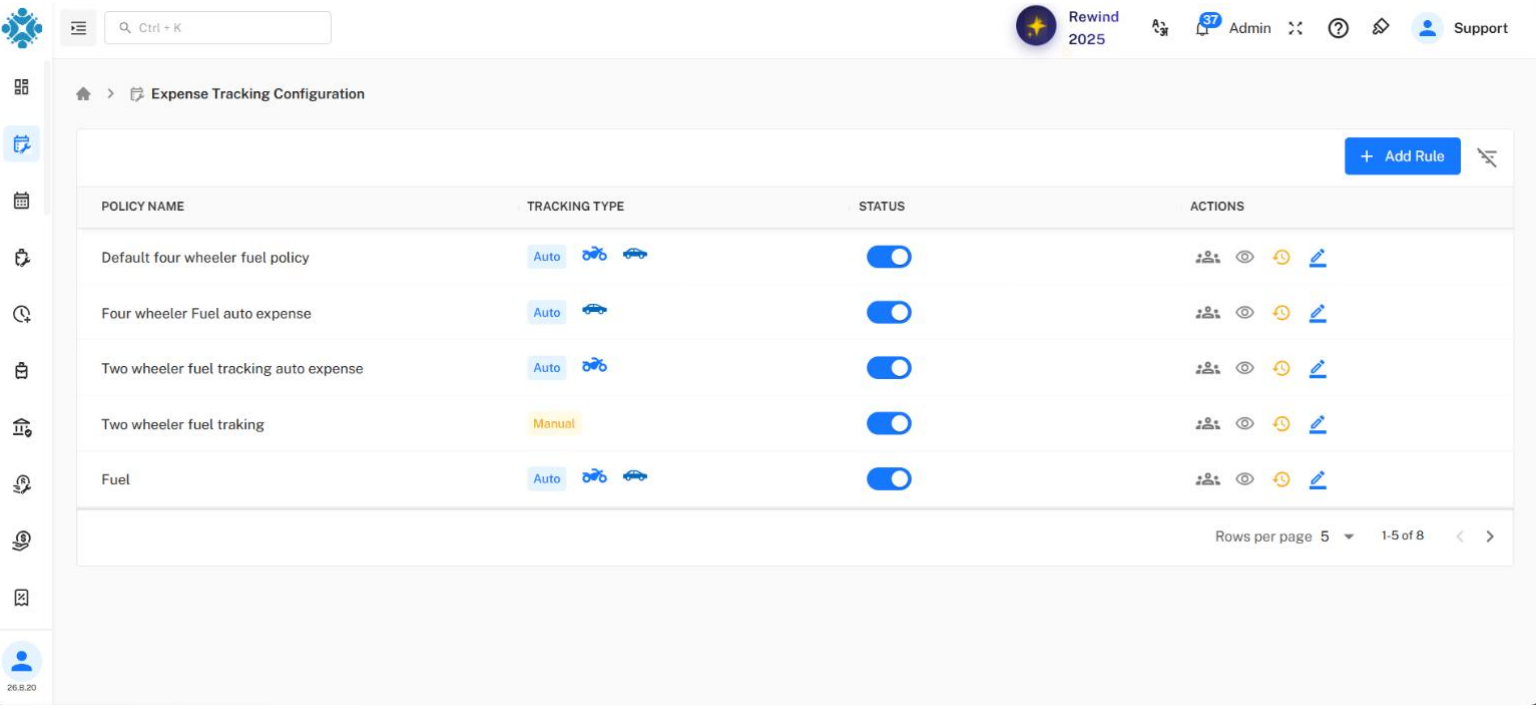
Click + Add Rule to open the tracking rule form.
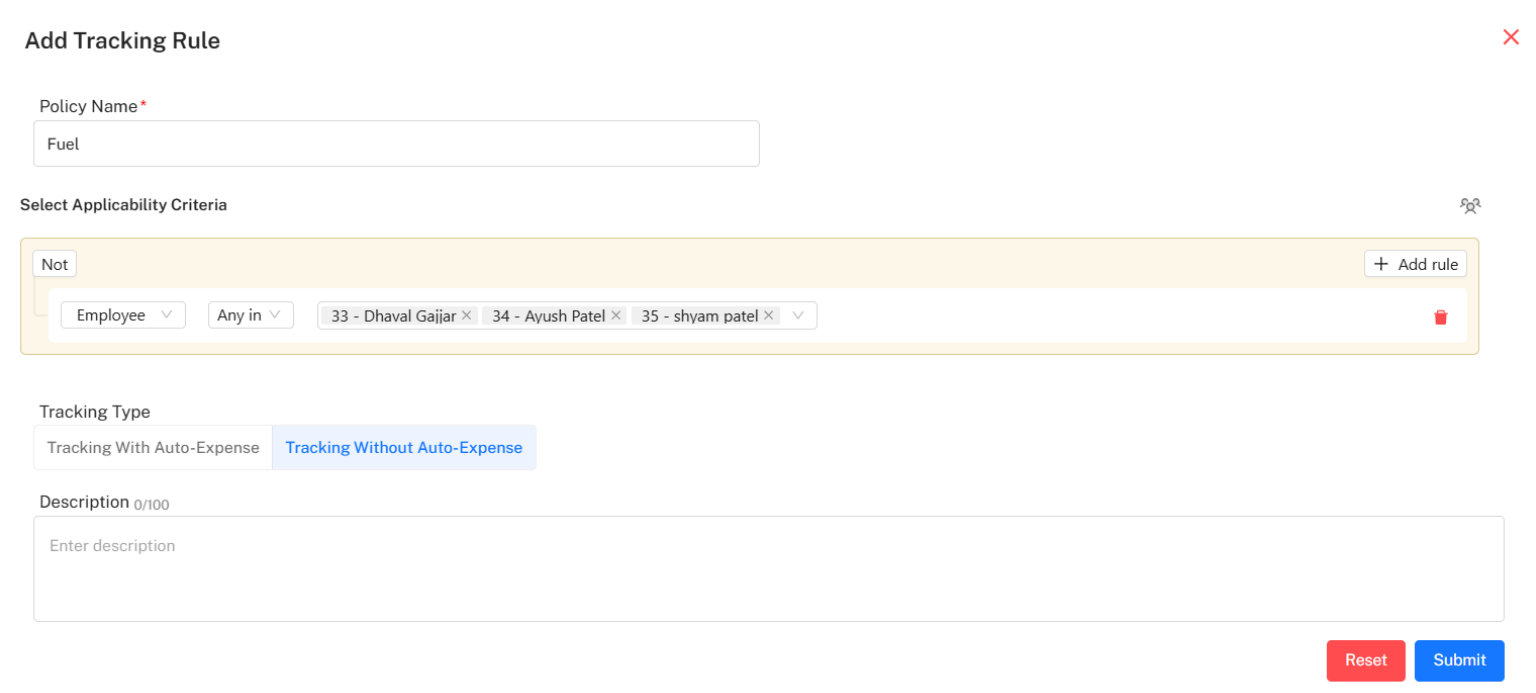
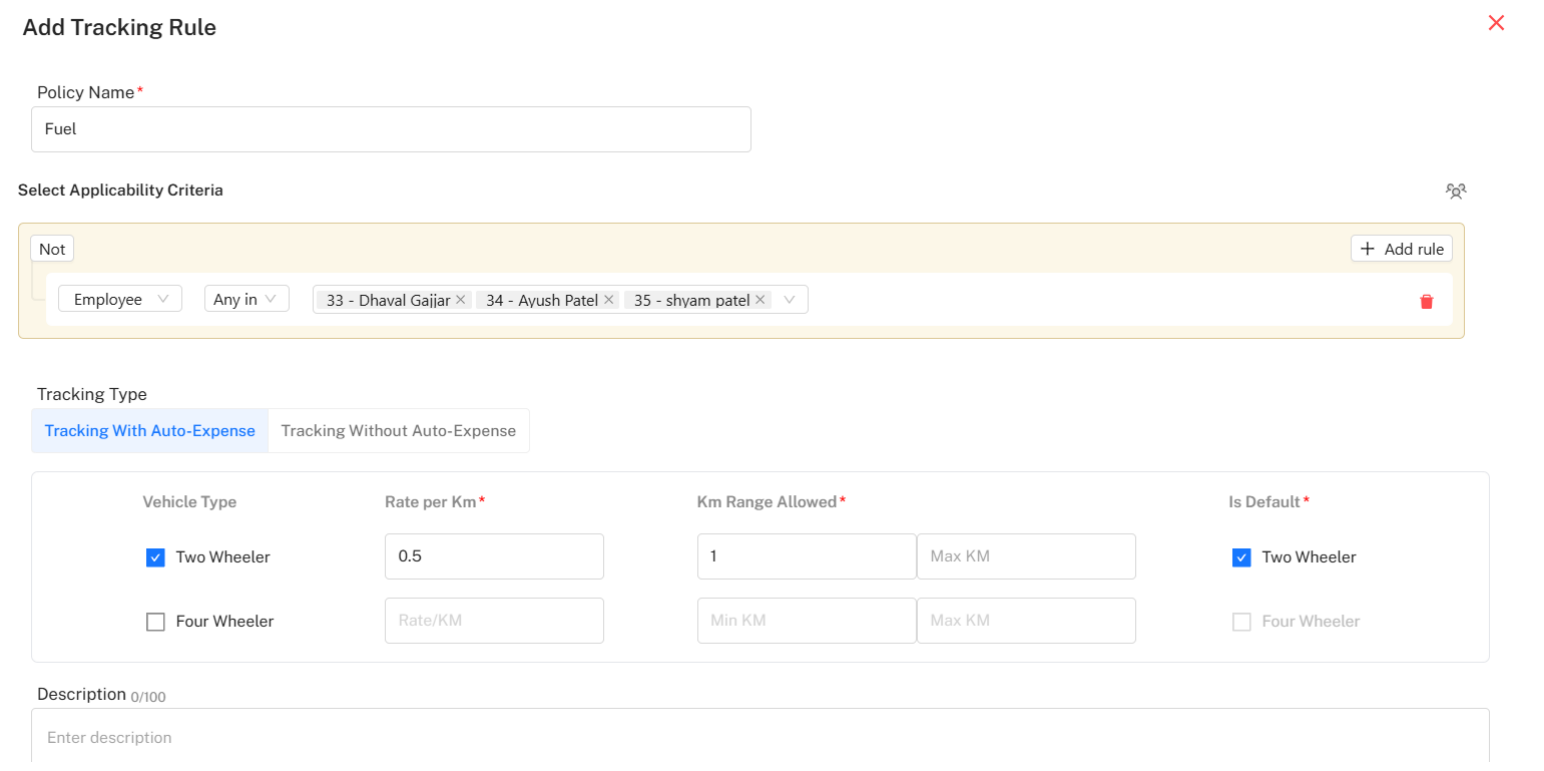
Choose one of the two tracking modes:
| Tracking Type | Description | Expense Created? |
|---|---|---|
| Tracking With Auto-Expense | System automatically calculates and creates an expense entry at punch-out based on Total KM × Rate per KM. | Yes – Automatically |
| Tracking Without Auto-Expense | GPS tracking is active for monitoring purposes only. No expense entry is created automatically. | No – Manual only |
Tracking Without Auto-Expense:
Tracking With Auto-Expense:
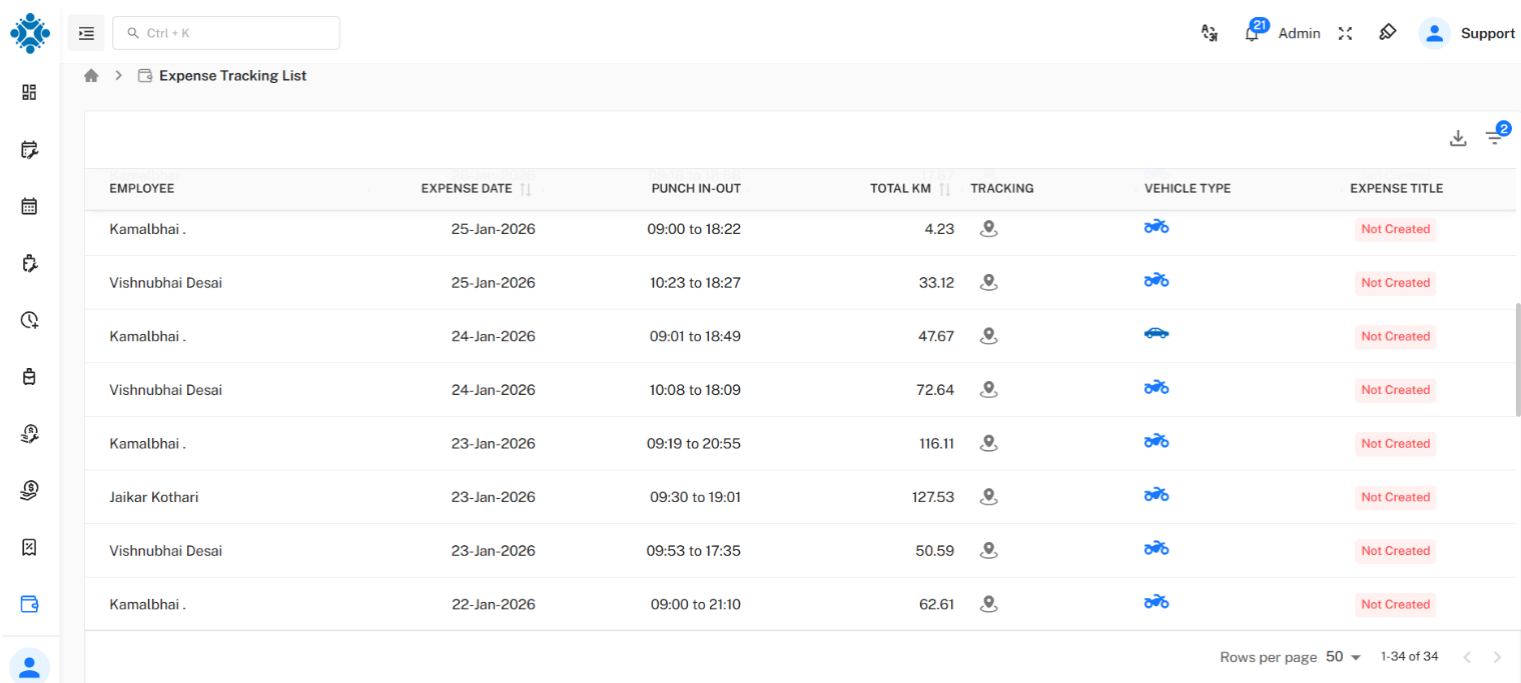
When Fuel Expense policy is not made in Expense Policy > Expense Tracking List will show Expense title as Not Created.
Vehicle Rate Configuration (for Tracking with Auto-Expense)
| Field / Setting | Description |
|---|---|
| Vehicle Type | Two-Wheeler / Four-Wheeler (select applicable) |
| Rate per KM | Reimbursement rate (e.g., ₹6 per KM for Two-Wheeler) |
| KM Range Allowed | Set minimum and maximum KM allowed per session |
| Is Default | Mark the default vehicle for this policy |
Applicability Criteria
- Use the + Add Rule button inside Selects Applicability Criteria to define which employees, departments, or designations this policy applies to.
- Multiple criteria can be stacked to fine-tune the policy applicability.
PHASE 2 — Employee Punch-In
3. Employee Punch-In (Mobile App)
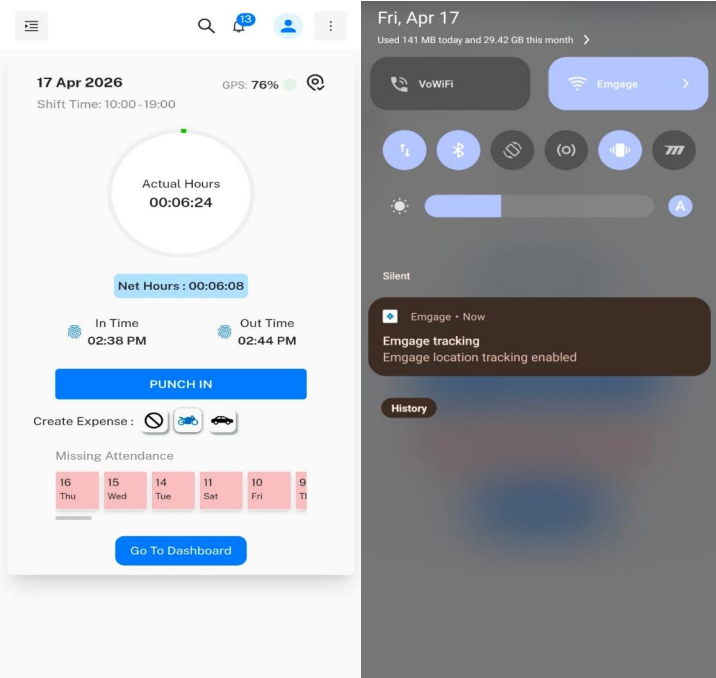
When an employee starts their work session or a field travel task, they use the Emgage mobile app to punch in.
Vehicle selection is a mandatory step when tracking is enabled.
3.1 Vehicle Selection & Punch-In
On the attendance screen, the employee will see a Create Expense section with vehicle icons displayed below the PUNCH IN button:
- 🚫 No expense – for tracking without auto-expense
- 🏍 Two-Wheeler – activates motorcycle/scooter rate
- 🚗 Four-Wheeler – activates car/SUV rate
The employee selects the appropriate vehicle type and then taps PUNCH IN.
GPS tracking begins immediately in the background.
Note: Vehicle selection is mandatory when tracking is enabled. The selected vehicle determines the rate used for auto-expense calculation at punch-out.
PHASE 3 — Admin Live Monitoring
4. Admin Live Monitoring
Admins and managers can monitor all field employees in real-time from the Attendance module.
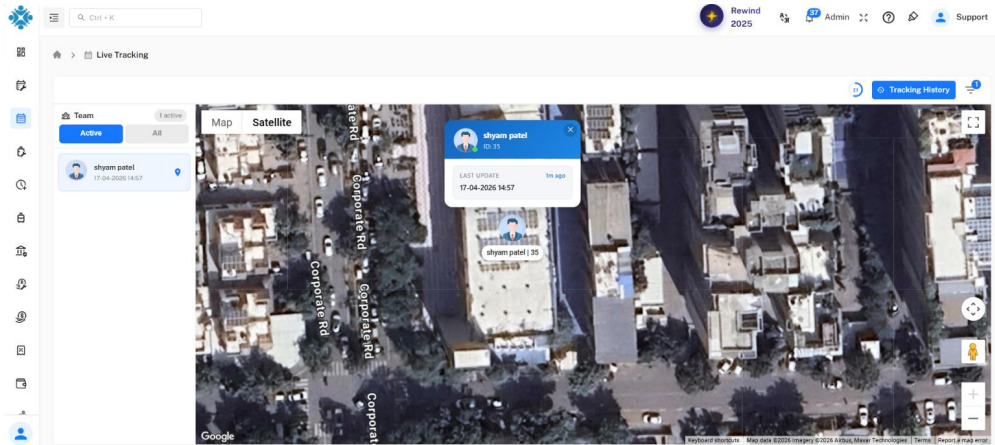
The Live Tracking page provides a comprehensive map-based view of all active and historical sessions.
4.1 Live Tracking Page
Navigate to:
Attendance → Live Tracking
| Tab | Description |
|---|---|
| Active | Shows all currently punched-in employees on a live map with their last known position. |
| All | Shows all employees who have punched in and have not made any movement for 15 minutes in the current punch-in state. |
Clicking on an employee marker on the map opens a popup displaying their Employee ID and the last update timestamp.
4.2 Tracking History (Per Employee)
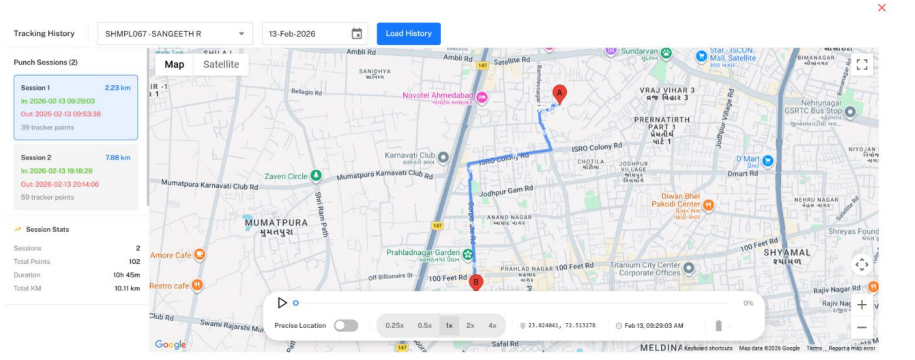
From the Live Tracking page, click Tracking History to review all historical sessions for a specific employee on a selected date.
This view shows individual sessions with timestamps and distance details, as well as cumulative totals for the day.
Note: The Live Tracking page requires Expense Tracking Configuration to be set up. Ensure the tracking policy is assigned to the relevant employees before monitoring.
4.3 Street View
Click the Street View icon on any employee location to open a Google Street View of their exact surroundings.
This helps verify the physical presence of a field employee at a specific location.
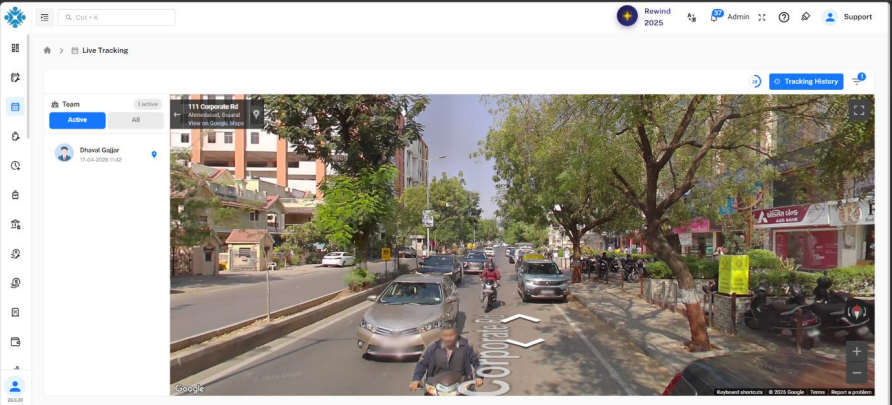
Note: Street View shows the last known GPS coordinate. It is useful for verification but may differ slightly from the actual current position due to GPS polling intervals.
PHASE 4 — Expense List & Route Review
5. Expense Tracking List & Route Review
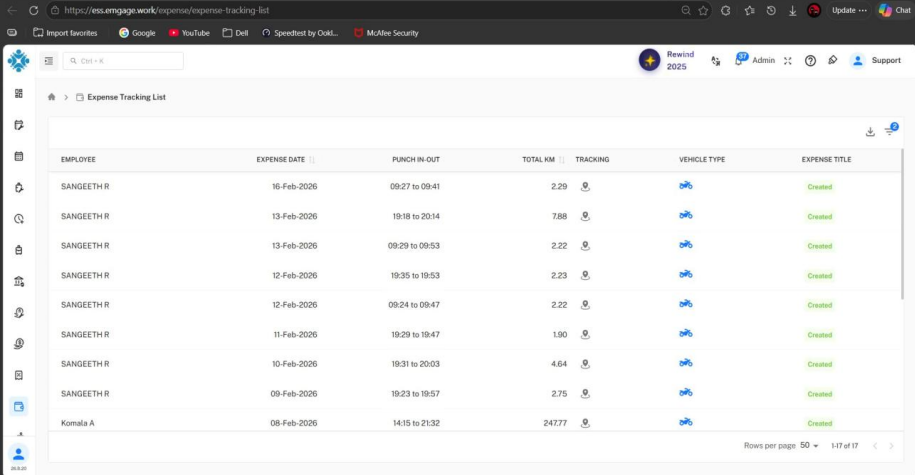
5.1 Expense Tracking List
Navigate to:
Expense → Expense Tracking List
View all tracking sessions with employee-wise travel summaries.
The list displays:
- Employee name
- Expense Date
- Punch In/Out times
- Total KM travelled during the session
- Vehicle type used
- Expense creation status
Click the Tracking icon (map pin icon) against any record to open the Expense Track Routes window for detailed route review.
Important: When Expense Tracking Policy is configured with Auto Expense, all punch-in/punch-out sessions throughout the day (including sessions that cross midnight) will generate expense entries in the Expense Tracking List.
5.2 Expense Track Routes Window
The route viewer provides a complete playback of the employee's travel path on Google Maps, with detailed session statistics and interactive controls.
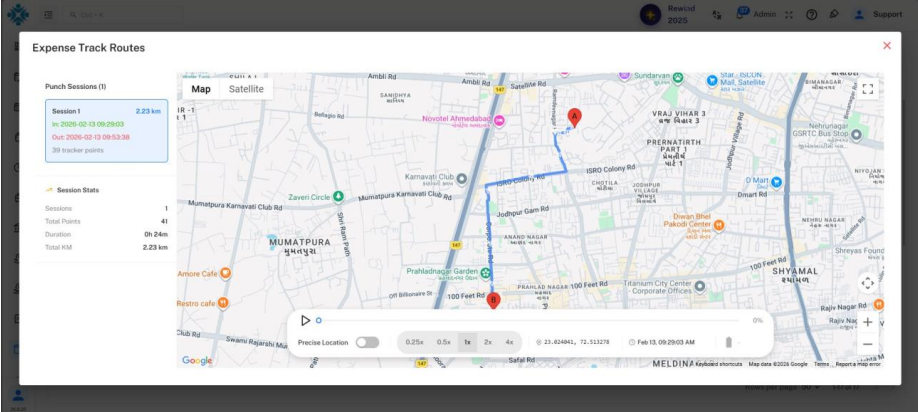
Session Panel (Left Side)
| Field | Description |
|---|---|
| Punch Sessions | List of individual sessions within the day |
| In / Out Time | Exact punch-in and punch-out timestamps |
| KM per Session | Total distance covered during that specific session |
| Session Stats | Session count, total points, duration, total KM |
Map & Playback Controls
| Control | Description |
|---|---|
| Point A | Punch-In location |
| Point B | Punch-Out location |
| Blue Line | Actual GPS-recorded travel path |
| Play Button | Starts animated route playback |
| Speed Control | 0.25x / 0.5x / 1x / 2x / 4x |
| Precise Location | Toggle for high-accuracy coordinate display |
| Timestamp | Shows exact time for each playback frame |
PHASE 5 — Expense Settlement
6. Expense Settlement
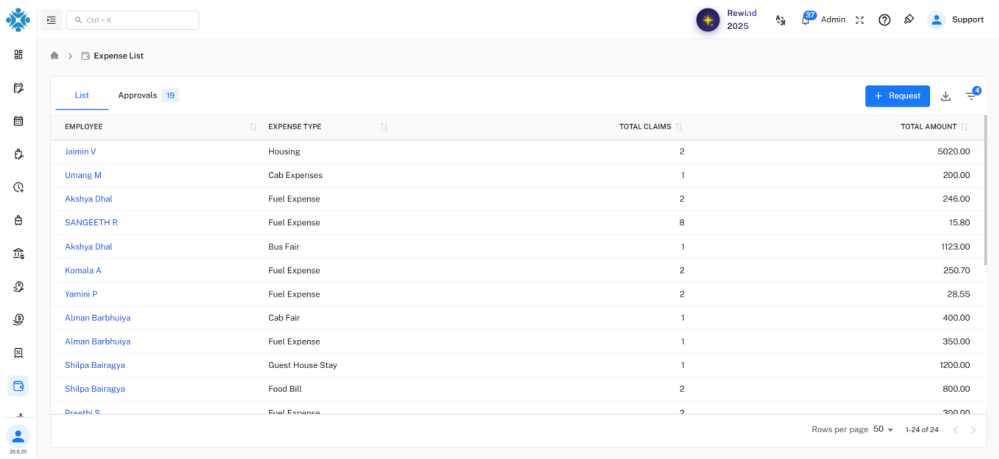
6.1 Auto-Expense Generation (Tracking with Auto-Expense)
When the Tracking with Auto-Expense policy is configured, the system automatically performs the following at punch-out:
- Calculates:
Total KM × Rate per KM - Creates an expense entry in the Expense List
- Links the entry to the employee's attendance date and session
Finance or HR can then review the auto-generated entry alongside the route proof and approve it for payout.
6.2 Tracking Without Auto-Expense
If the policy is set to Tracking Without Auto-Expense:
- Only GPS location data is stored
- No expense entry is created automatically
- Employees may submit manual expense claims referencing tracked route data
6.3 Approval & Payout
- Approved expense entries flow into the payroll or reimbursement cycle
- Route evidence is available for audit purposes
- All route data is retained after approval for compliance and review.
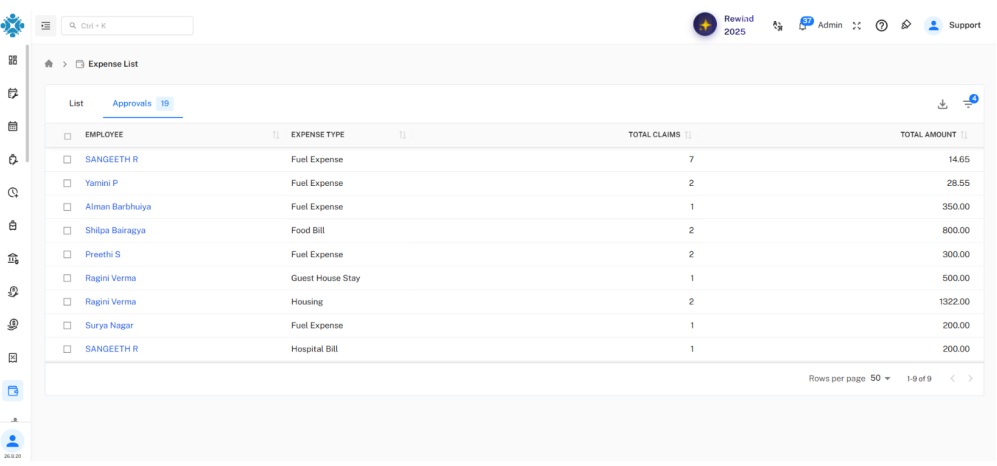
Expense List:
Expense Approvals:
7. End-to-End Flow Summary
| Step | Action | Responsible | Module |
|---|---|---|---|
| 1 – Admin Setup | Create Fuel Expense type | HR / Admin | Expense Policy |
| 2 – Tracking Policy | Add tracking rule | HR / Admin | Attendance Setup |
| 3 – Employee Punch-In | Employee selects vehicle type and punches in | Employee | Mobile App |
| 4 – GPS Tracking | System records GPS coordinates and distance | System | Live Tracking |
| 5 – Admin Monitoring | Admin views live employee location | Manager / Admin | Attendance Module |
| 6 – Route Review | Admin reviews route playback | Manager / Admin | Expense Module |
| 7 – Expense Creation | Auto-expense generated or manual claim submitted | System / Employee | Expense Management |
| 8 – Approval | Finance reviews and approves the entry | Finance / HR | Expense List |
Quick Guide: Attendance DAR & Geo-Fencing
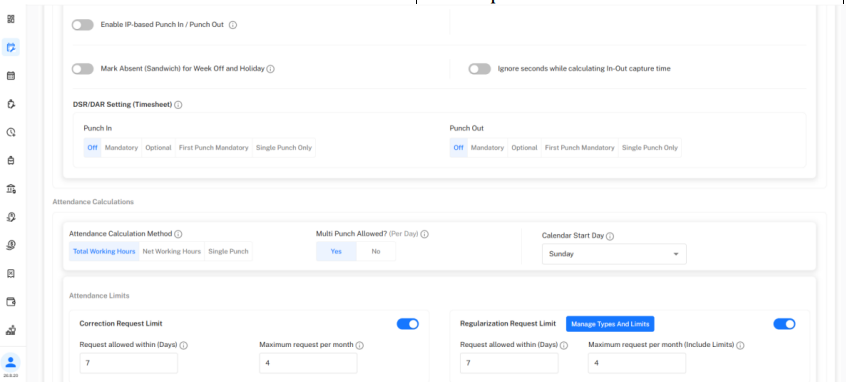
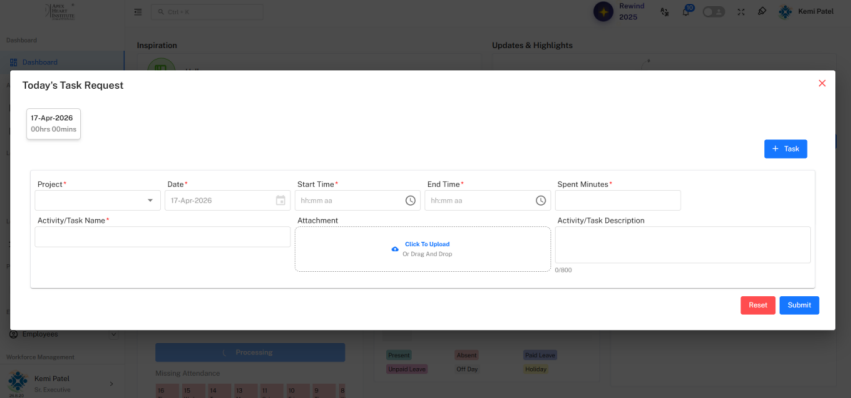
1. Daily Activity Report (DAR/DSR)
This feature captures work details directly at the time of Punch-In or Punch-Out.
Admins can configure if this is mandatory.
| Configuration | Action |
|---|---|
| Mandatory Enabled | Employee cannot Punch In/Out without filling task details |
| Optional / Combination | Employees are prompted for tasks based on policy rules |
2. Geo-Fencing & Activity Monitoring
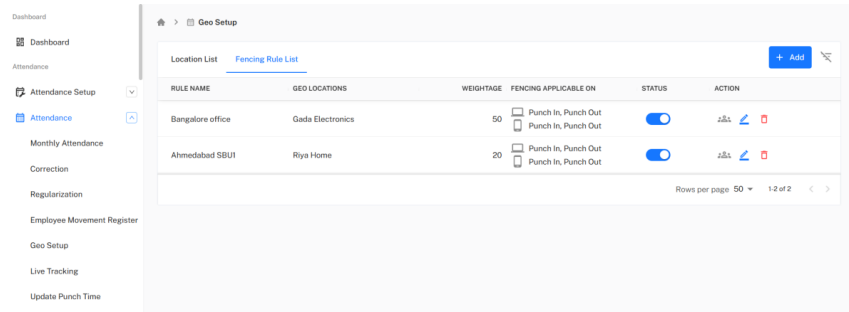
Monitor movement and GPS integrity.
When Monitor Geo-fenced activity is enabled, the system tracks violations in real-time.
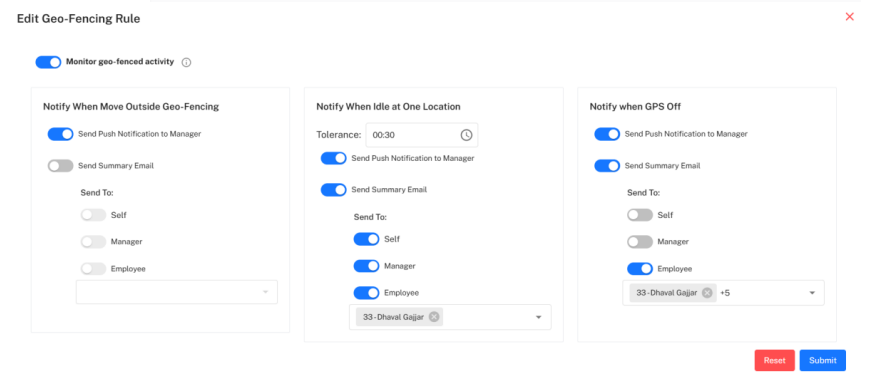
Monitored Events
- GPS Off
- Outside Geo-Fence
- Idle at Location
3. Notifications & Alerts
Stay informed via automated alerts.
You can configure combinations of Mail and App notifications.
The email can be sent to:
- Self (logged-in user)
- Selected Employee
- Manager of the Employee
based on criteria.
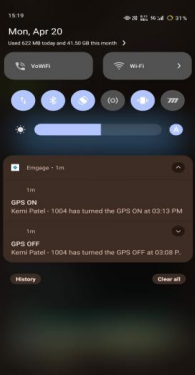
App Notification:
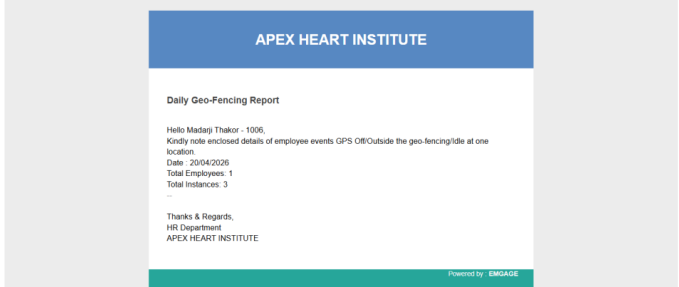
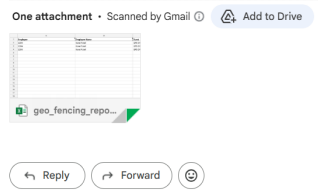
Mail Notification:
Quick Action Summary
| Feature | Setup Location |
|---|---|
| DAR/DSR Tasks | Attendance Policy |
| Geo-Fencing Rules | Geo-Fencing Rule List |
| Alert Configuration | Email/Push Notification Settings |