Loan Application Management
Last Updated: October 27,2025 Document Version: 1.0 **Prepared for:**Emgage HRMS Implementation Team
Streamlined Employee Loan Handling
The Loan Application Management module simplifies how administrators and employees manage loan requests — from applying and calculating EMIs to tracking approval and disbursement stages.
Overview
Key Benefits This feature enables both HR/Admins and employees to:
- Apply Digitally: Employees can submit loan requests online.
- Automate EMI Calculations: Instant EMI breakdown based on entered amount and tenure.
- Track Request Status: Real-time updates on approval, pending, or disbursed loans.
- Centralized Policy Access: Review applicable loan policies before submission.
- Transparency: Maintain full visibility from request creation to disbursement.
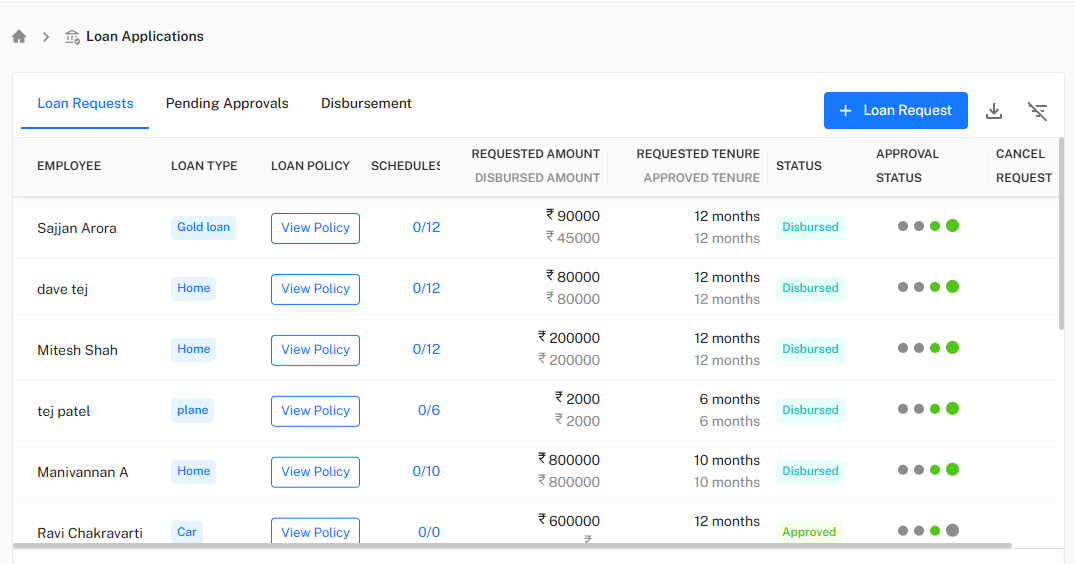
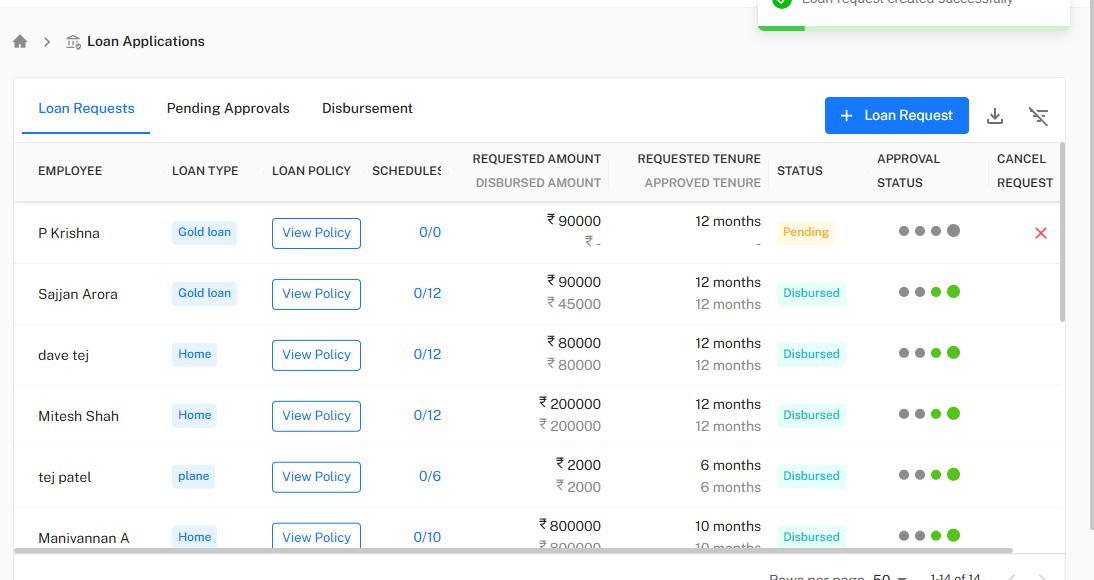
Step 1: Viewing Existing Loan Requests
Navigate to Loan Applications → Loan Requests to view all ongoing and past loan records.
Each record displays:
- Employee Name
- Loan Type (e.g., Home, Gold, Car, Personal)
- Loan Policy (with quick “View Policy” button)
- Schedule (e.g., 0/12 payments completed)
- Requested Amount & Disbursed Amount
- Requested Tenure & Approved Tenure
- Status (e.g., Pending, Disbursed, Approved)
- Approval Status indicators
- Cancel Request option
!Loan Request Table
Example For instance, Sajjan Arora has a Gold Loan with ₹90,000 requested and ₹45,000 disbursed over 12 months.
Step 2: Creating a New Loan Request
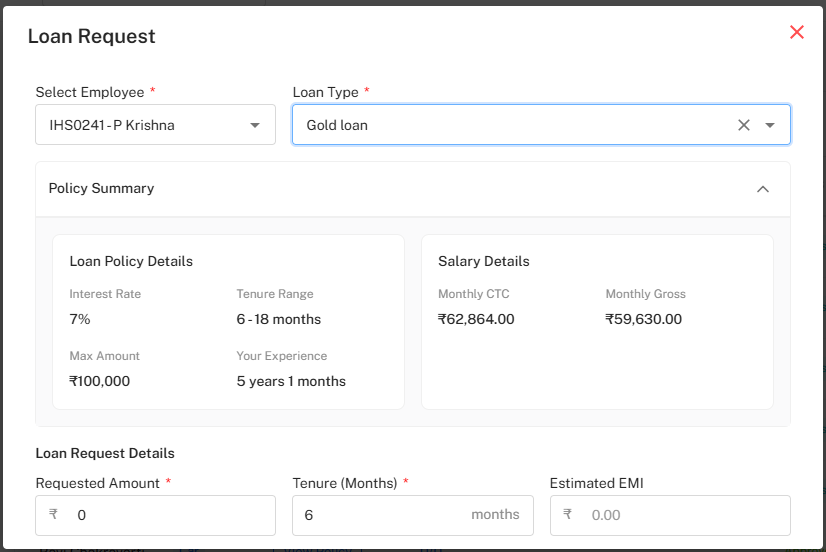 Click on the + Loan Request button to initiate a new loan.
!Loan Request Button
Fill Out Loan Request Form
- Select Employee – Choose the applicant’s name from the dropdown.
- Select Loan Type – Choose the applicable category (e.g., Home, Gold, Car).
- The Policy Summary auto-populates with:
- Interest Rate
- Tenure Range
- Maximum Amount
- Employee Experience
- Salary Details (CTC & Gross)
!Loan Request Form
Auto Policy Display Selecting the loan type instantly loads the associated Loan Policy and Salary Details, ensuring transparency before proceeding.
Step 3: Entering Loan Details and EMI Calculation
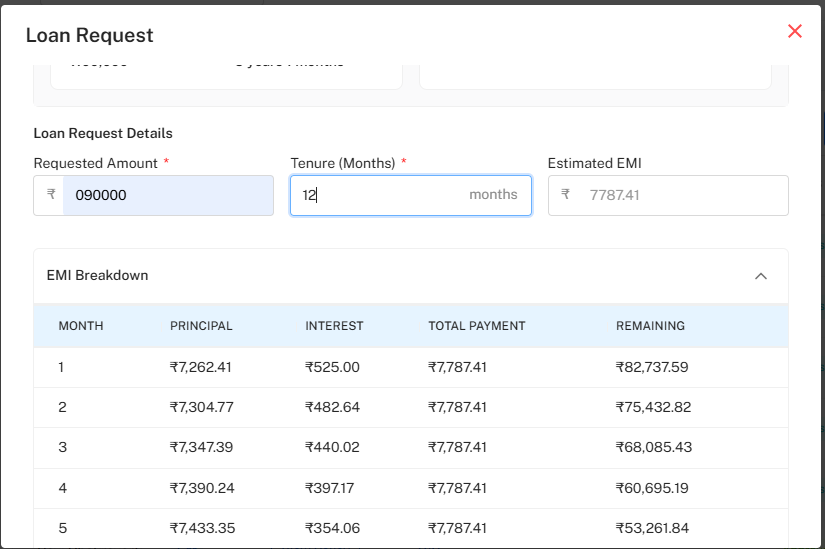
Fill in the following fields under Loan Request Details:
- Requested Amount (₹)
- Tenure (Months)
- The system auto-calculates the Estimated EMI based on loan parameters.
Below, an EMI Breakdown Table appears showing:
- Month Number
- Principal
- Interest
- Total Payment
- Remaining Balance
!EMI Breakdown Table
Instant EMI Estimation Once the amount and tenure are entered:
- The EMI breakdown is generated automatically.
- Each row shows the decreasing balance month by month.
Step 4: Submitting the Loan Request
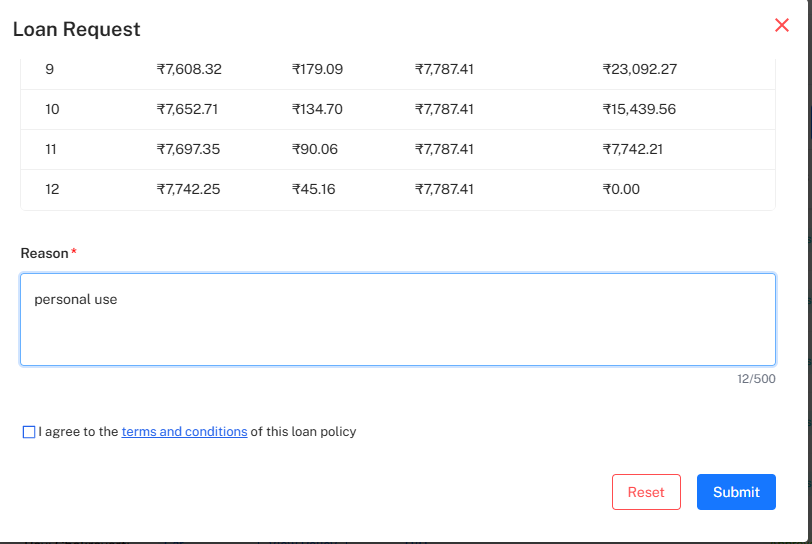 Complete the remaining fields before submission:
- Reason – Enter purpose (e.g., personal use, medical, renovation).
- Terms & Conditions Checkbox – Must be accepted to proceed.
- Use Reset to clear fields or Submit to send the request.
!Submit Loan Request
Confirmation Message Upon successful submission, a message appears: "Loan request created successfully"
Step 5: Tracking Request Status
Return to the Loan Requests tab to view the updated list.
- The new request appears with Pending status under the Status column.
- Once approved by the admin, it moves to Disbursed or Approved states.
- The Approval Status dots visually represent progress.
- You can also Cancel a pending request before approval.
!Pending Loan Request Status
Status Indicators
- Pending – Waiting for approval.
- Disbursed – Loan amount released.
- Approved – Ready for disbursement.
- Rejected – Request declined by admin.
Step 6: Admin and Disbursement View
Admins can switch to the Pending Approvals or Disbursement tabs to:
- Review and approve pending loan applications.
- Manage EMI schedules and disbursed amounts.
- Monitor completion progress (e.g., 0/12 installments paid).