Timesheet Management
Last Updated: Oct 13, 2025
Document Version: 1.0
Prepared for: Emgage HRMS Users
Timesheet Management
Track Your Work Hours & Tasks
Log daily tasks, manage projects, and submit timesheets for approval. Perfect for tracking billable hours and productivity.
✅Quick Overview
- The Timesheet module has 3 main tabs:
- Daily Task - Add and view your daily work entries
- Daily Task Approval - Submit tasks for manager approval
- Project - View and create projects
1. Daily Task
+ Add Task:
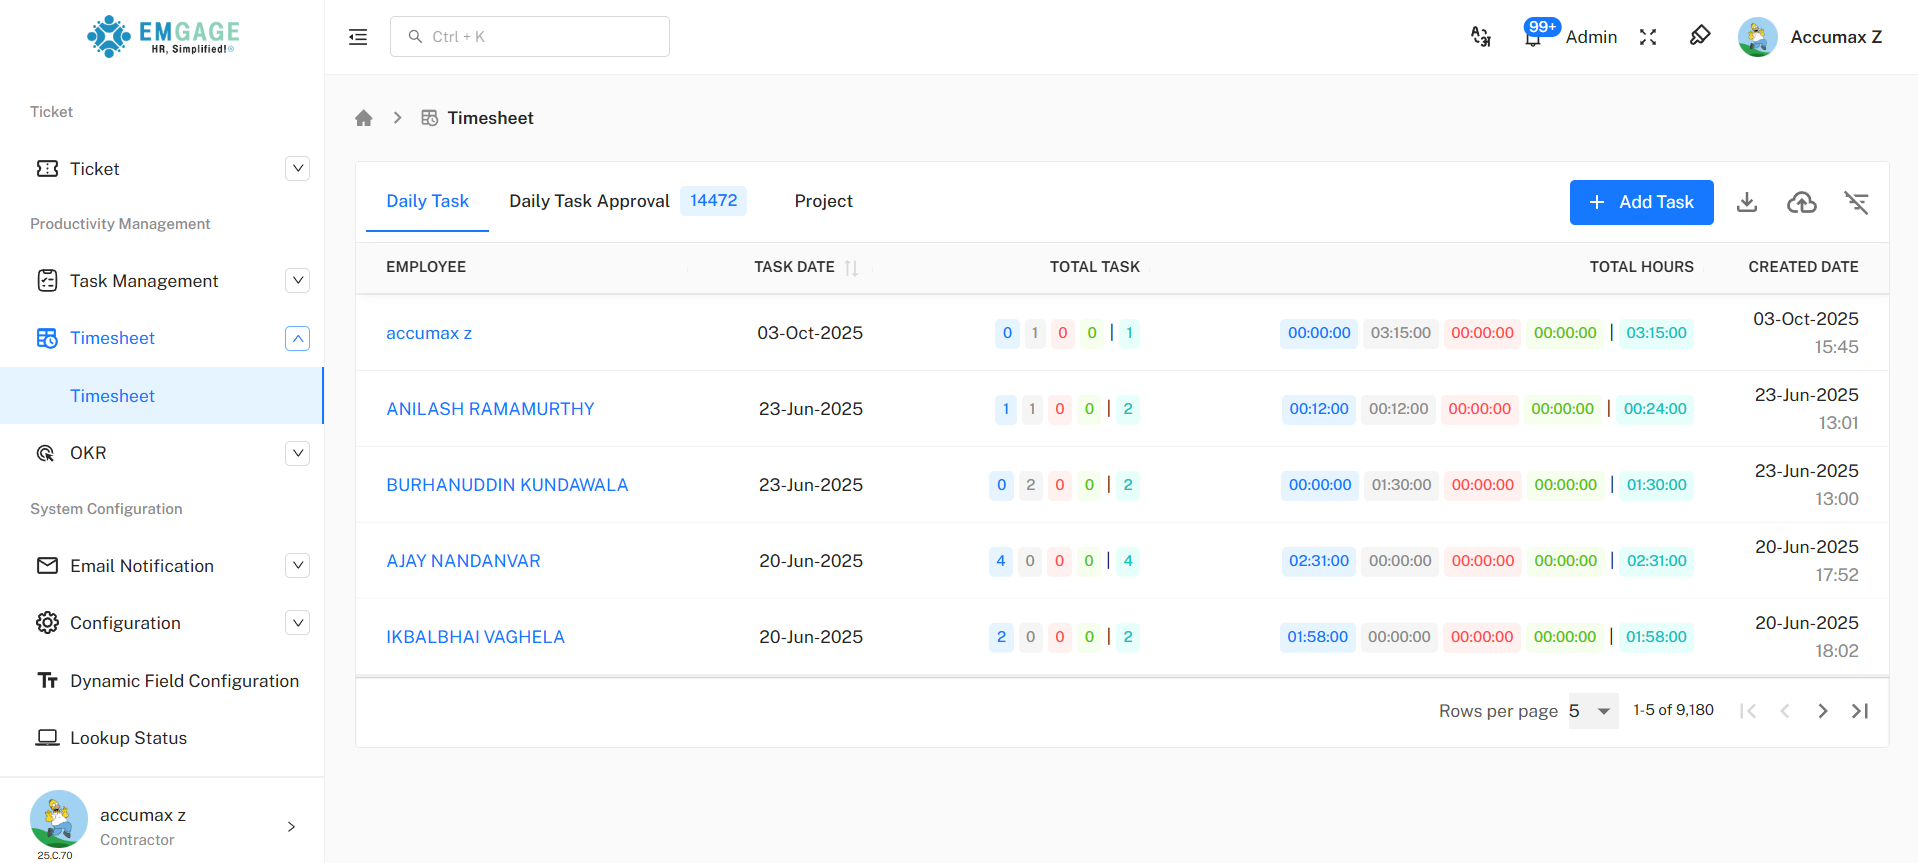
Step 1: Open Add Task Form
- Go to Timesheet → Daily Task tab
- Click blue "+ Add Task" button (top right)
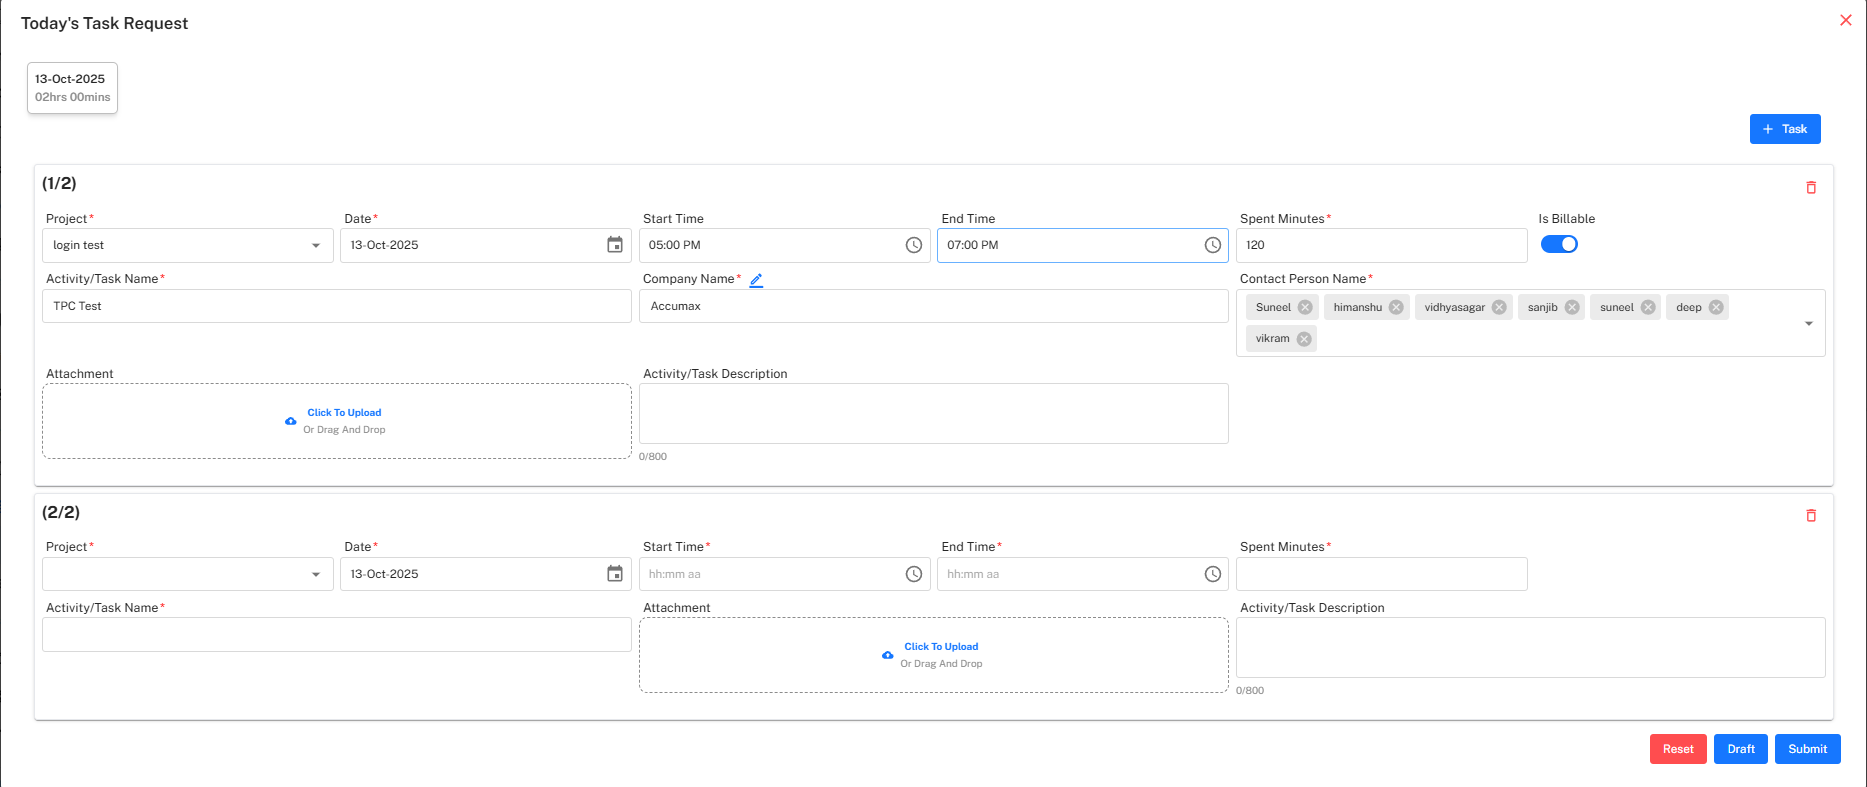
Step 2: Fill Basic Details
| Field | What to Enter |
|---|---|
| Project* | Select from dropdown |
| Date* | Work date |
| Start Time* | When started |
| End Time* | When finished |
| Spent Minutes* | Auto-calculated |
| Is Billable | Toggle if client-billable |
Step 3: Add Task Information
| Field | What to Enter |
|---|---|
| Activity/Task Name* | What you worked on (e.g., "TPC Test") |
| Company Name* | Select company (e.g., "Accumax") |
| Contact Person Name* | Add team members involved |
Step 4: Add Attachments & Description (Optional)
- Attachment: Click "Click To Upload" or drag files
- Description: Enter task details (0/800 characters)
Step 5: Add Multiple Tasks (Optional)
- Click +Task to add multiple Tasks
- Click 🗑️ icon to remove tasks
Step 6: Submit
| Button | Purpose |
|---|---|
| Submit | Save and send for approval |
| Draft | Save without sending |
| Reset | Clear all fields |
After Submit, you cannot edit. Use Draft if incomplete.
The dropdown menu of Project field displays only those projects that are linked to the employee’s assigned tasks.
View Your Tasks
Table shows:
- Employee name
- Task date
- Task count (colored badges)
- Hours breakdown
- Created date
Task Count Badges:
| Color | Meaning |
|---|---|
| 🔵 Blue | Draft/Re-open |
| 💿 Gray | Total |
| 🔴 Red | Rejected |
| 🟢 Green | Approved |
| 🟦 Cyan | Total |
Import Timesheet:
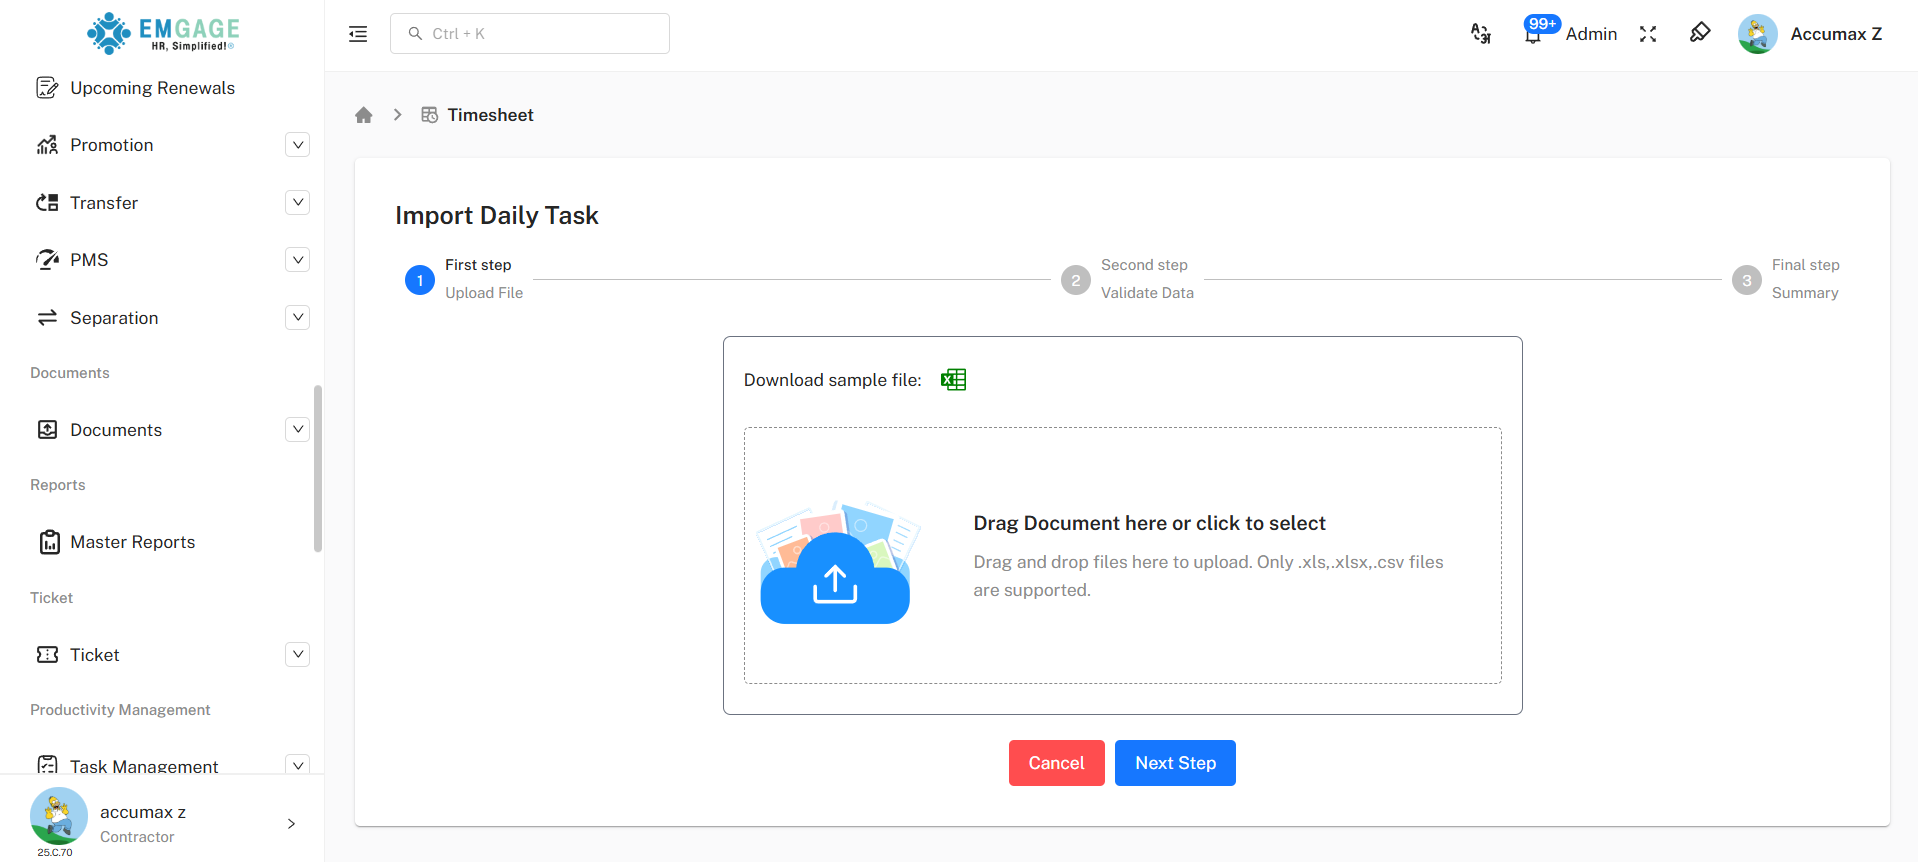
Download sample file:

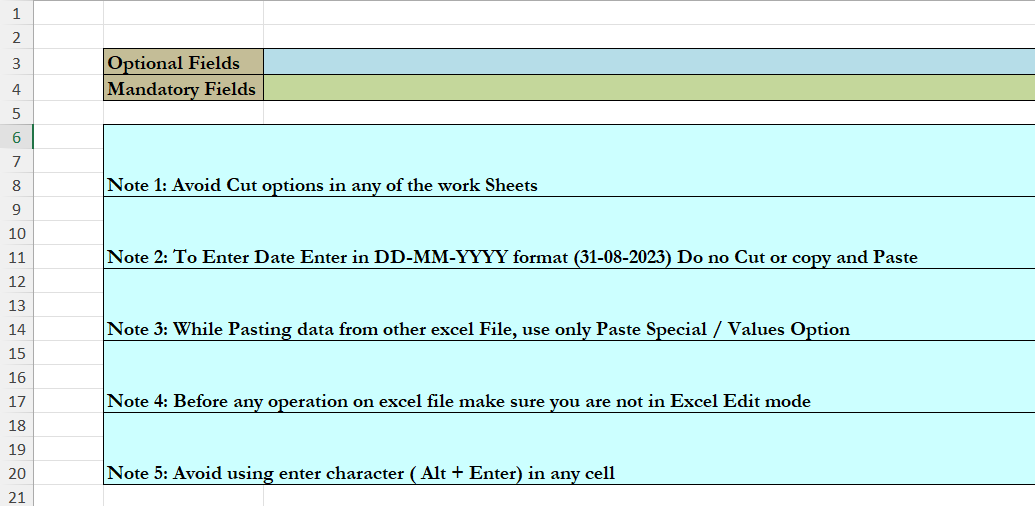
-
Click download icon (📥) → "Import Daily Task"
-
Step 1 - Upload File:
- Click "Download sample file" (Excel icon)
- Fill Excel with task data
- Upload file
- Click "Next Step"
-
Step 2 - Validate Data:
- Fix any errors shown
- Click "Next Step"
-
Step 3 - Summary:
- Review import
- Click "Finish"
Export Data:
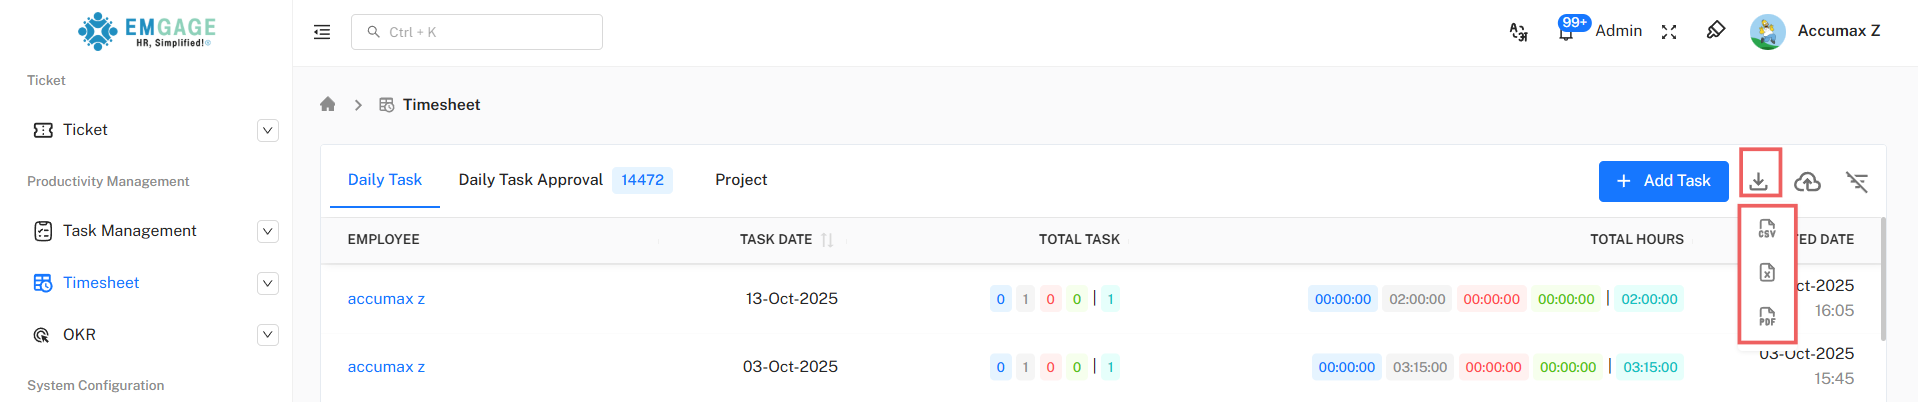
- Daily Task Data can be exported in CSV, Excel (XLSX), or PDF formats.
Filter:
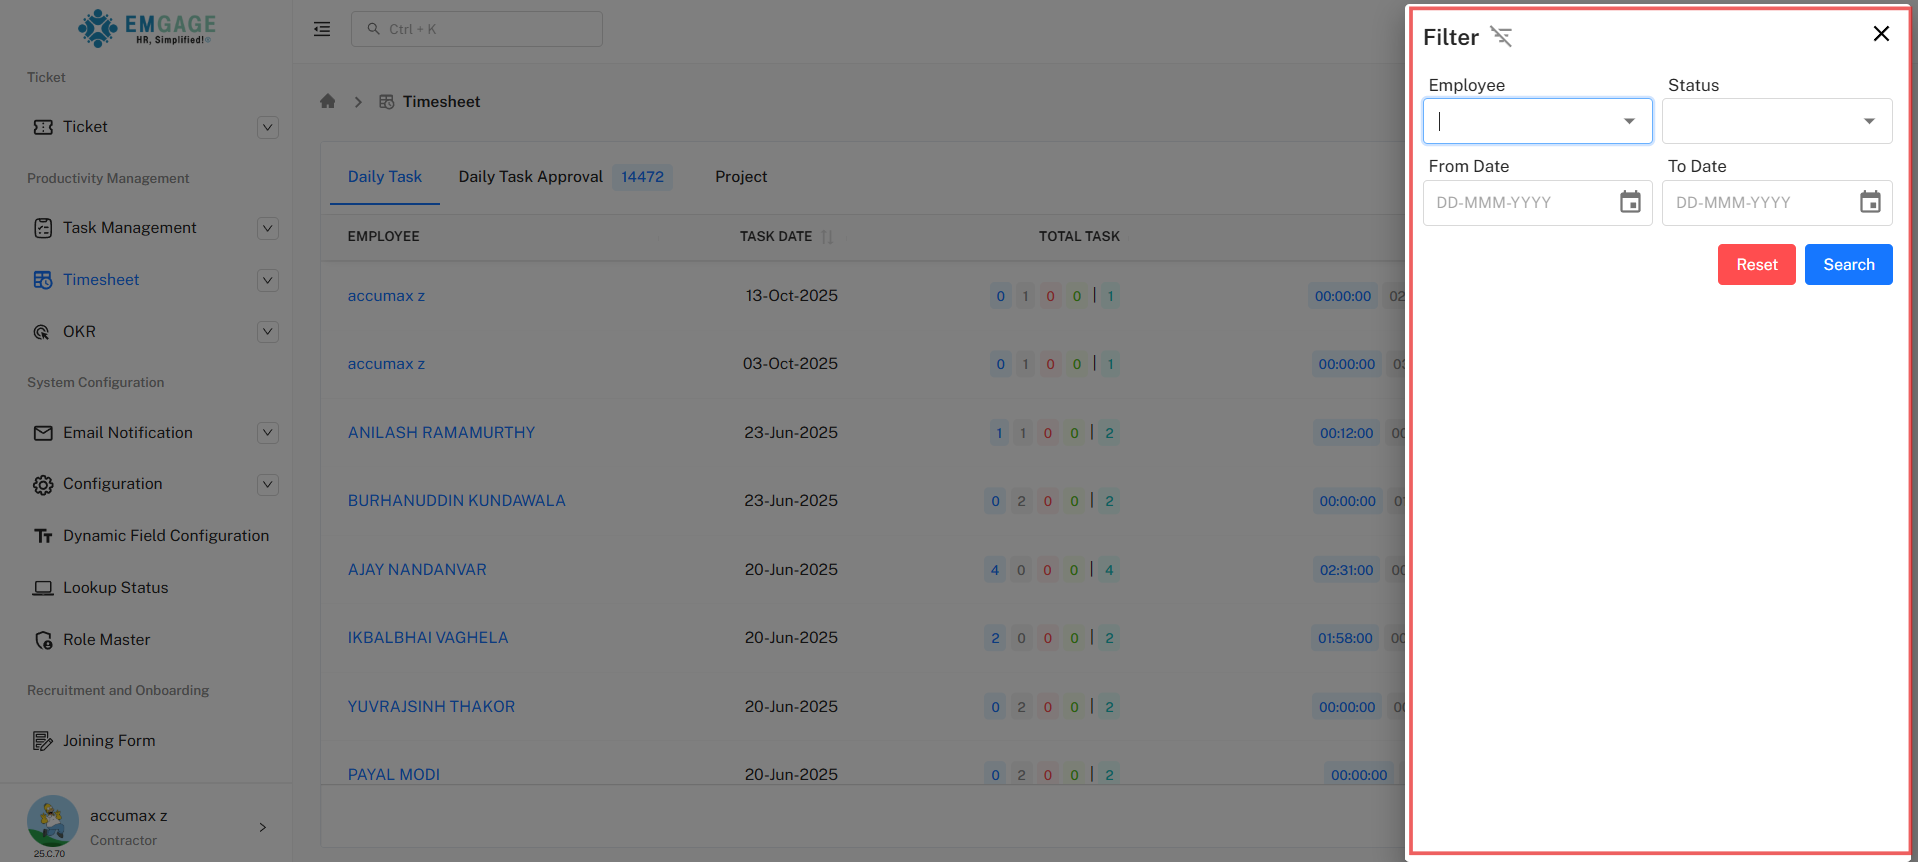
- Filter records based on:
- Employee name
- Status (Draft, Pending, Approved, Rejected)
- Date range (From Date – To Date)
2. Daily Task Approval
View Pending Tasks
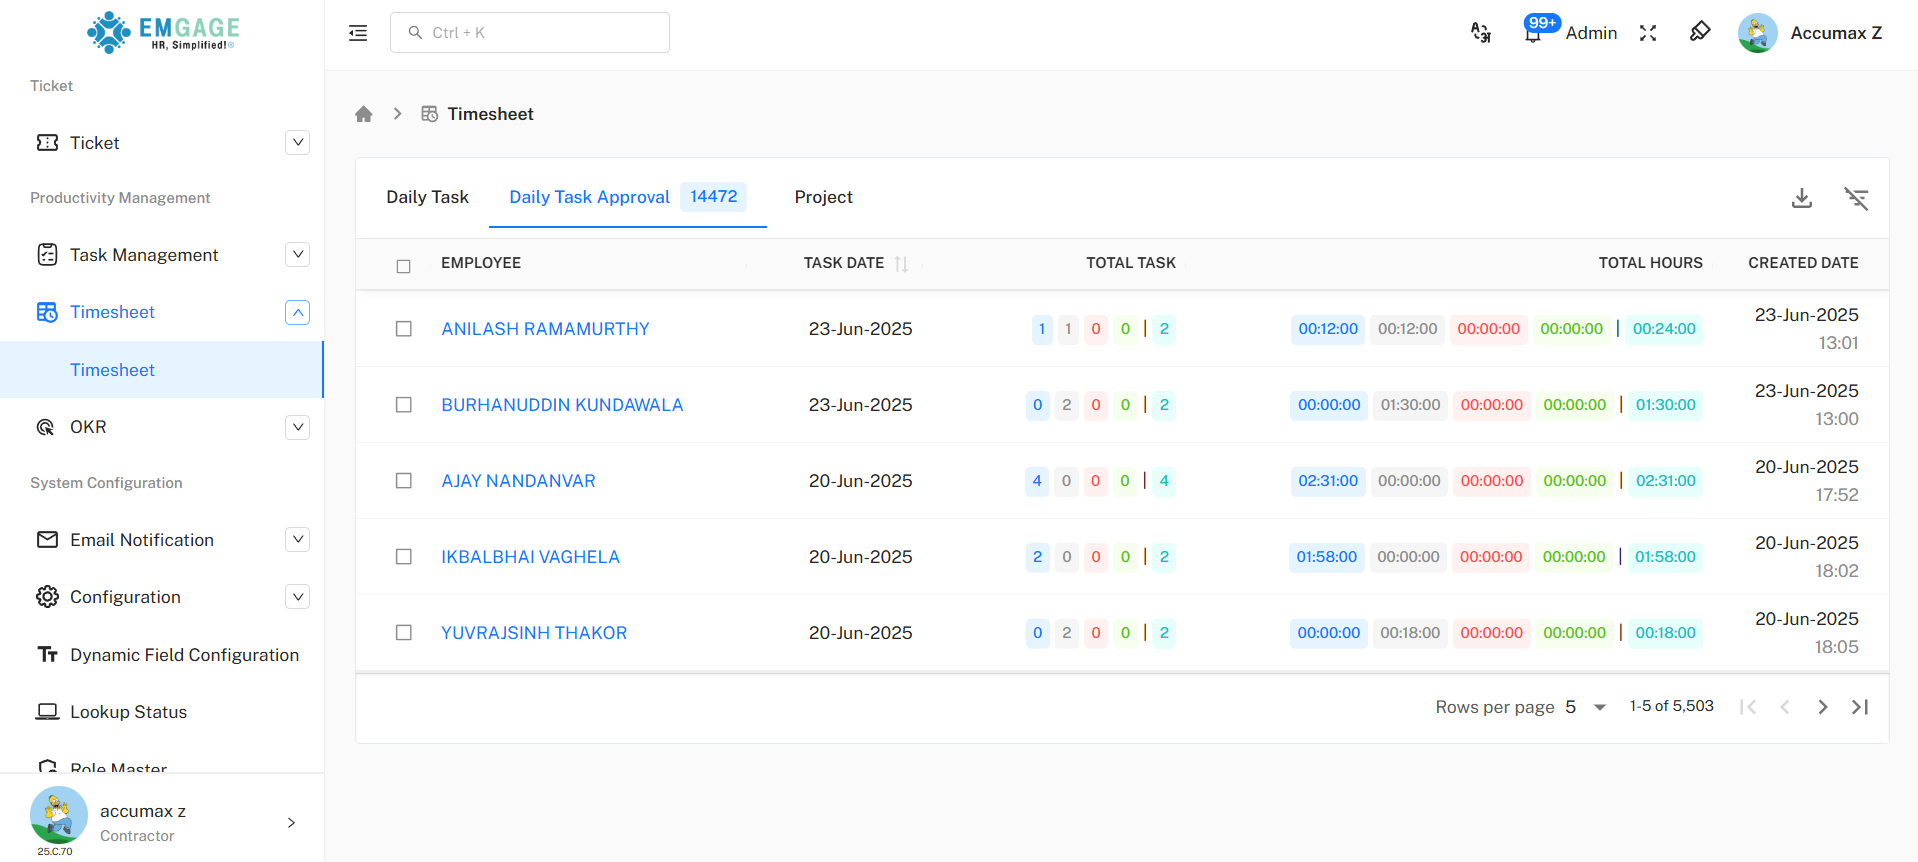
- Click "Daily Task Approval" tab
- See all submitted tasks in table
Table Columns:
- Employee
- Task Date
- Total Task (count breakdown)
- Total Hours (time breakdown)
- Created Date
Step 1: Select Tasks
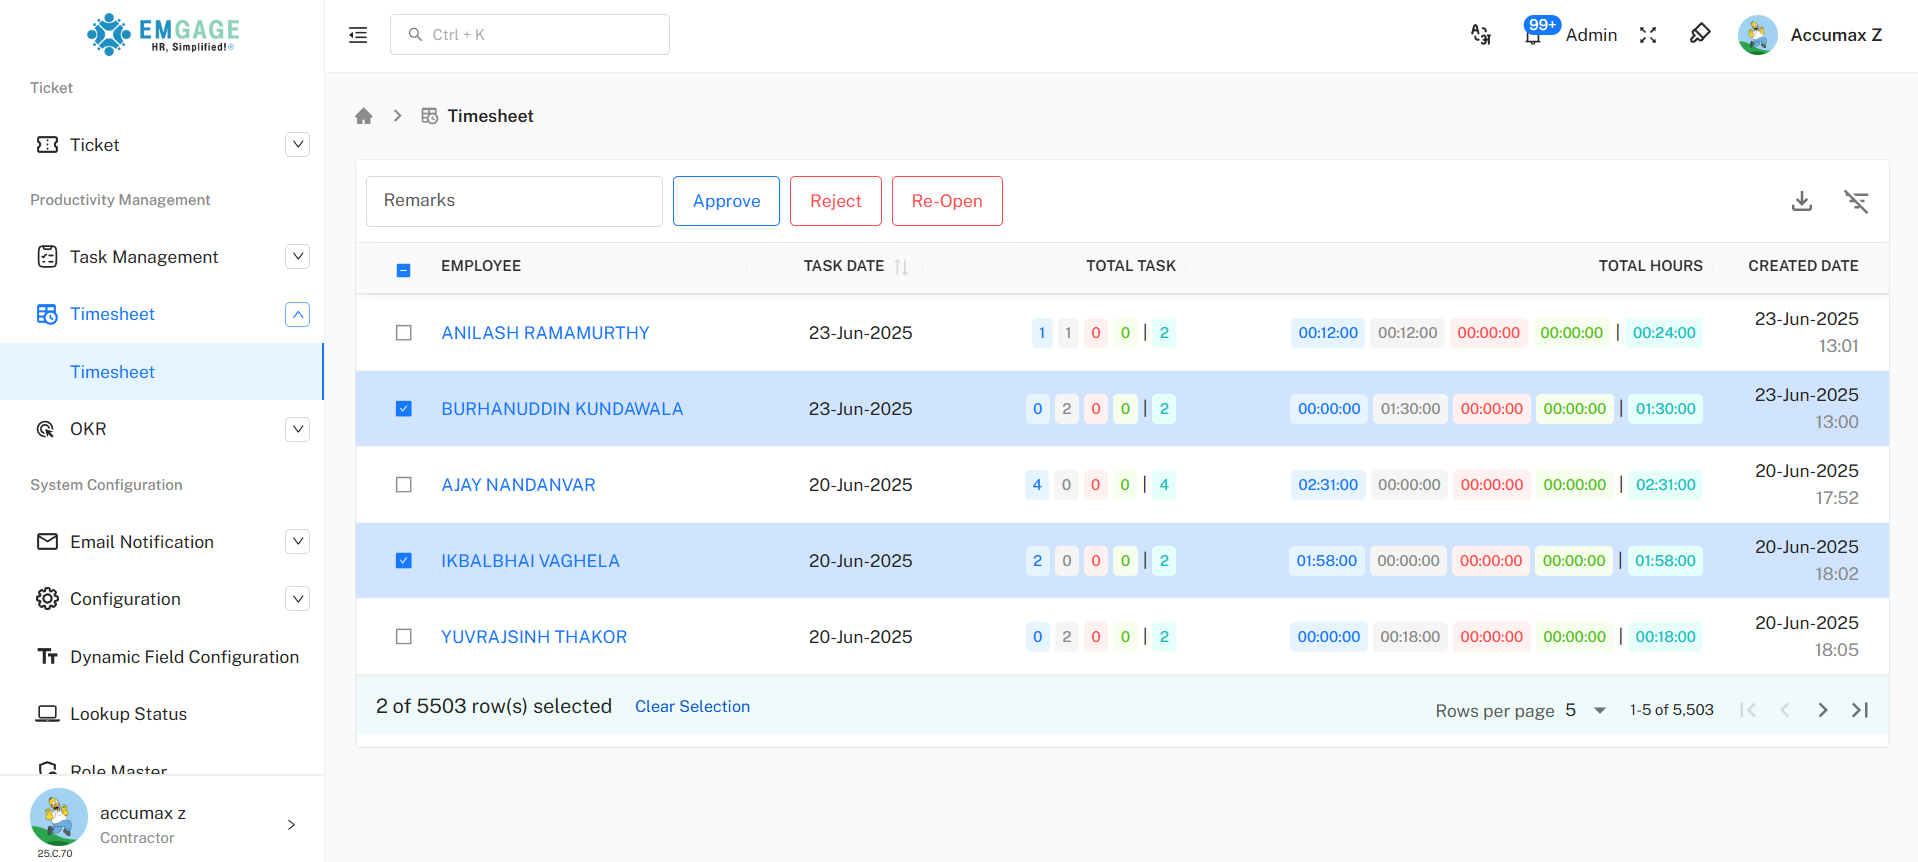
- Check boxes next to tasks
- Use "Clear Selection" to unselect
Step 2: Take Action
Add Remarks (Optional):
- Enter notes in "Remarks" field
- Helps track approval reasons
Choose Action:
| Button | Purpose |
|---|---|
| Approve | Accept selected tasks ✅ |
| Reject | Decline tasks (needs remarks) ❌ |
| Re-Open | Let employee edit rejected tasks 🔄 |
Bulk Actions: Select multiple tasks to approve/reject at once.
Task Status Flow
Submitted → Pending → Approved ✅
                   → Rejected ❌ → Re-Opened → Pending
3. Project
Click "Project" tab to see:
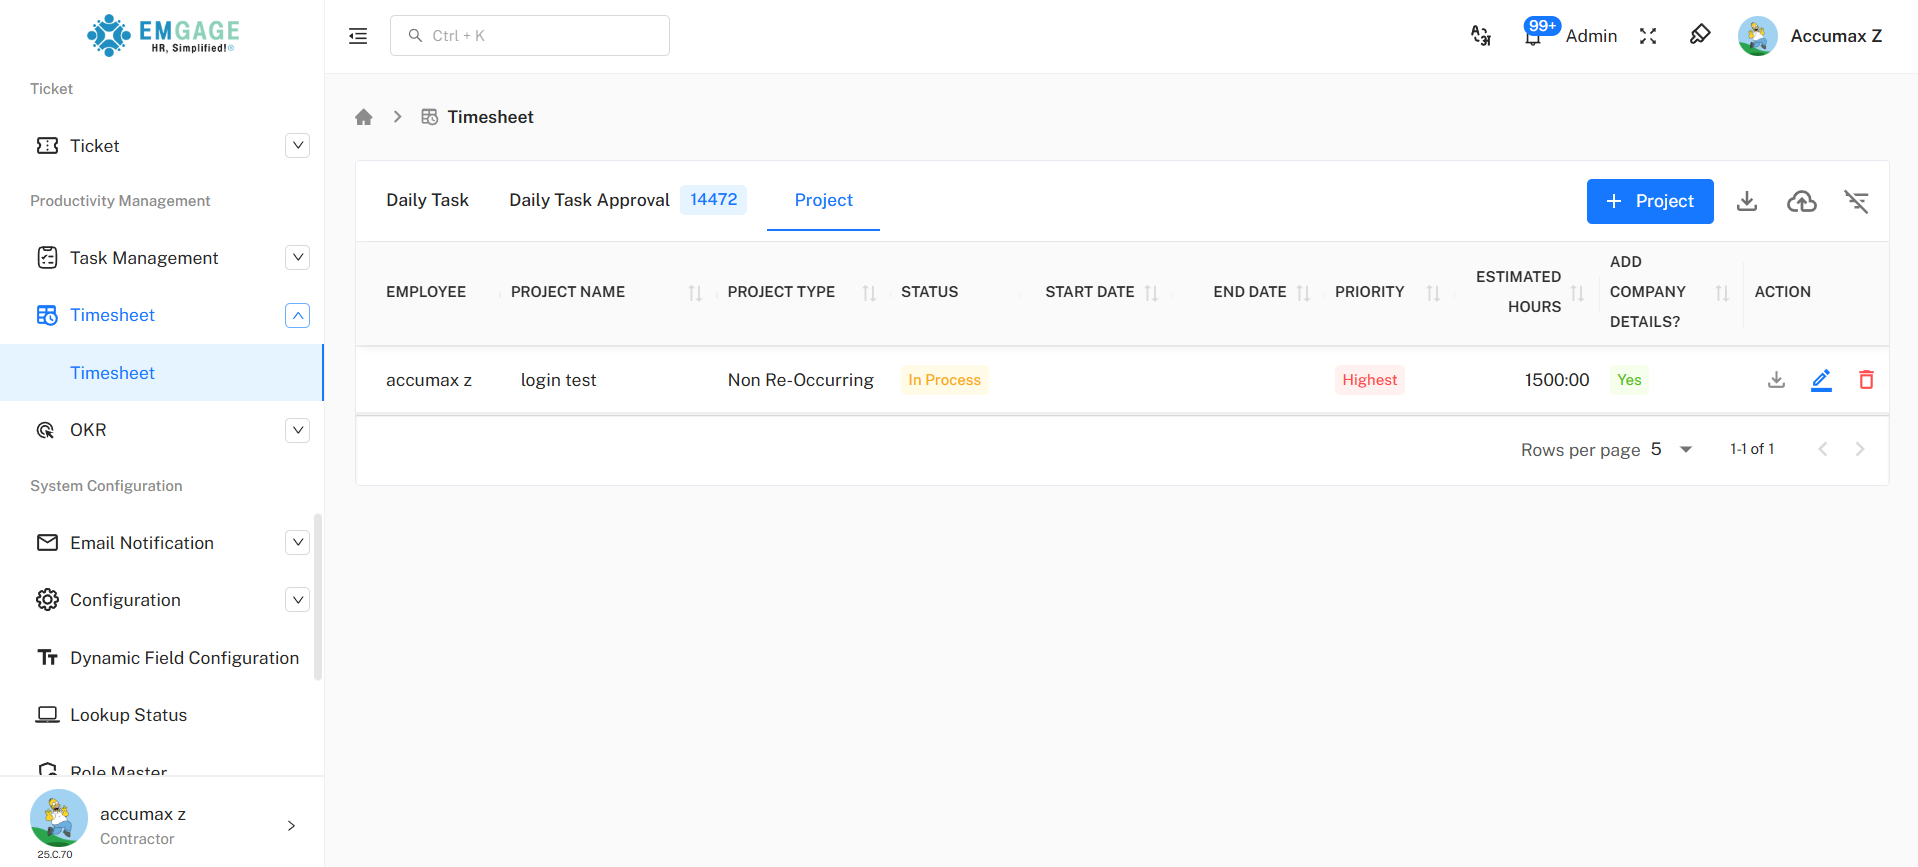
Table Columns:
- Employee (owner)
- Project Name
- Project Type (Recurring/Non-Recurring)
- Status (Created/In Process/Completed)
- Start Date / End Date
- Priority (Highest/High/Medium/Low)
- Estimated Hours
- Add Company Details? (Yes/No)
- Action (📥 Download, ✏️ Edit, 🗑️ Delete)
Create New Project
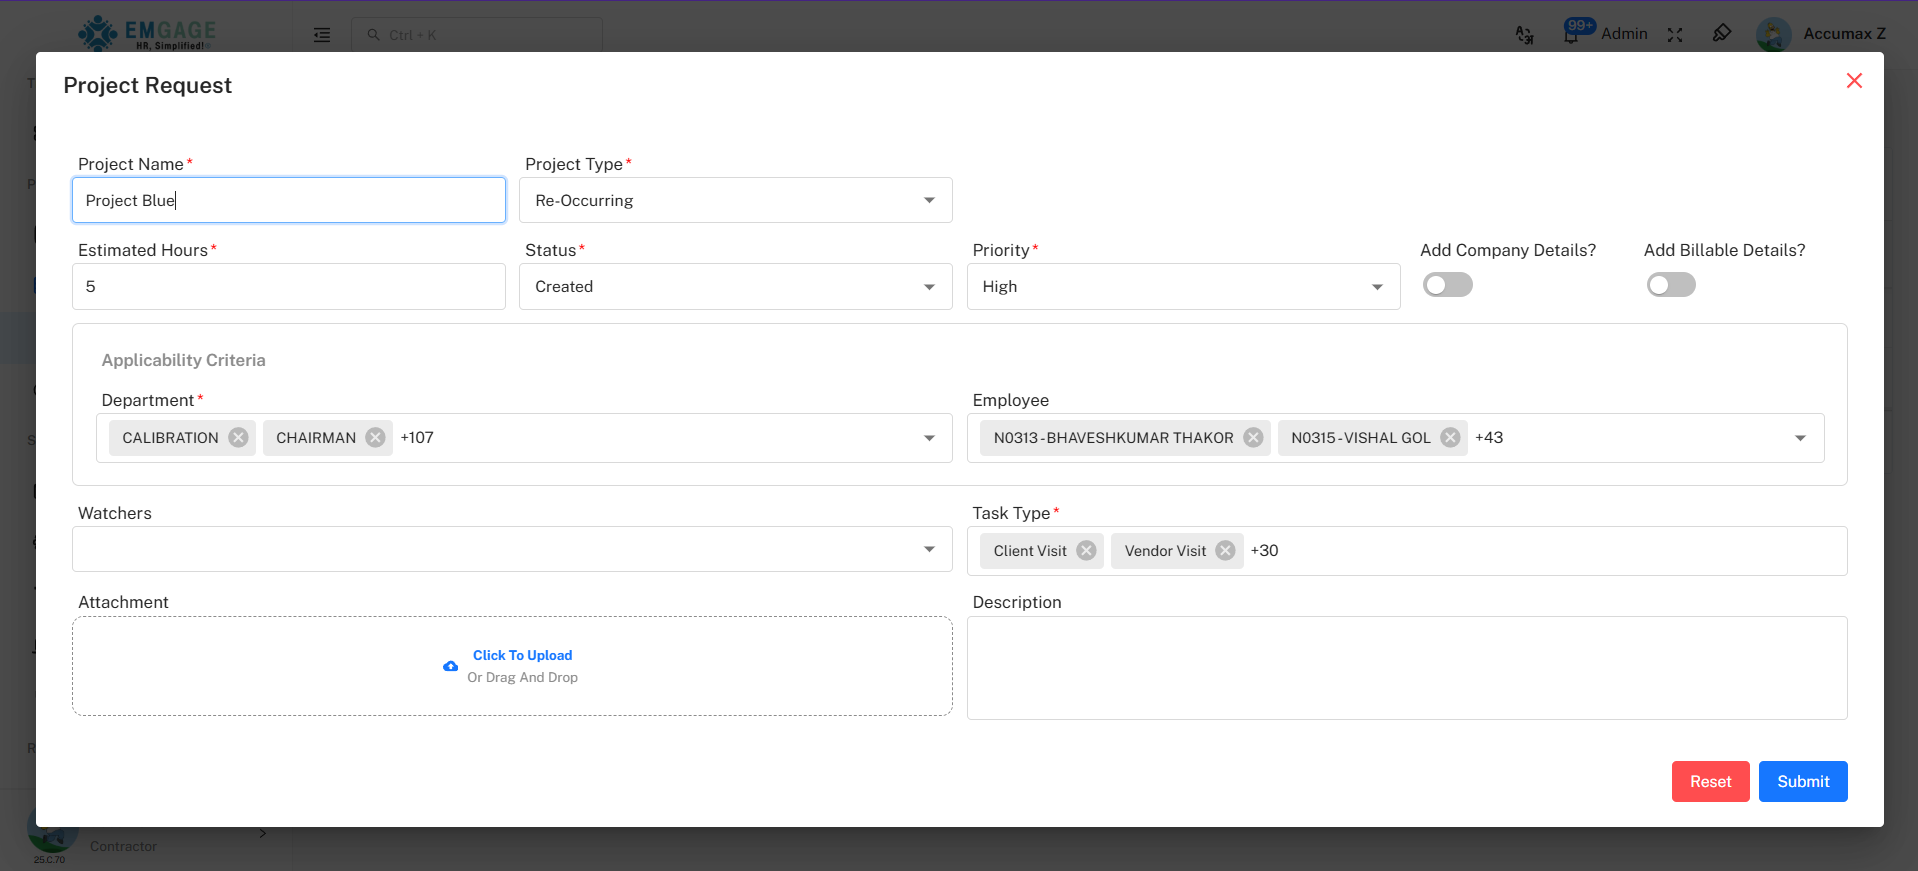
Step 1: Open Form
Click "+ Project" button (blue, top right)
Step 2: Fill Basic Information
| Field | What to Enter |
|---|---|
| Project Name* | Clear project title |
| Project Type* | Select type |
| Estimated Hours* | Total hours needed |
| Status* | Current status |
| Priority* | Importance level |
| Add Company Details? | Toggle if client project |
| Add Billable Details? | Toggle if billable |
Step 3: Set Applicability Criteria
Who can work on this project:
| Field | Purpose |
|---|---|
| Department* | Select teams |
| Employee | Select specific people |
| Watchers | Who gets notifications |
| Task Type* | Types of work allowed |
Step 4: Add Details
- Attachment: Upload project files (Click To Upload)
- Description: Add project notes, requirements
Step 5: Submit
| Button | Action |
|---|---|
| Submit | Save project |
| Reset | Clear form |
Import Projects
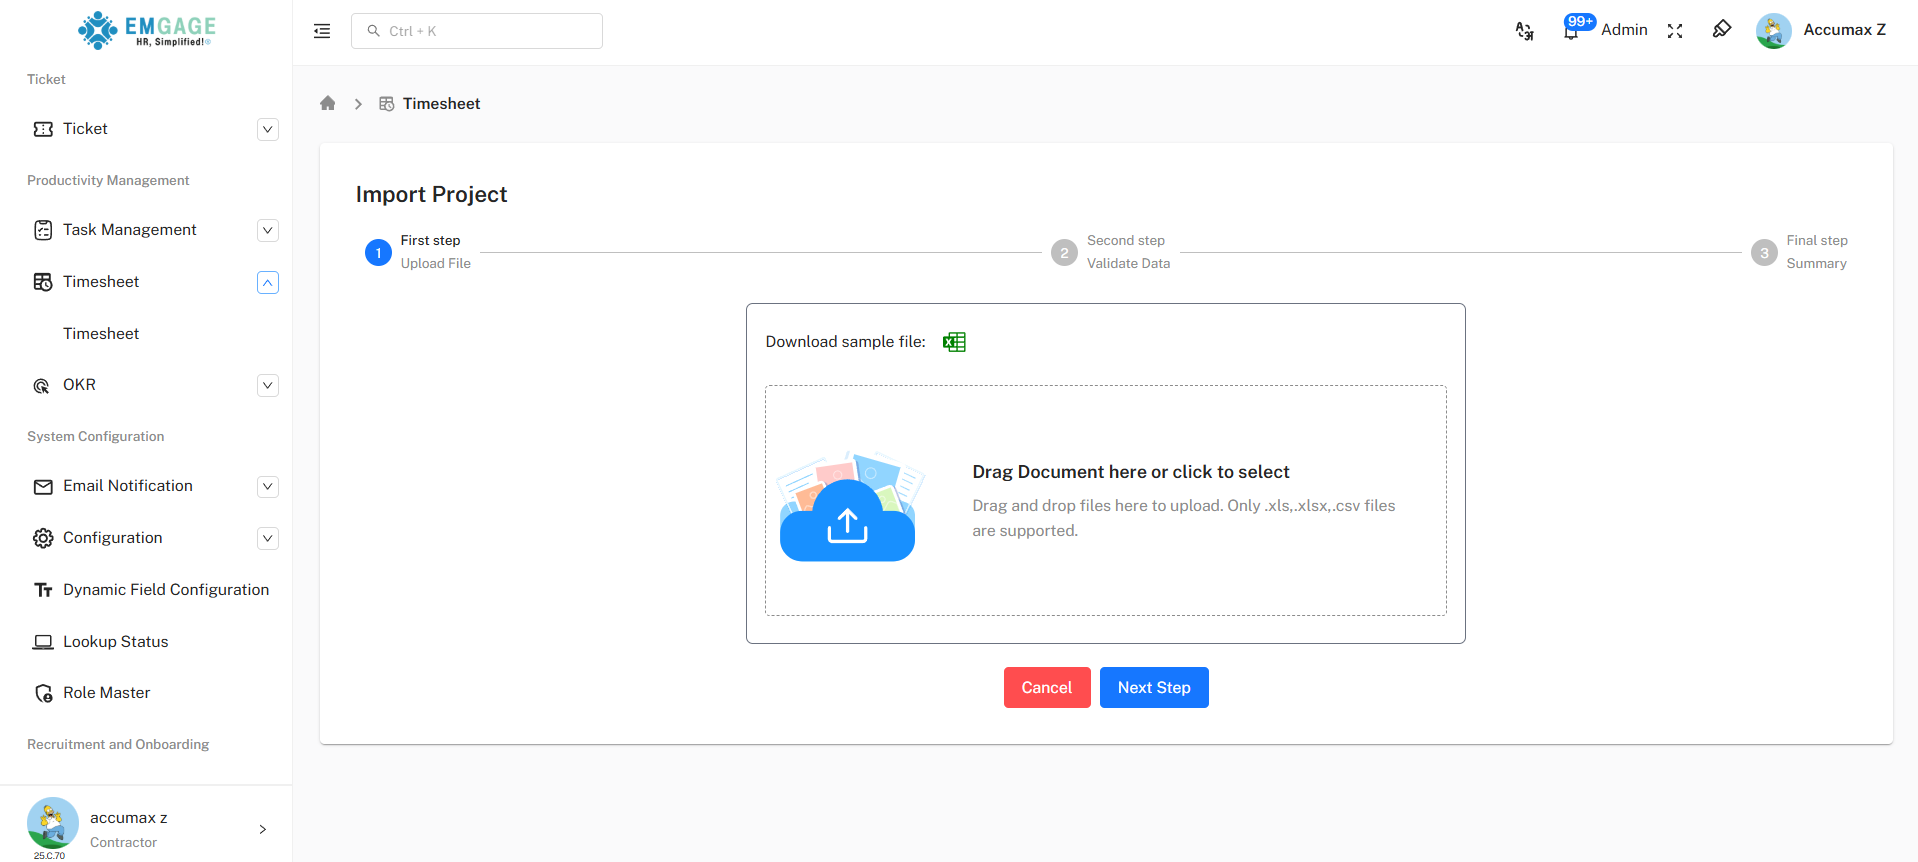
- Click Import icon (📥) → "Import Project"
-a9caaefc0e0a9792de8f718954ad20b2.png)
- Follow same 3-step process:
- Upload File (download sample first)
- Validate Data
- Summary & Finish
Import assign projects
Timesheet – Project Assignment
Overview
The Project Assignment Import feature allows administrators to assign projects to employees in bulk using an Excel or CSV file, eliminating the need for manual assignment.
Steps to Assign Projects
Step 1: Open Project Module
- Navigate to Timesheet > Project.
- Click the Import icon available in the top-right corner of the screen.
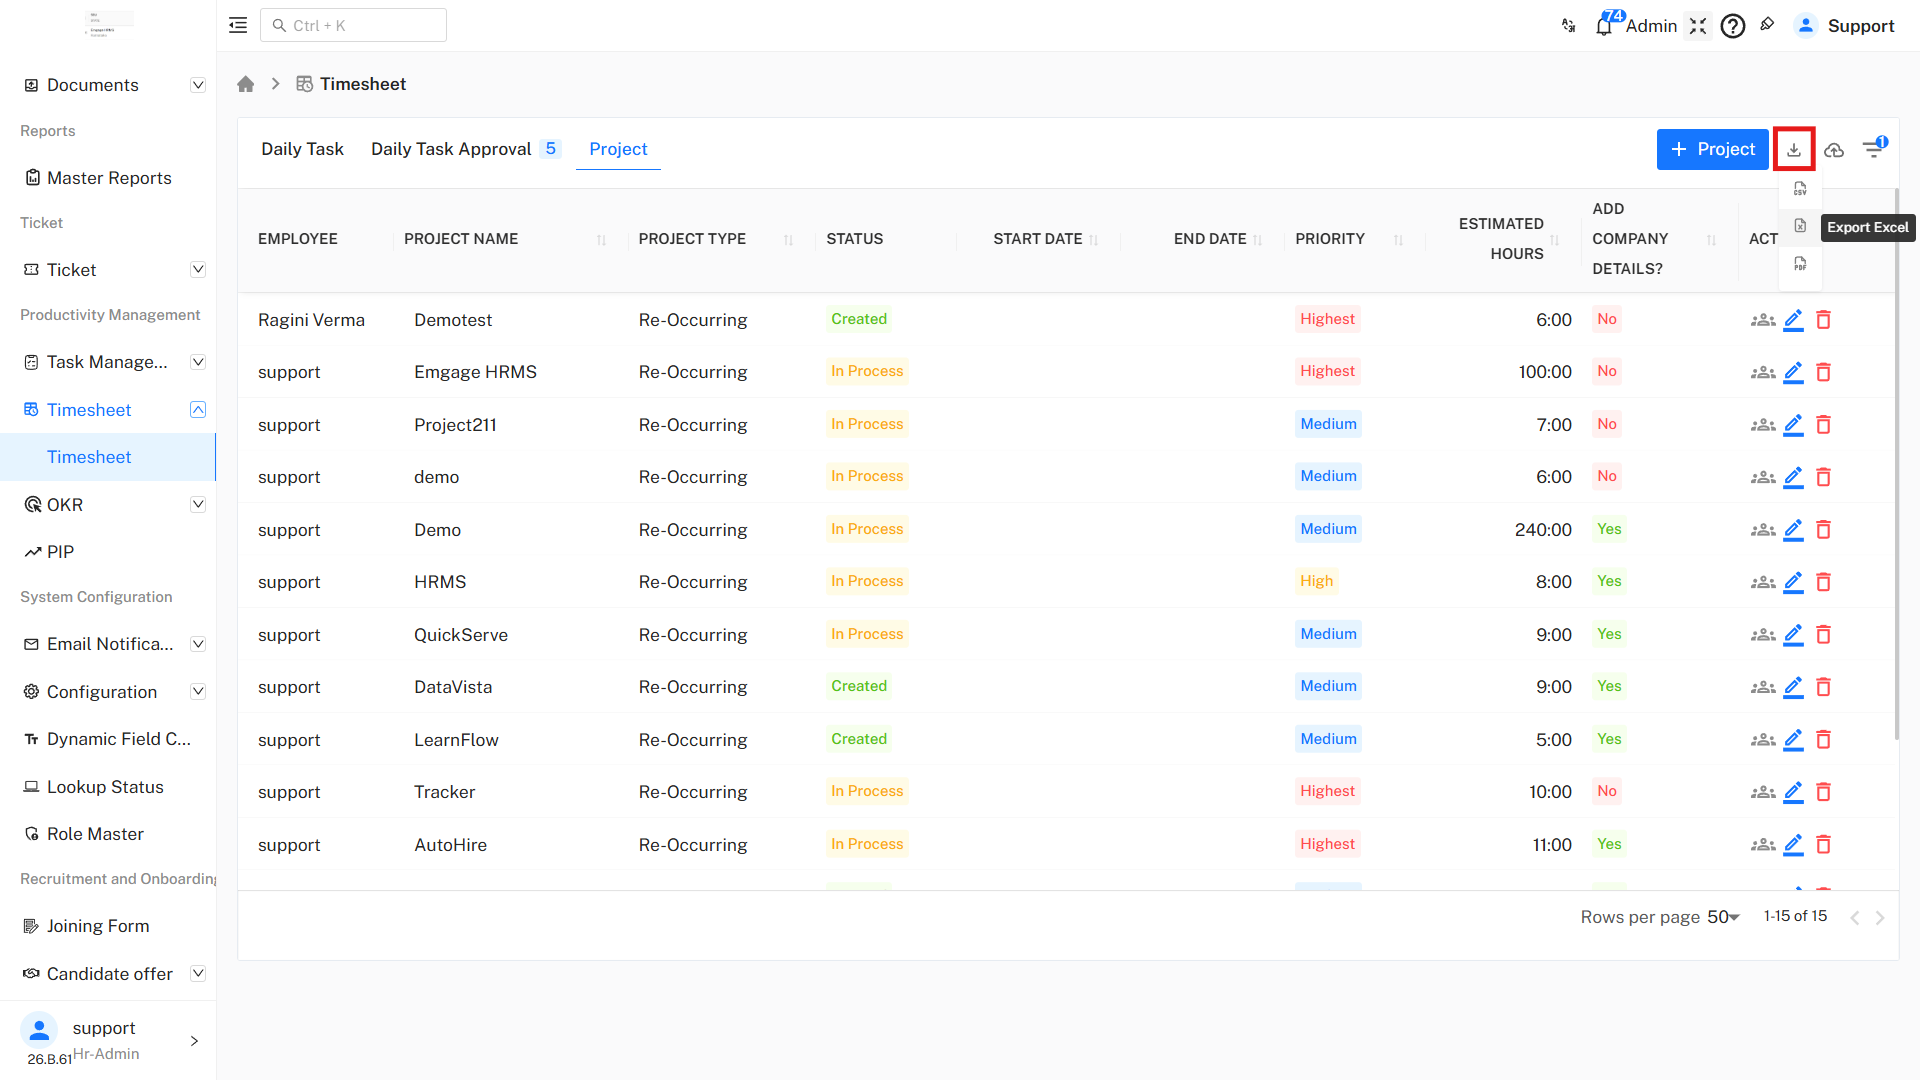
Step 2: Upload Assignment File
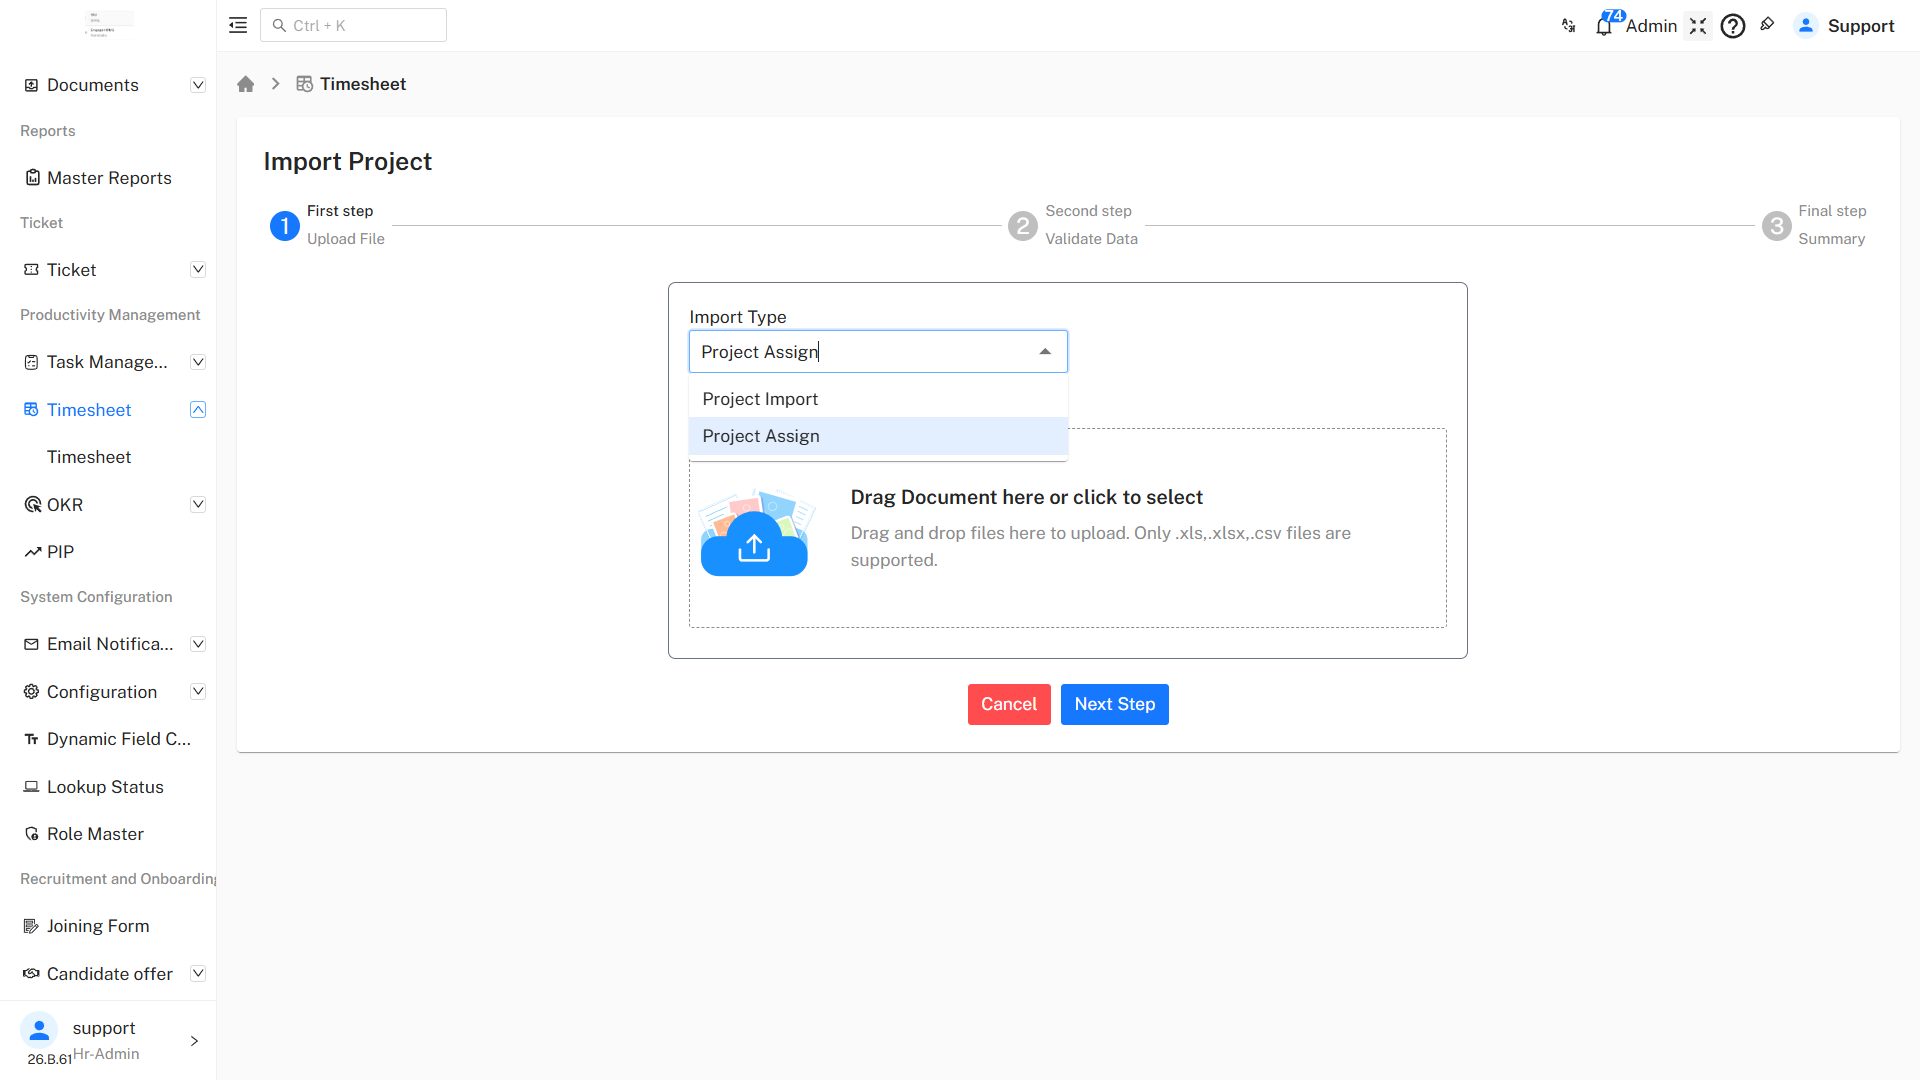
- In the Import Type dropdown, select Project Assign.
- Upload the project assignment file by dragging and dropping it or by selecting it from your system.
- Supported file formats:
.xls.xlsx.csv
- Click Next Step.
Step 3: Validate Data
- The system will validate the uploaded file.
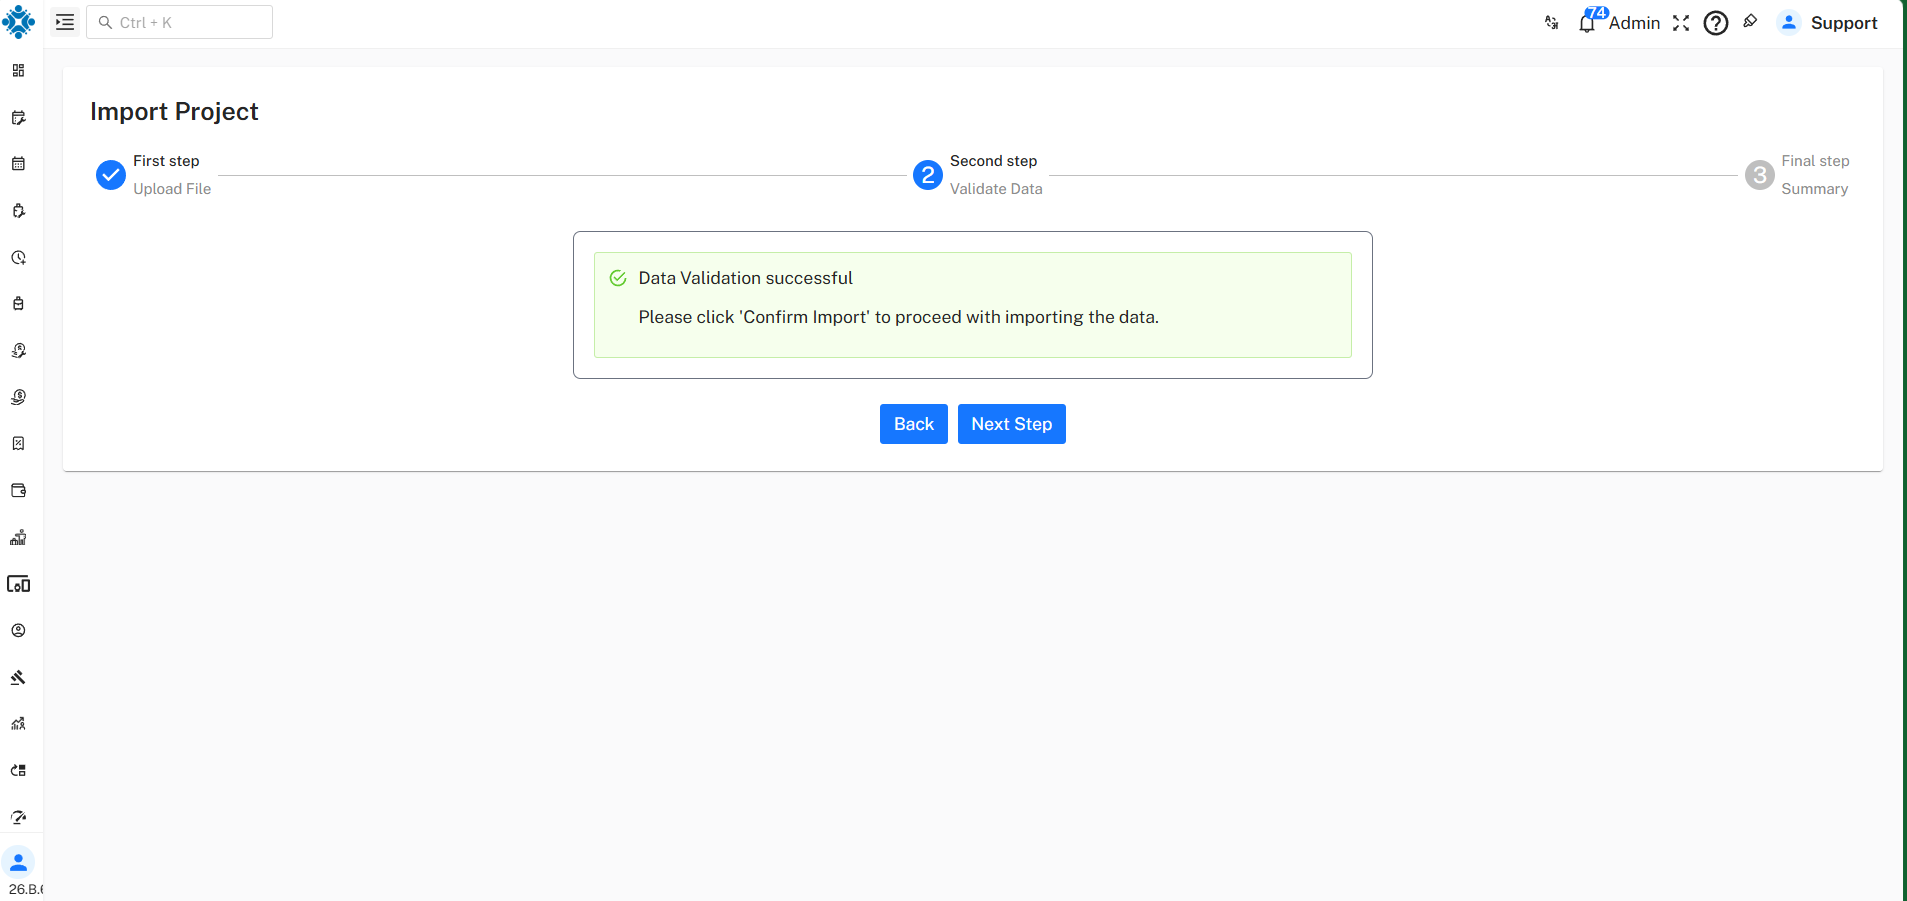
- If all records are valid, a Data Validation Successful message will be displayed.
- Click Next Step to continue.
Step 4: Confirm Import
- Review the import summary.
- Click Confirm Import to complete the assignment process.

Viewing Assigned Projects
- Navigate to Timesheet > Project.
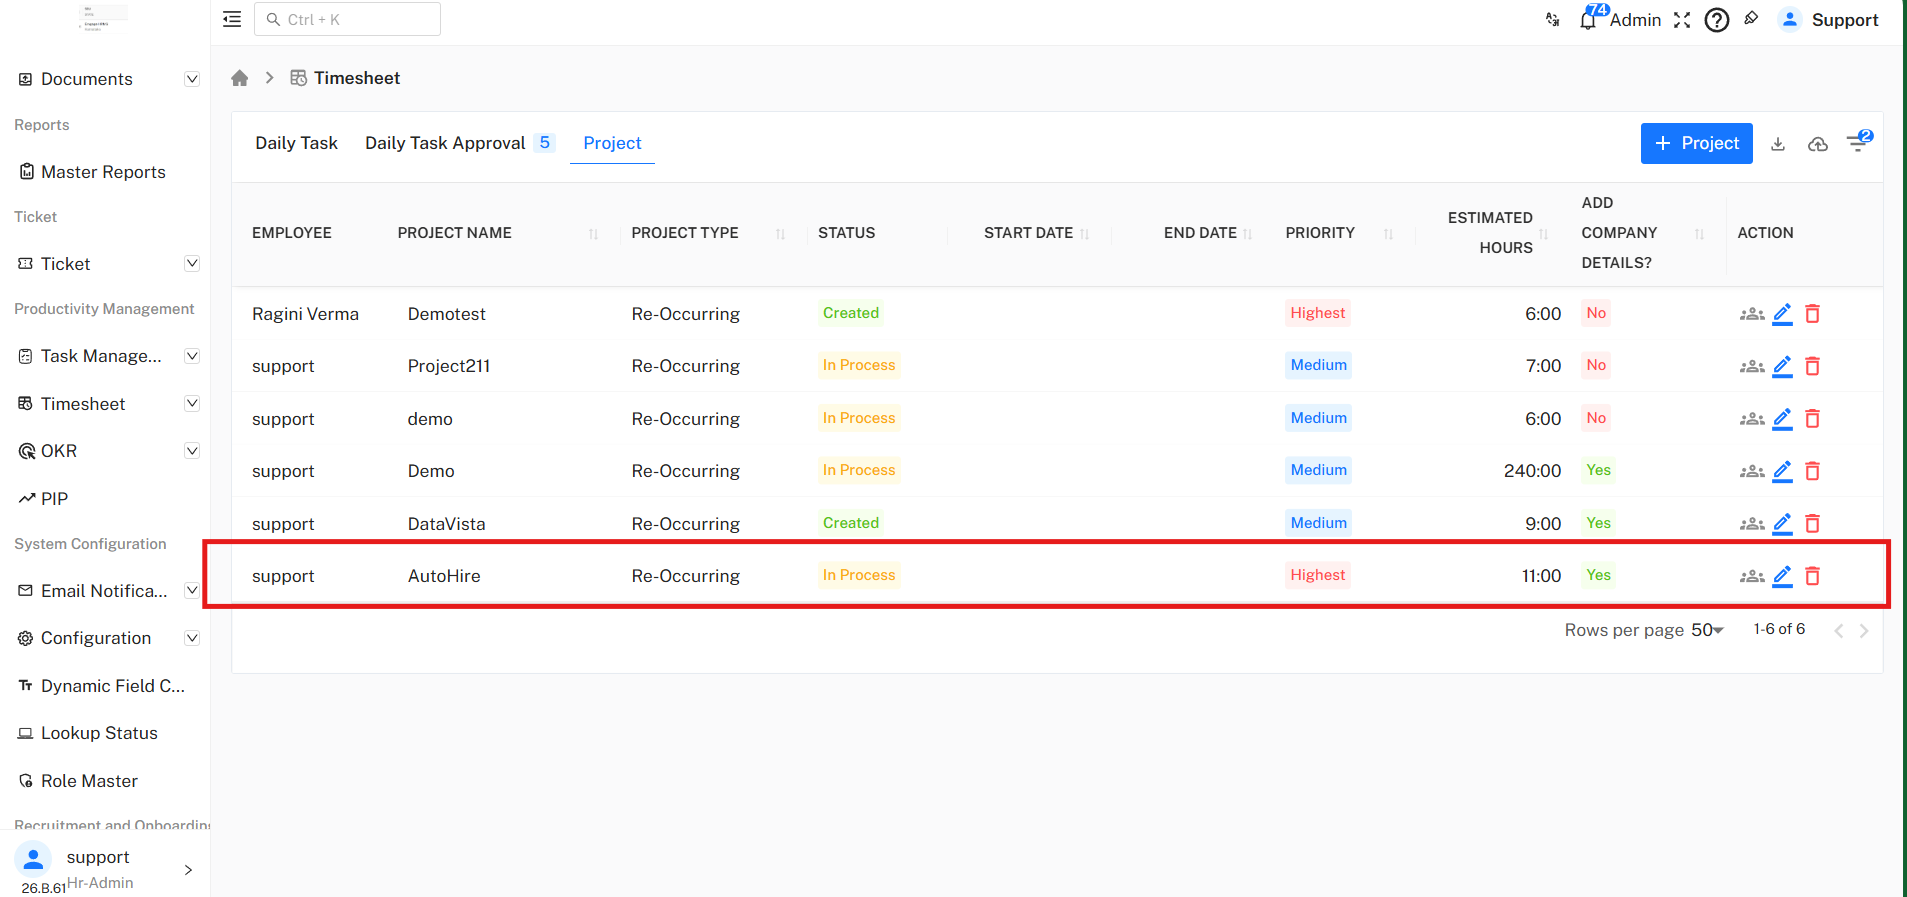
- Use the available filters to search for a specific employee.
- The system will display all projects assigned to the selected employee.
- Review the project details, status, priority, and estimated hours to confirm the assignment.
Result
After successful import:
- Projects will be assigned to the respective employees.
- Assigned projects will be visible under the Project tab.
- Employees can start logging timesheets against the assigned projects.
Important Notes
- Ensure the employee and project details in the import file are accurate.
- Any validation errors must be corrected before proceeding with the import.
- Only users with the required permissions can perform project assignments.
Export Data:
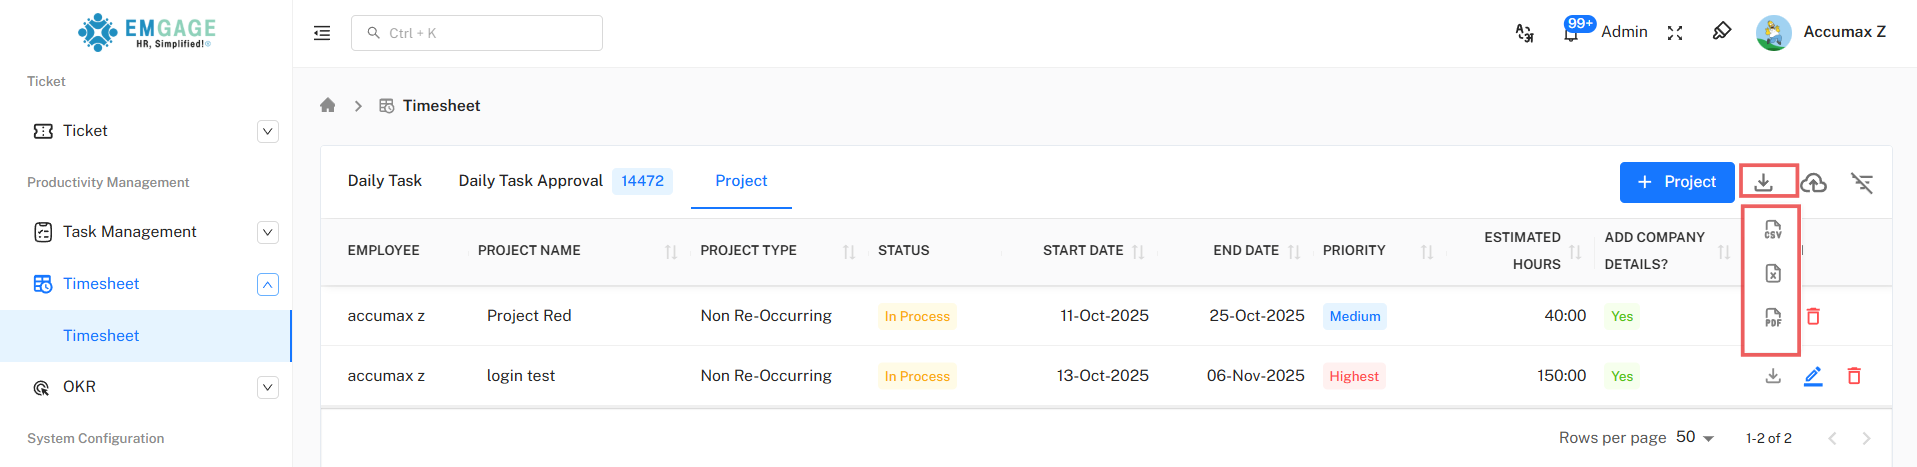
- Project Data can be exported in CSV, Excel (XLSX), or PDF formats.
Quick Reference Tables
Common Actions
| Action | Location | Button |
|---|---|---|
| Add new task | Daily Task tab | + Add Task (blue) |
| Submit tasks | Task form | Submit (blue) |
| Approve tasks | Daily Task Approval | Approve (blue) |
| Reject tasks | Daily Task Approval | Reject (red) |
| Create project | Project tab | + Project (blue) |
| Import data | Top toolbar | 📥 Download icon |
Troubleshooting
| Problem | Solution |
|---|---|
| Cannot submit task | Fill all fields with * |
| Time not calculating | Start Time must be before End Time |
| No projects in dropdown | Create project in Project tab first |
| Cannot approve | Check approval permissions |
| Import failed | Use sample file format |
| Task disappeared | Check which tab: Daily Task or Approval |
Best Practices
✅ Daily Task Tab:
- Log tasks daily, not weekly
- Use clear task names
- Mark billable correctly
- Add descriptions for clarity
- Attach proof (screenshots)
✅ Daily Task Approval Tab:
- Review tasks promptly
- Add remarks when rejecting
- Use bulk selection for efficiency
- Re-open tasks for corrections
✅ Project Tab:
- Create projects before tasks
- Set realistic estimated hours
- Choose appropriate priority
- Define clear task types
- Update status regularly