Separation Setup
Last Updated: October 22, 2025 Document Version: 1.0 Prepared for: Emgage HRMS Implementation Team
System Overview
The Separation Setup module under the Separation section manages all aspects of the employee exit process — including workflow configuration, notice period policies, and department clearance setup.
It ensures a standardized, transparent, and compliant exit process within the organization by allowing HR administrators to define policies, manage approvals, and assign department-level responsibilities.
Navigation Path
Path:
Separation → Separation Setup
Once accessed, the Separation Setup page displays three main tabs:
- Workflow – Default selected tab for configuring separation approval workflows.
- Notice Period – For defining notice period policies and applicability.
- Department Clearance – For managing department-specific clearance tasks during separation.
Each tab serves a unique function and contributes to the overall separation management process.
Feature Overview
| Feature | Description |
|---|---|
| Workflow Configuration | Define and manage approval requirements and interview dependencies for different separation types. |
| Notice Period Policies | Set and assign notice period durations based on employee category, department, or designation etc. |
| Department Clearance Setup | Create and manage clearance responsibilities for specific departments or reporting heads. |
Step 1: Workflow Configuration
Navigation
Separation → Separation Setup → Workflow
(Default page opens here.)
Table Fields
- Name: Lists types of separation such as Retirement, Resignation, End of Contract, Termination.
- Application Approval: Indicates whether application approval is Required or Not Required.
- Department Clearance: Defines if clearance from departments is Required or Not Required.
- Department Clearance Initiation: Shows when clearance should start: Auto, Manual, or X days before relieving date.
- Exit Interview Required: Specifies if an exit interview is Required or Not Required.
- Action: Contains multiple buttons for managing each workflow record.
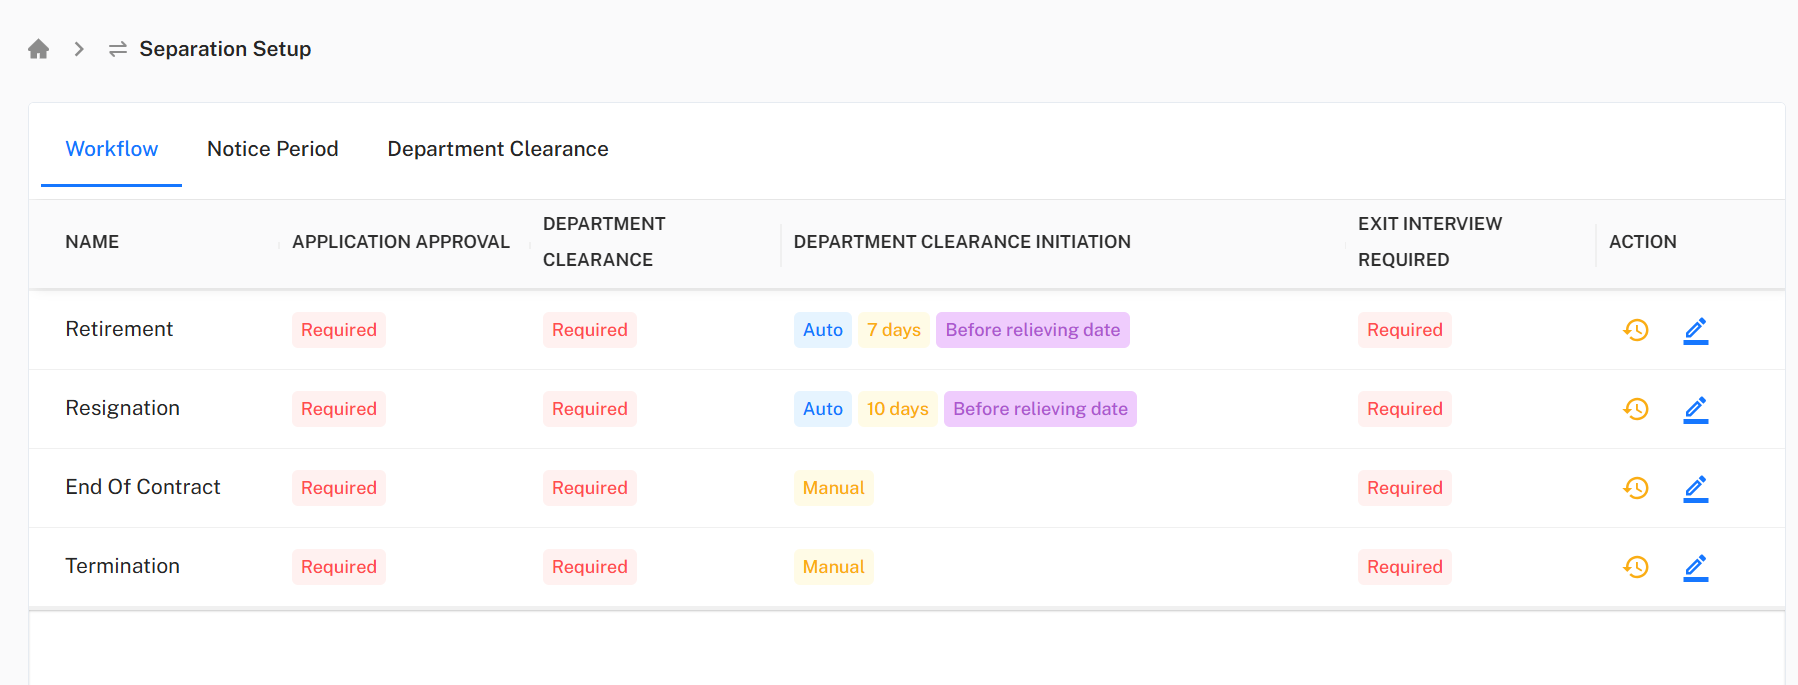
Action Field Details
The Action column in the Workflow table provides administrators with buttons to manage each workflow record individually.
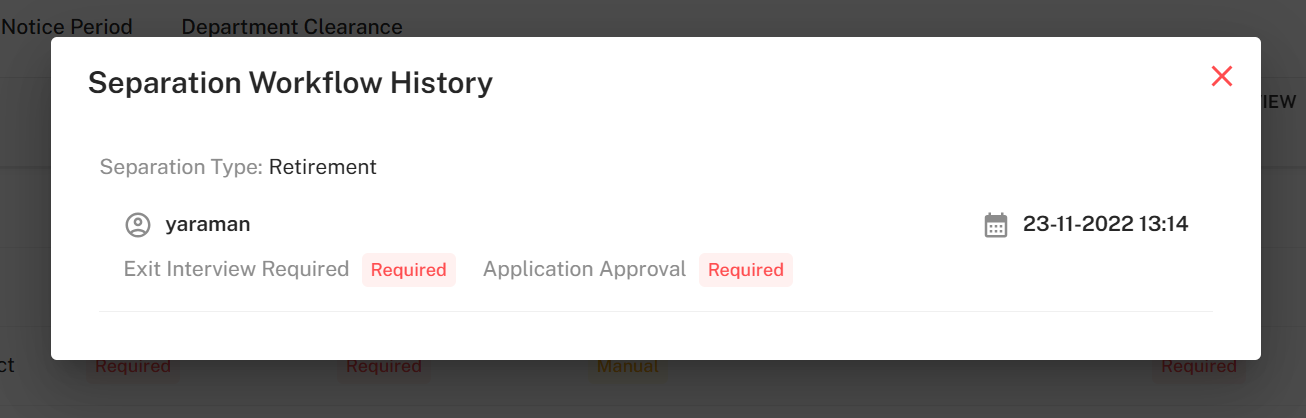
- History Button Clicking the History button opens a popup that displays all past changes and updates made to the workflow. This maintains an audit trail and allows administrators to track modifications over time.
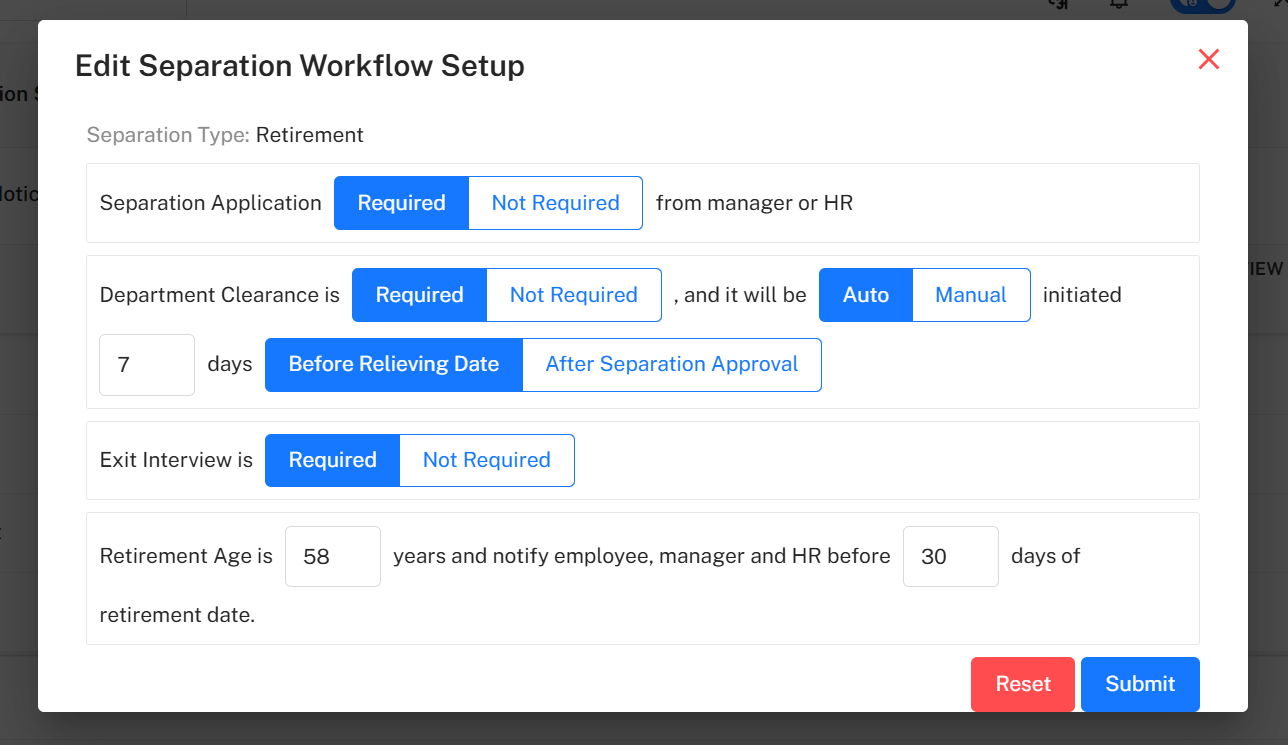
- Edit Button The Edit button opens the Edit Separation Workflow Setup popup, where administrators can modify workflow settings for the selected separation type.
Step 2: Notice Period Configuration
Navigation
Separation → Separation Setup → Notice Period
Table Fields
- Policy Name: The name of the notice period policy.
- Notice Period During Probation: Duration of notice period for probationary employees.
- Notice Period After Confirmation: Duration of notice period for confirmed employees.
- Effective Date: Date from which the policy is effective.
- Status: Indicates whether the policy is Active or Inactive.
- Action: Includes buttons to view Employee List, History, and Edit.

Action Field Details
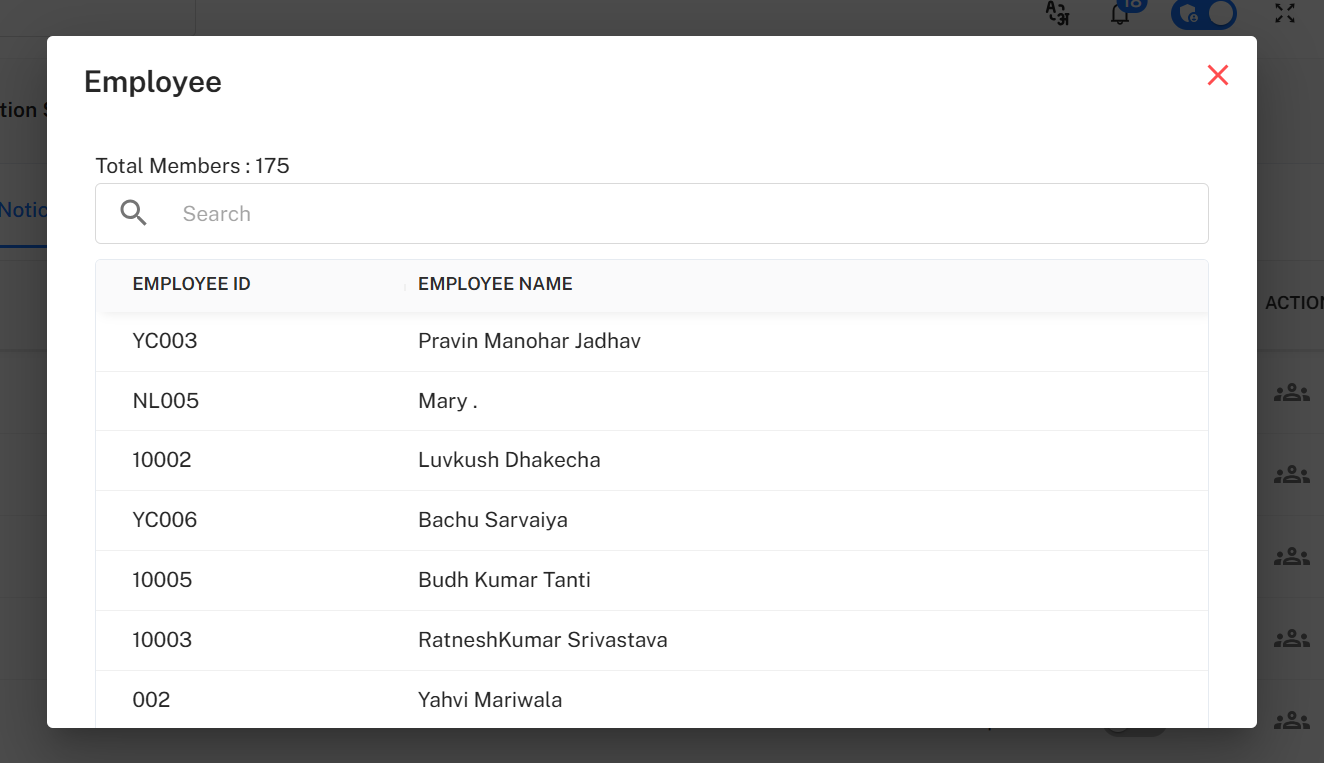
- Employee Button Clicking this button displays a list of employees to whom this notice period policy has been applied.
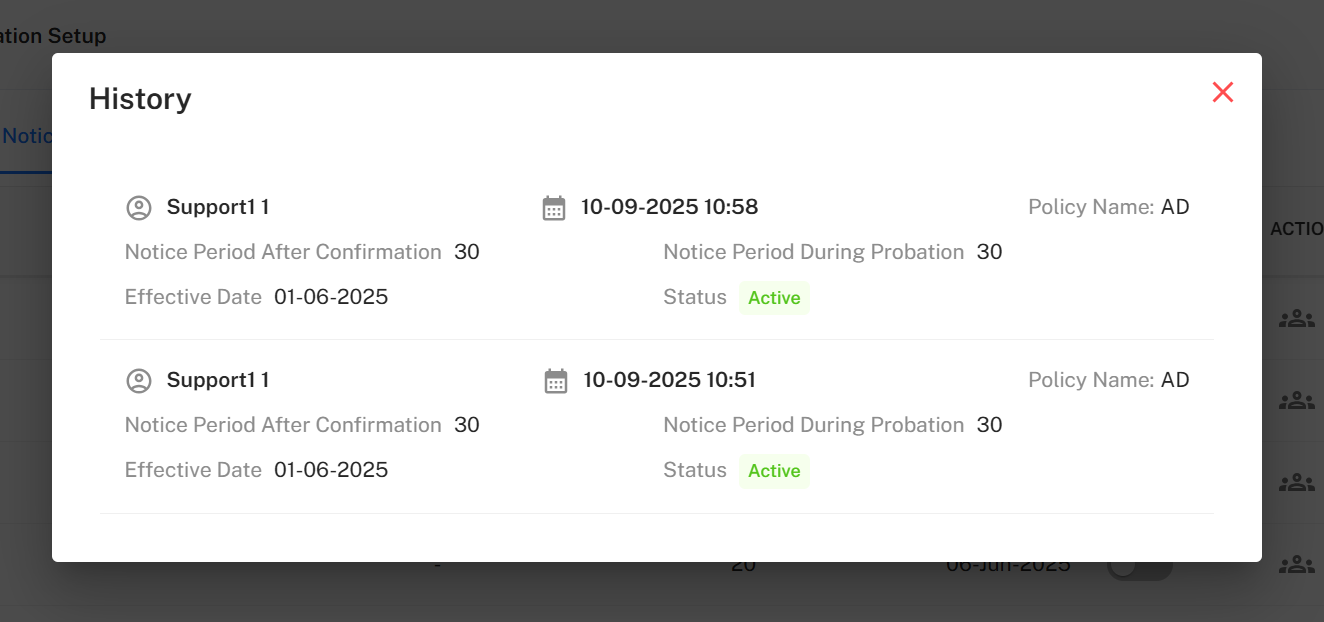
- History Button
Shows all changes made to the policy, providing a complete audit trail.
- Edit Button
Opens a popup to modify existing notice period details.

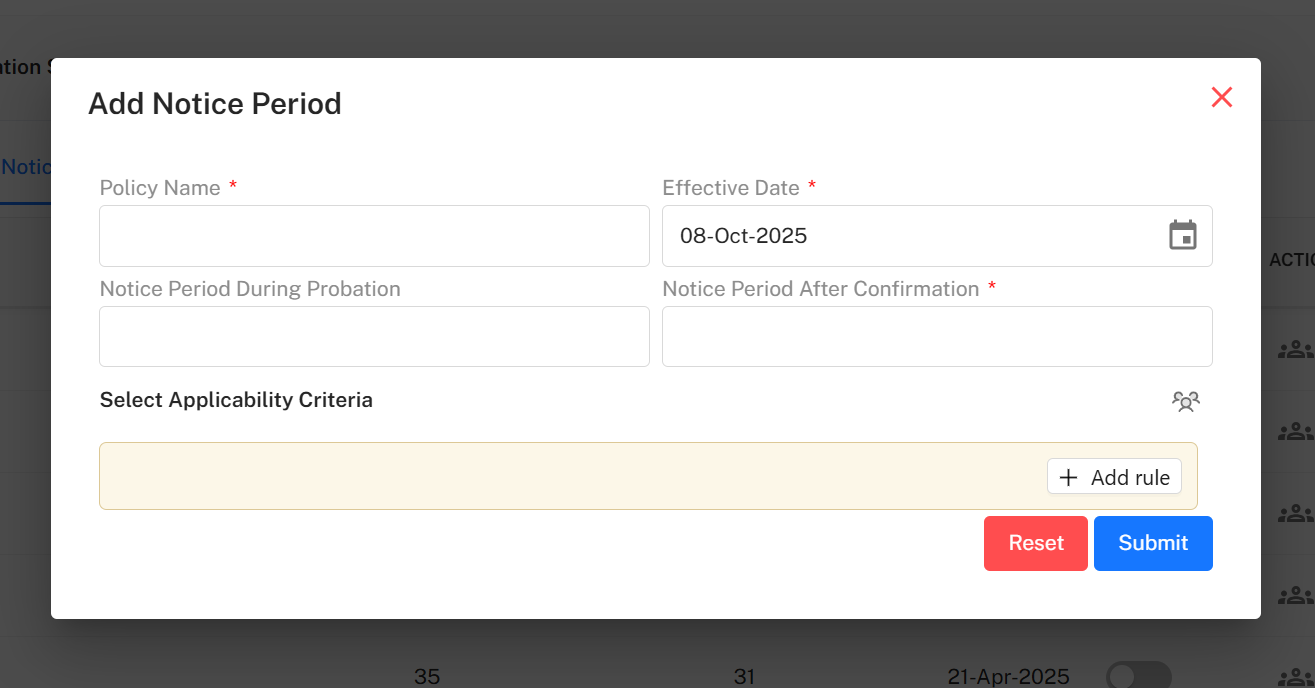
+ Add Notice Period
Clicking + Add opens the Add Notice Period popup to create a new policy.
Form Fields:
- Policy Name* – Unique name for the notice period policy.
- Effective Date* – The date when the policy will become active.
- Notice Period During Probation – Optional field for probationary duration.
- Notice Period After Confirmation* – Mandatory duration for confirmed employees.
- Select Applicability Criteria* – Decide which group the policy applies to:
- Employee: Select specific employees manually.
- Department: Assign to all employees under a department.
- Designation, Branch, or SBU: Assign policy by these categories.
Buttons:
- Reset – Clears all input fields.
- Submit – Saves and activates the policy.
- ** (Close)** – Closes the popup without saving.
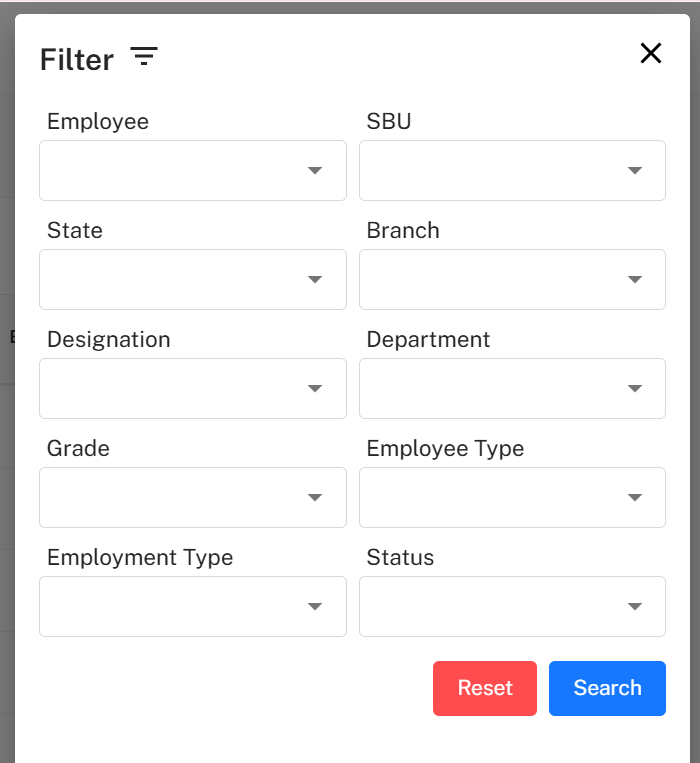
Filter Notice Periods
Click the Filter button to refine or search specific policies.
Filter Fields:
- Employee
- SBU
- State
- Branch
- Designation
- Department
- Grade
- Employee Type
- Employment Type
- Status
Filter Controls:
- Search – Apply filters.
- Reset – Clear all selections.
- ** (Close)** – Exit without applying filters.
Step 3: Department Clearance Configuration
Navigation
Separation → Separation Setup → Department Clearance
Table Fields
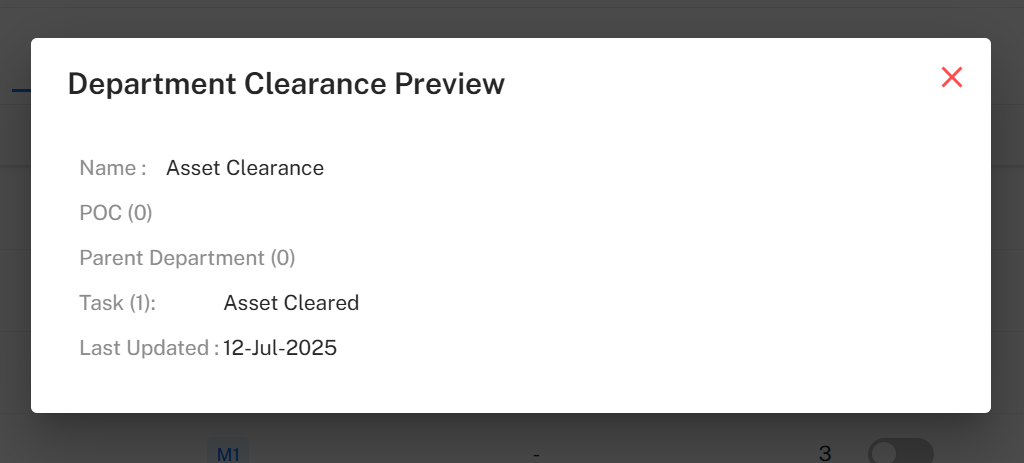
- Name: Name of the department clearance setup (e.g., HR Clearance, Asset Clearance).
- POC: Point of Contact for the clearance process.
- Department: The department responsible for this clearance.
- Task: Task description to be completed during clearance.
- Status: Active/Inactive toggle (slider).
- Action: Includes buttons to View, History, and Edit.
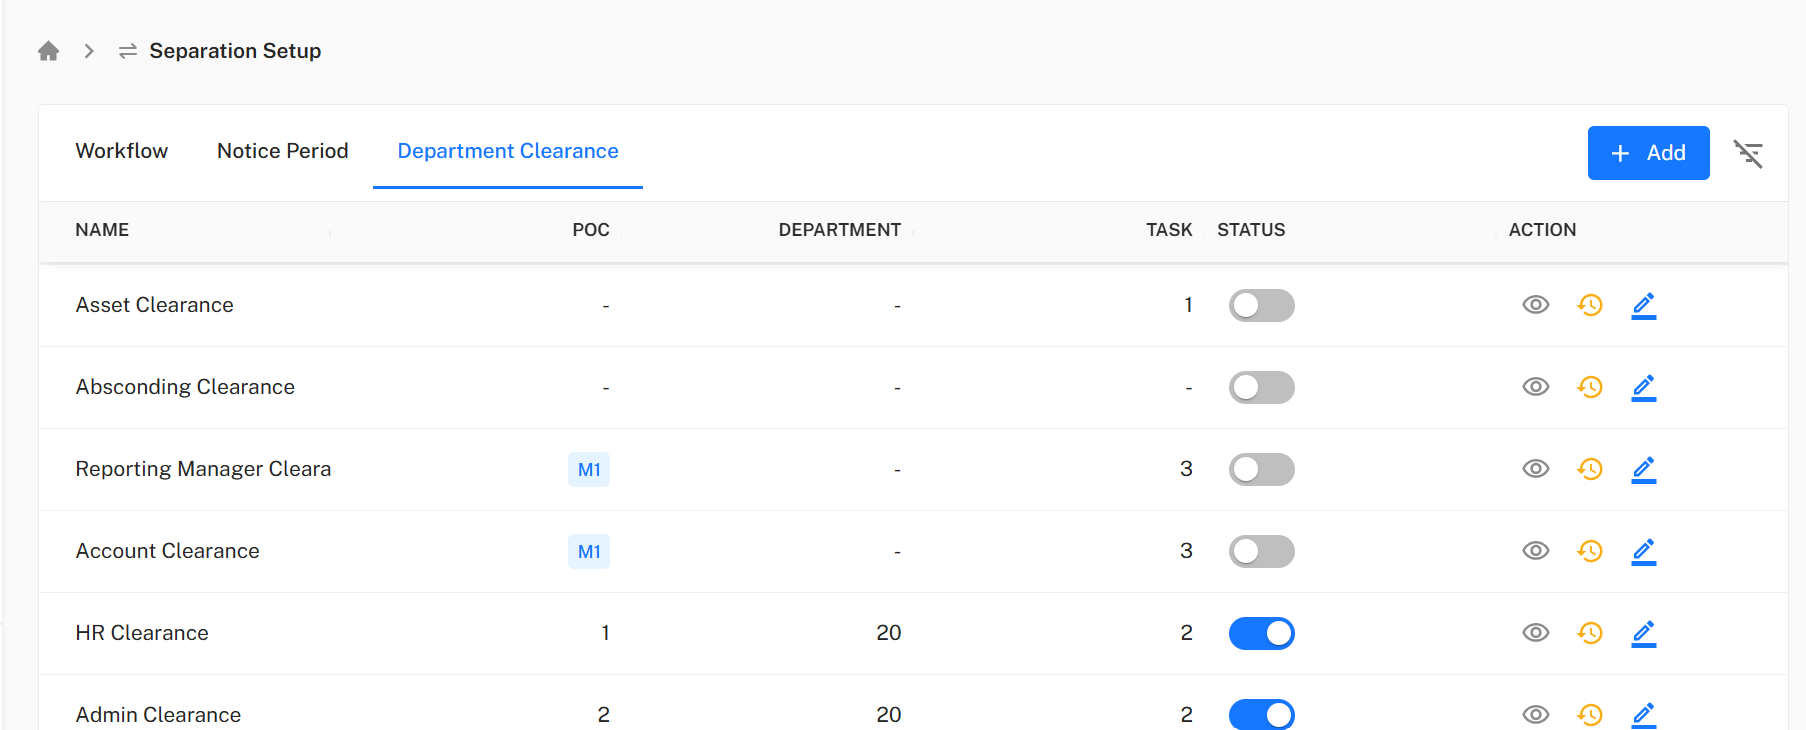
Action Field Details
- View Button Opens a detailed view of the clearance tasks for that department.
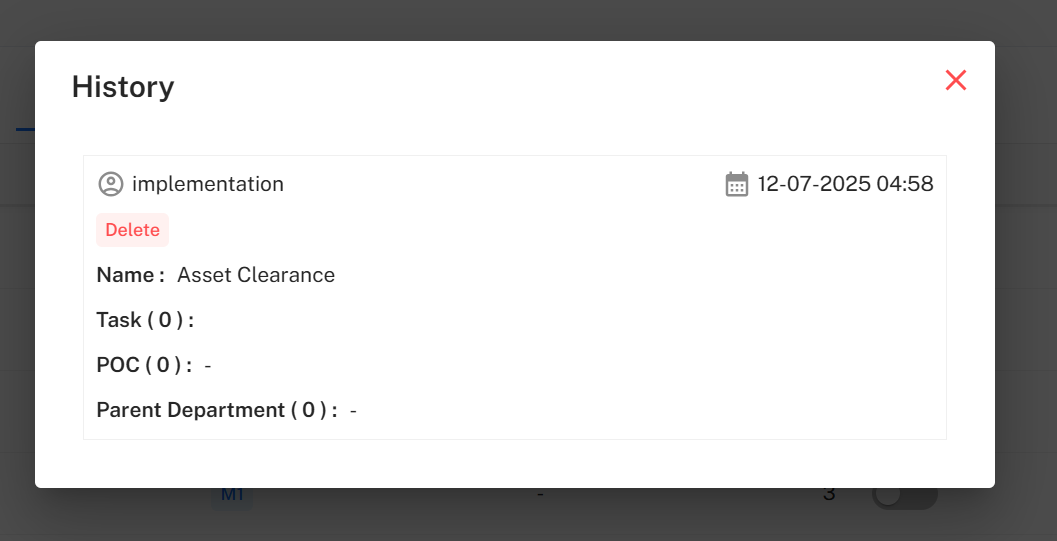
- History Button Displays all changes made to the department clearance setup.
- Edit Button Opens a popup to edit clearance details including tasks, POC, and department.
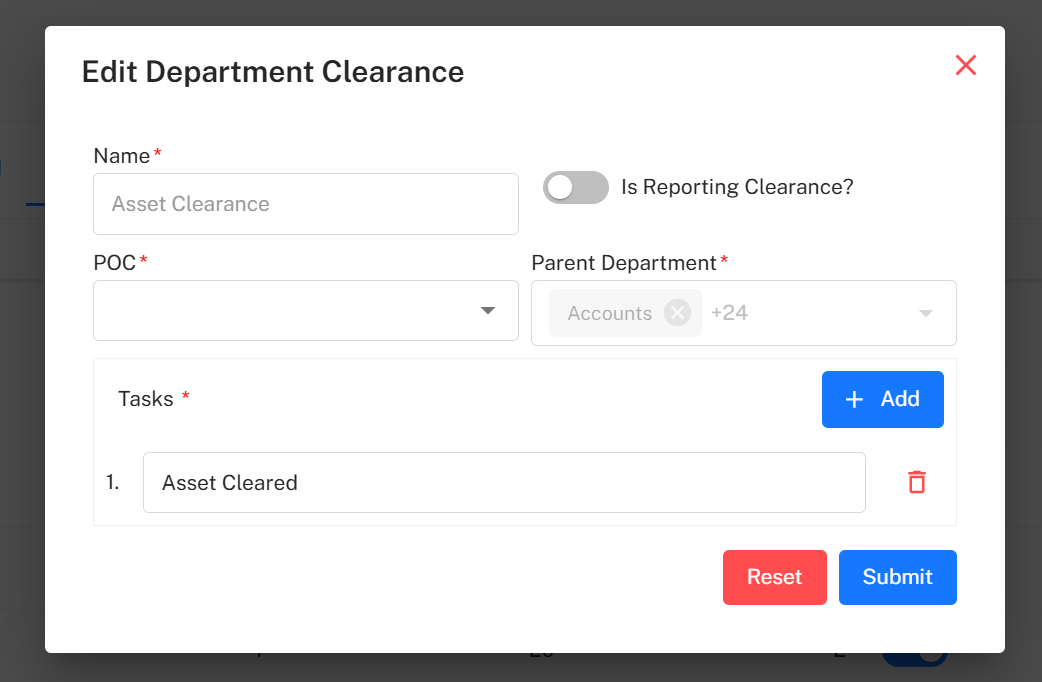
+ Add Department Clearance
Click + Add to define a new department clearance setup.
Form Fields:
- Name* – Unique clearance setup name.
- POC* – Person responsible for managing the clearance.
- Parent Department* – Department under which the clearance applies.
- Is Reporting Clearance? – On/Off toggle to specify if it’s a reporting-related clearance.
- Tasks* – Add specific clearance tasks using the + Add button.
- Each task added can be removed using the Delete () button beside it.
Buttons:
- Reset – Clears all entries.
- Submit – Saves and activates the clearance configuration.
- ** (Close)** – Closes the popup.

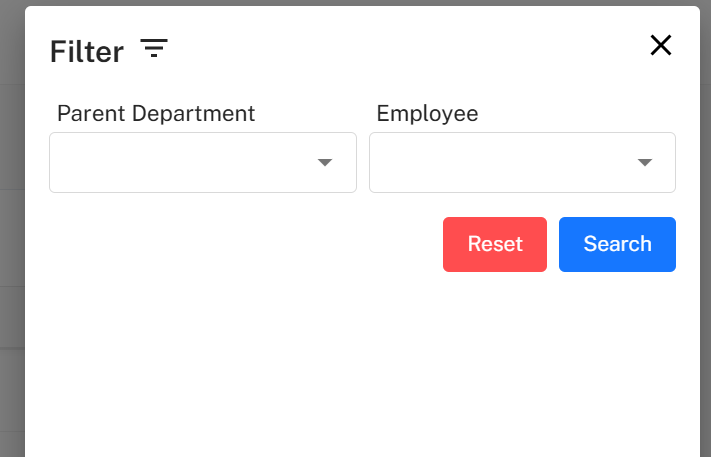
Filter Department Clearance
Click Filter to refine the department clearance table.
Filter Fields:
- Parent Department
- Employee
Actions:
- Search – Apply selected filters.
- Reset – Clear all filters.
- ** (Close)** – Exit the popup.
Example Workflow Summary
- Go to Separation → Separation Setup.
- Review and edit Workflows to define approval and interview requirements.
- Move to Notice Period to create or modify notice policies.
- Assign notice periods based on employee, department, or designation.
- Configure Department Clearance by adding departments, tasks, and POCs.
- Apply filters for targeted search and record review.
- Update or deactivate existing setups as needed.
Best Practices
- Always verify that every employee has a valid Notice Period Policy assigned to prevent separation errors.
- Keep Department Clearance tasks specific and actionable (e.g., “Return company laptop”, “Complete final HR interview”).
- Use History Logs to audit changes in workflows or policies.
- Enable Exit Interview Required where applicable to ensure proper feedback collection.