Microsoft Azure SSO — Setup Guide for Emgage HRMS
Audience: Client IT / Azure administrator and Emgage HR administrator
Purpose: Enable employees to sign in to Emgage using their existing Microsoft (Azure Entra ID) account
Reference: Ticket 50054 — verified end-to-end on the Emgage Azure environment
1. What You Will Achieve
After this setup, an employee opens Emgage, clicks Login with Microsoft, signs in with the company Microsoft account they already use for Outlook/Teams, and lands directly in Emgage. No separate Emgage password is required.
Time required: About 20 minutes
You Will Need
| Role | Access Needed |
|---|---|
| Azure administrator | Permission to create an App Registration in the company's Azure tenant |
| Emgage administrator | Access to Configuration → Integration → SSO Setup in Emgage |
Keep both screens open side by side. You will copy values back and forth between them.
2. How It Works
Emgage never sees the employee's Microsoft password. Microsoft verifies the employee and then tells Emgage who just signed in. Emgage matches that person to an employee record and creates the session.
Login Journey
- Employee clicks Login with Microsoft in Emgage.
- Browser goes to the Microsoft sign-in page.
- Employee signs in, including MFA if the company enforces it.
- Microsoft sends a one-time code back to Emgage at a pre-agreed address — the Redirect URI.
- Emgage exchanges that code, using the Client ID and Client Secret, for the employee's identity details.
- Emgage matches the identity to an employee record.
- Match found → employee is signed in. No match → login is refused.
2.1 Two Redirect URIs — The Single Most Important Point
Emgage uses two addresses, and both must be registered in Azure:
| # | Redirect URI | Registered in Azure as | Used by |
|---|---|---|---|
| 1 | .../sso<N>/login/oauth2/code/<CompanyName> | Web | Everyday employee login |
| 2 | .../configuration/sso-test-callback | Single-page application | The Verify button in Emgage |
If only one is registered, one of the two will fail. Emgage will prompt you for the second one at the right moment (Step 7), so simply follow the order in this guide.
3. Step 1 — Create the App Registration in Azure
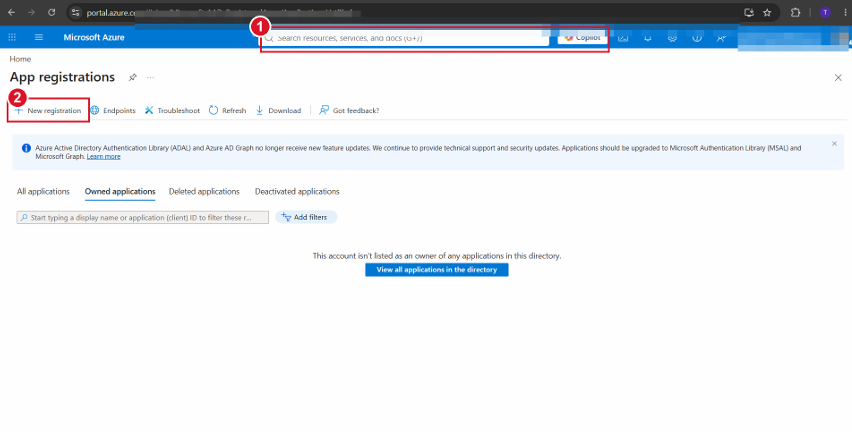
Go to https://portal.azure.com and sign in with an administrator account.
- In the top search bar, type App registrations and open it.
- Click + New registration.
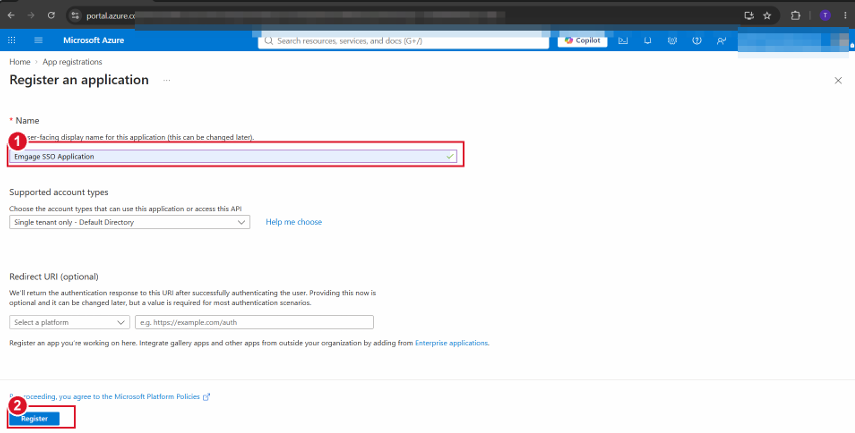
- Name: Enter something recognisable, for example
Emgage SSO Application. - Supported account types: Leave Single tenant (Accounts in this organizational directory only).
- Leave Redirect URI empty for now — it is added in Step 6.
- Click Register.
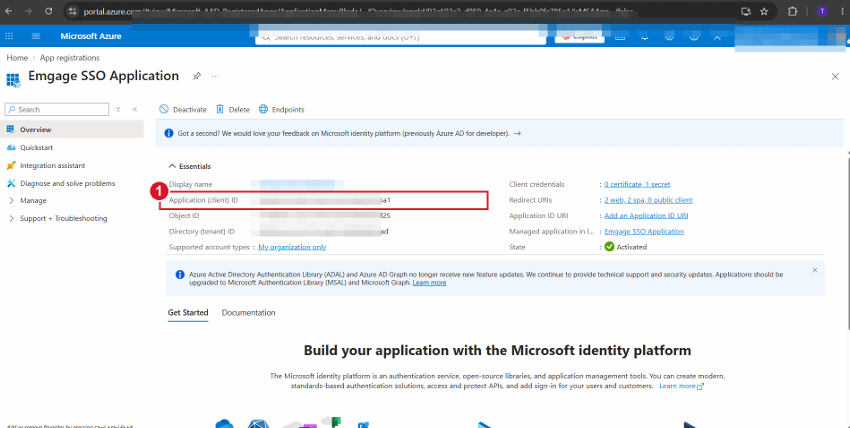
The application Overview page opens. Every value in the next steps is collected from this page.
4. Step 2 — Client ID
On the Overview page, copy Application (client) ID.
In Emgage, open:
Configuration → Integration → SSO Setup → Microsoft Azure AD
Paste the Application (client) ID into Client ID.
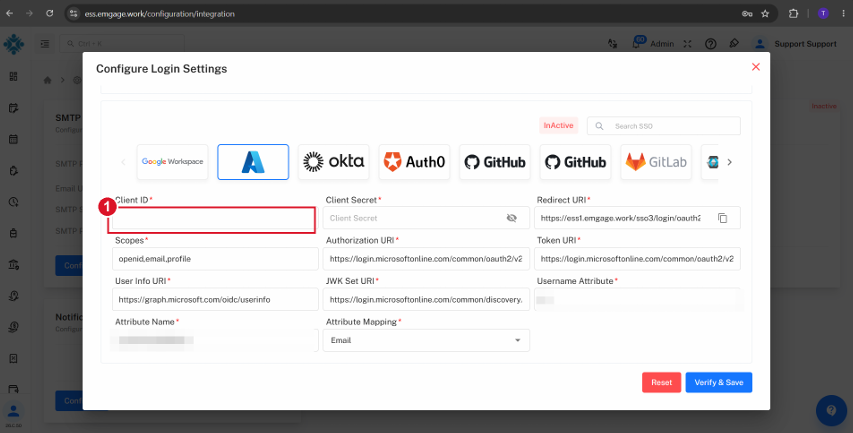
Important: Application (client) ID in Azure = Client ID in Emgage. They are the same value under two different names.
5. Step 3 — Client Secret
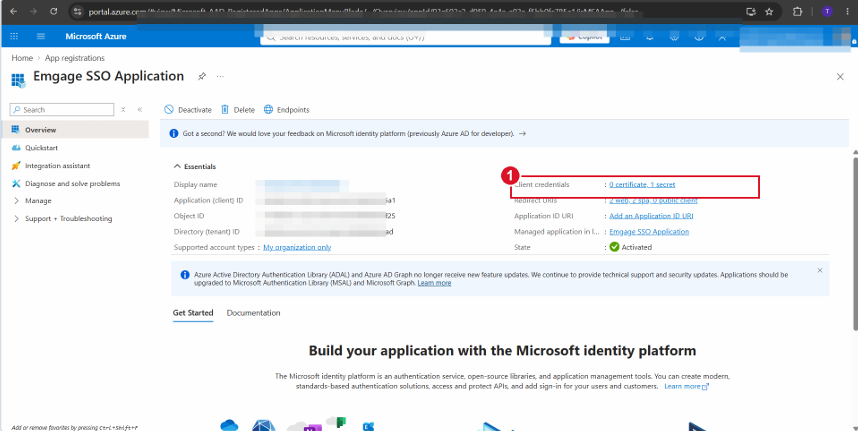
- On the Overview page, click Client credentials (shown as 0 certificate, 1 secret).
- On the Certificates & secrets page, click + New client secret.
- Give it a description and select an expiry period.
- Click Add.
- Copy the Value column immediately.
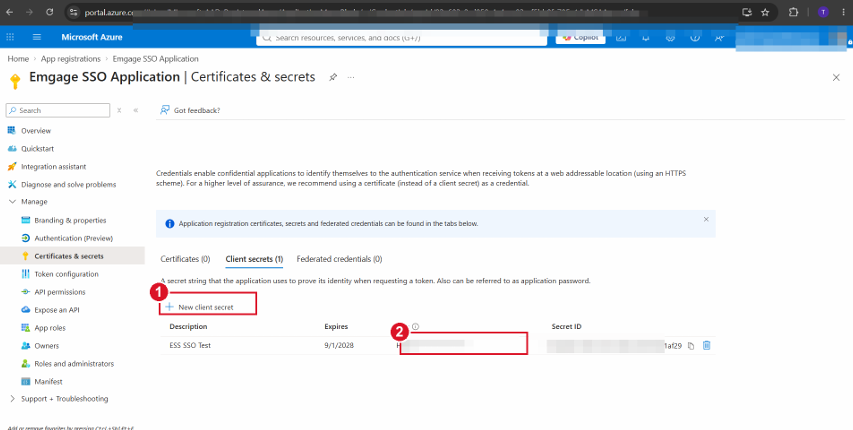
Important: Copy the Value, not the Secret ID. The Value is shown only once. Once you navigate away it is hidden forever and you must create a new secret.
Paste the secret into Client Secret in Emgage.
Client Secret Expiry
Note the expiry date. When the secret expires, SSO stops working for everyone. Create a new secret and update Emgage before that date.
6. Step 4 — Endpoints and Tenant ID
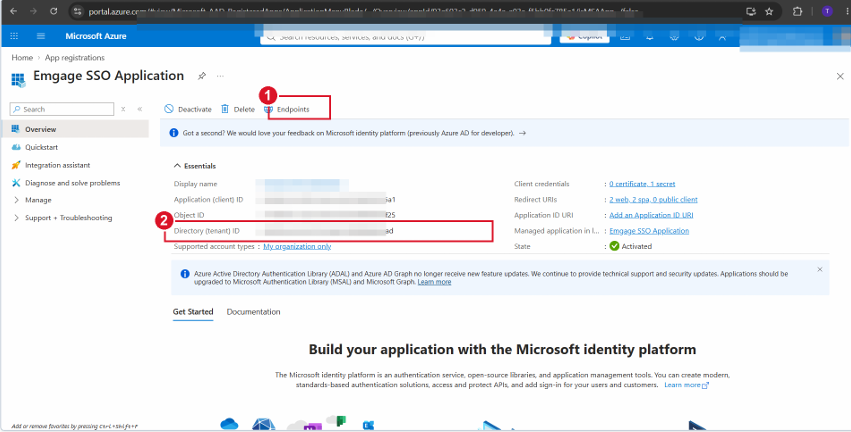
- On the Azure Overview page, click Endpoints in the top toolbar.The Directory (tenant) ID is on the same page.
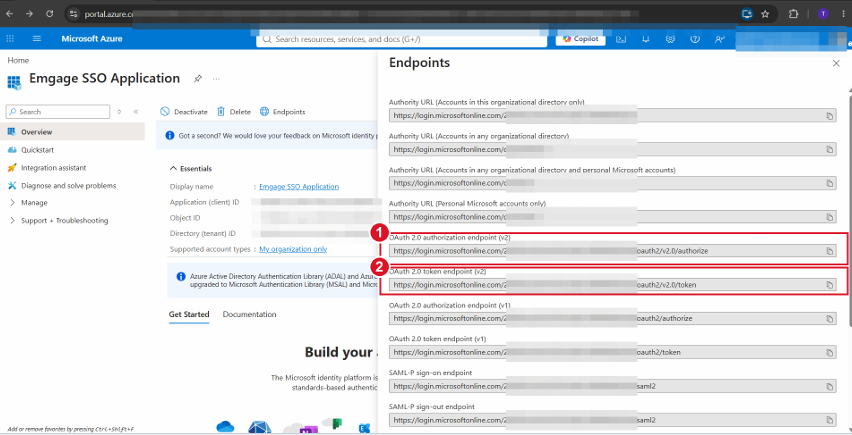
- In the Endpoints panel, use the OAuth 2.0 endpoints marked (v2) — not the (v1) ones.
- Enter the following values in Emgage, replacing
<TENANT_ID>with your Directory (tenant) ID.
| Emgage Field | Value |
|---|---|
| Scopes | openid,email,profile |
| Authorization URI | https://login.microsoftonline.com/<TENANT_ID>/oauth2/v2.0/authorize |
| Token URI | https://login.microsoftonline.com/<TENANT_ID>/oauth2/v2.0/token |
| User Info URI | https://graph.microsoft.com/oidc/userinfo |
| JWK Set URI | https://login.microsoftonline.com/<TENANT_ID>/discovery/v2.0/keys |
Using your Tenant ID instead of common restricts sign-in to your own organisation's accounts. This is the recommended setting.
7. Step 5 — Decide How Employees Are Matched
Microsoft confirms who signed in. Emgage still has to find the matching employee record.
Three fields control this:
| Emgage Field | What It Means |
|---|---|
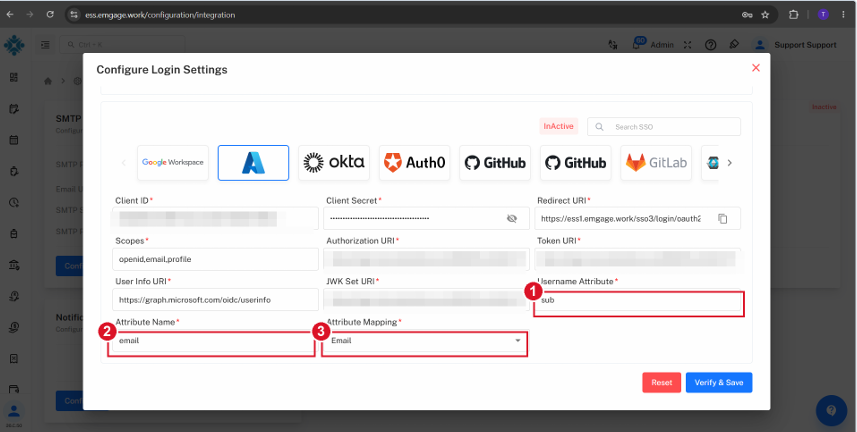
| Username Attribute | The unique identifier Emgage reads from Microsoft's response. For Azure, use sub. |
| Attribute Name | The field whose value is matched against the employee record. |
| Attribute Mapping | What that value is matched against — Email or Employee ID. |
Choose one of the three options below.
Option A — Microsoft Username Is the Same as the Employee's Official Email
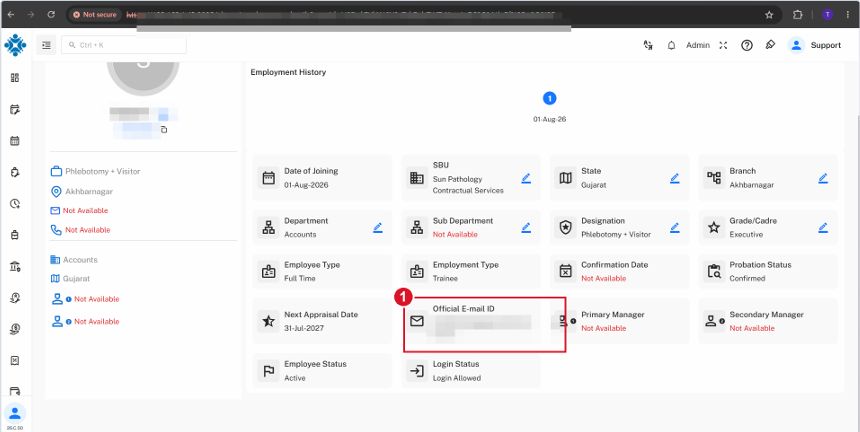
Use this when the employee's Microsoft sign-in name already equals the Official E-mail ID on their Emgage profile.
| Field | Value |
|---|---|
| Username Attribute | sub |
| Attribute Name | preferred_username |
| Attribute Mapping | Email |
The Official E-mail ID lives on the employee's Emgage profile.
Option B — A Different Email Address Should Be Used
Use this when the employee's Microsoft sign-in name is not the address you want to match on.
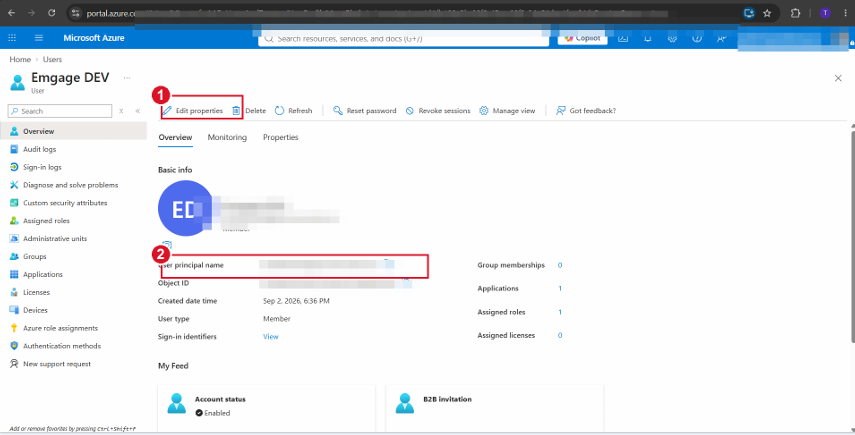
- In Azure, search for Users, open the employee, and click Edit properties.
- Open the Contact Information tab.
- Set Email to the address that will be matched.
- Click Save.
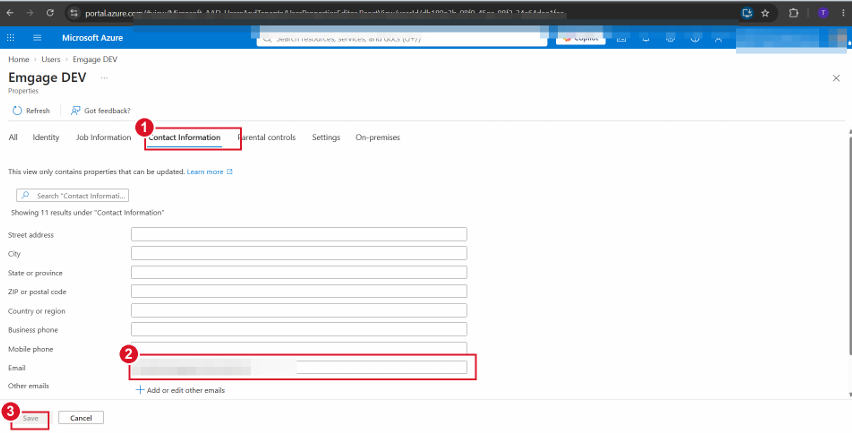
- The same address must be the Official E-mail ID on the employee's Emgage profile.
| Field | Value |
|---|---|
| Username Attribute | sub |
| Attribute Name | email |
| Attribute Mapping | Email |
Option C — Match on Employee ID Instead of Email
Use this when employee codes are the reliable identifier rather than email.
This option needs three extra steps first. Microsoft does not send the employee ID to Emgage by default. You must store it on the user, publish it as a claim, and switch on mapped claims for the application.
Skipping any of the three makes verification fail with:
Attribute "employeeid" not present
C1 — Store the Employee ID on the Azure User
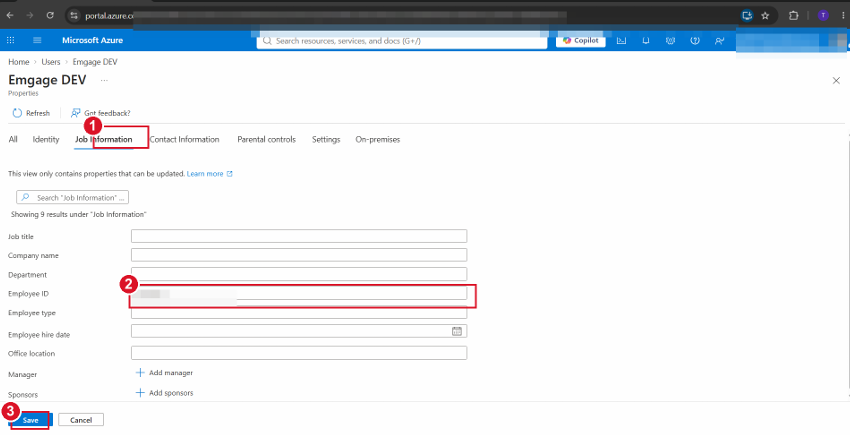
- In Azure, open the user → Edit properties → Job Information tab.
- Set Employee ID to exactly the employee code used in Emgage.
- Click Save.
C2 — Publish the Employee ID as a Claim
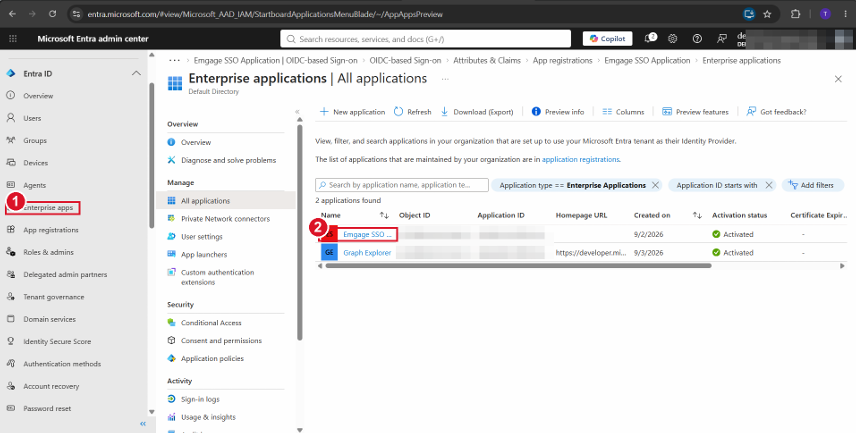
- Go to https://entra.microsoft.com and open Enterprise applications → All applications, Open the application you registered.
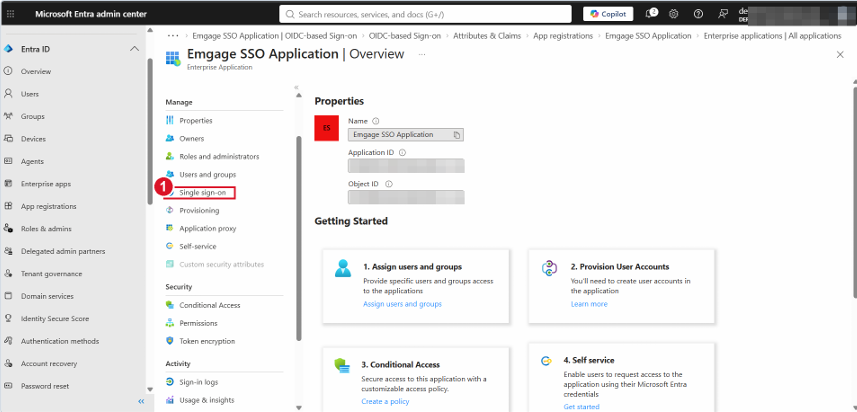
- Open Single sign-on.
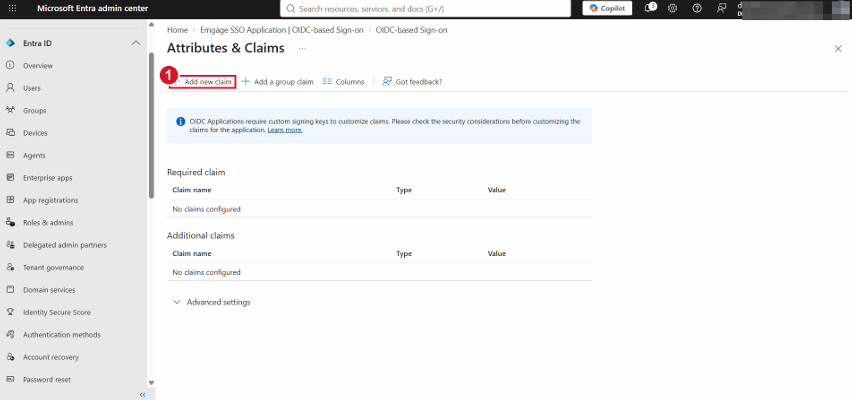
- Under Attributes & Claims, click Edit. then Click + Add new claim.
- Fill in the claim as follows:
| Field | Value |
|---|---|
| Name | employeeid |
| Namespace | Leave empty |
| Source | Attribute |
| Source attribute | user.employeeid |
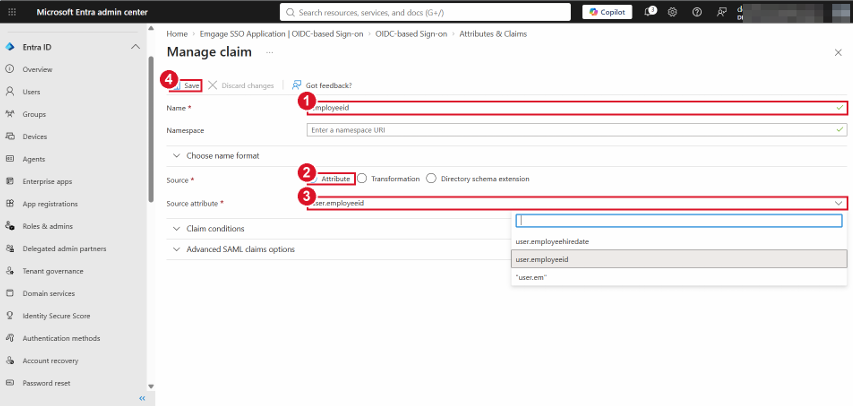
Important: The Name you enter here is exactly what goes in Emgage's Attribute Name field later. Keep it lowercase —
employeeid— and type it identically in both places.
C3 — Allow Mapped Claims in the Application Manifest
-
Go to App registrations, Open the same application and Select Manifest.
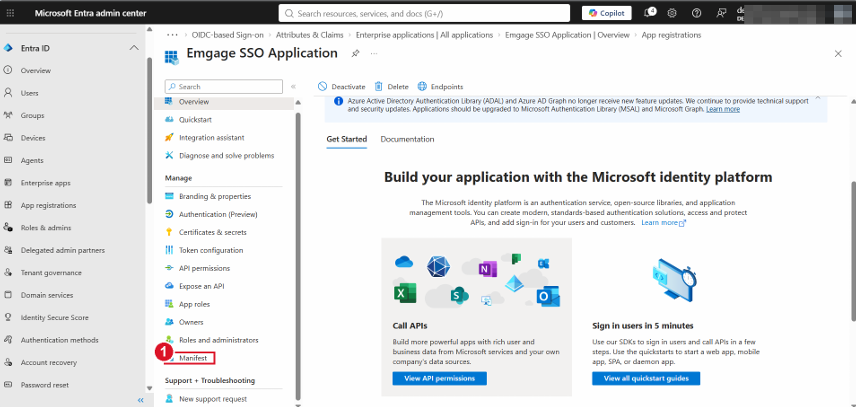
-
On the Microsoft Graph App Manifest (New) tab, find
acceptMappedClaims, Change its value fromnulltotrue, Click Save.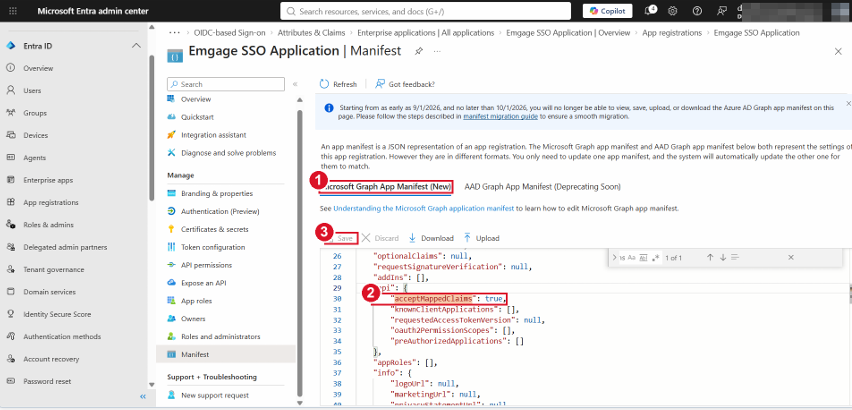
Without
acceptMappedClaims: true, Microsoft accepts the claim configuration but refuses to send the value, and Emgage sees nothing.
C4 — Enter the Values in Emgage
Return to https://portal.azure.com for the remaining steps, and set these values in Emgage:
| Field | Value |
|---|---|
| Username Attribute | sub |
| Attribute Name | employeeid |
| Attribute Mapping | Employee Id |
Important: Whichever option you choose, the value in Azure and the value in Emgage must match exactly — same spelling, same case, no extra spaces. A mismatch is the most common reason a single employee cannot log in while everyone else can.
8. Step 6 — Register the Web Redirect URI
-
In Emgage, the Redirect URI field is filled in automatically and cannot be edited. Click the copy icon next to it.
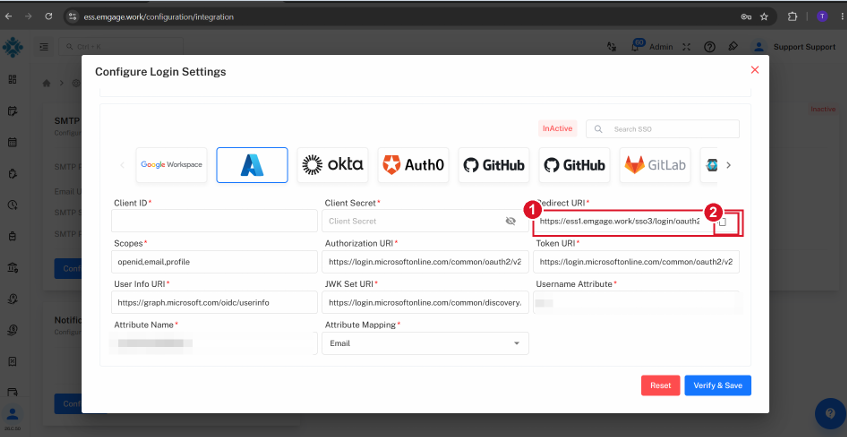
-
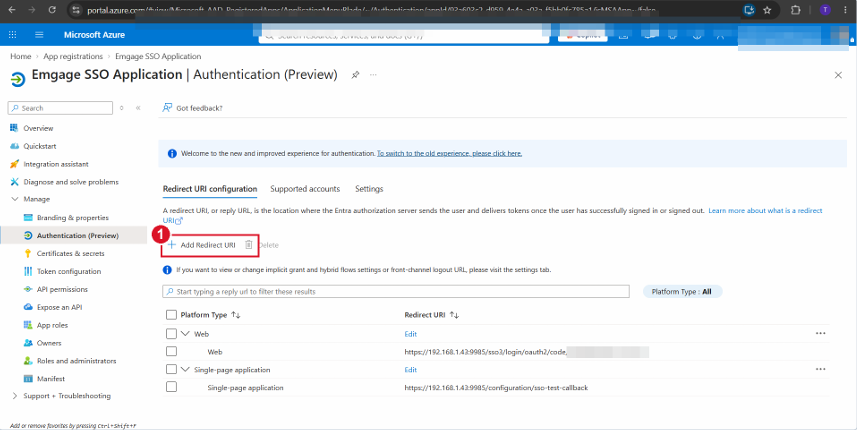
In Azure, from the Overview page open Redirect URIs.
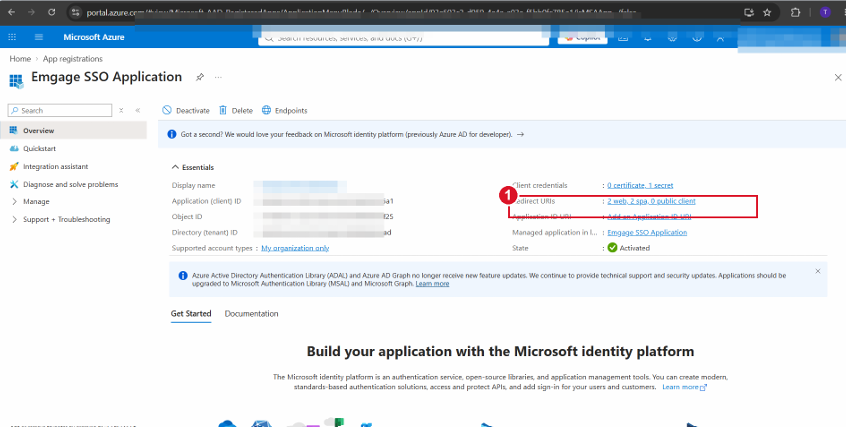
-
Click + Add Redirect URI.
-
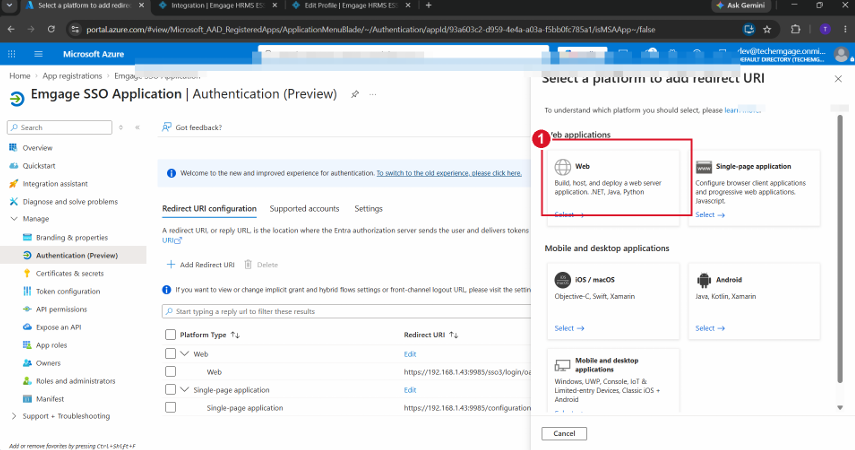
Choose the Web platform.
-
Paste the copied URI and click Configure.
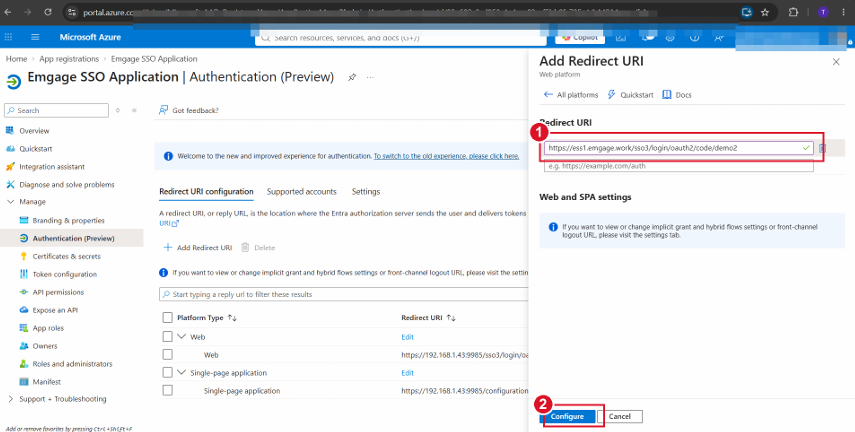
Important: Paste it exactly as copied — no trailing slash and no changed capitalisation. Azure requires a character-for-character match.
9. Step 7 — Verify and Save
-
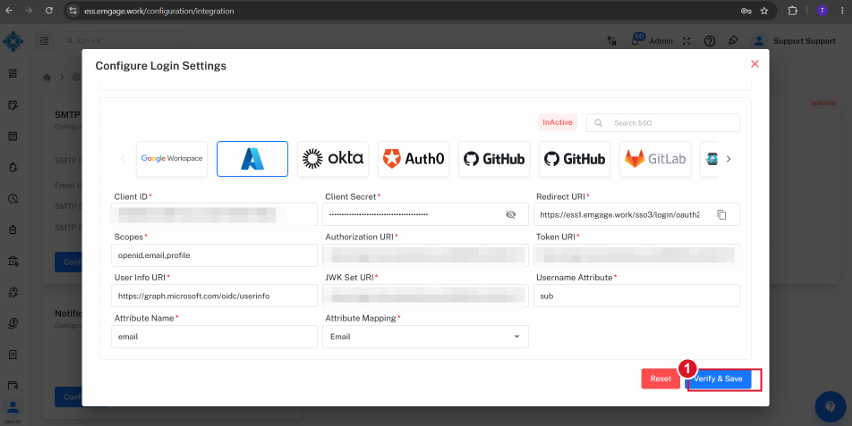
Back in Emgage, confirm the attribute fields from Step 5 are set.
-
Click Verify & Save.
-
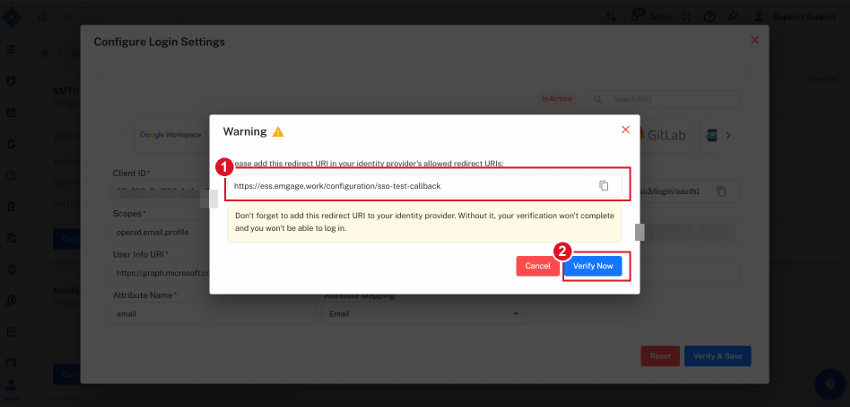
A Warning dialog appears showing a second Redirect URI — the test callback address. Copy it.
-
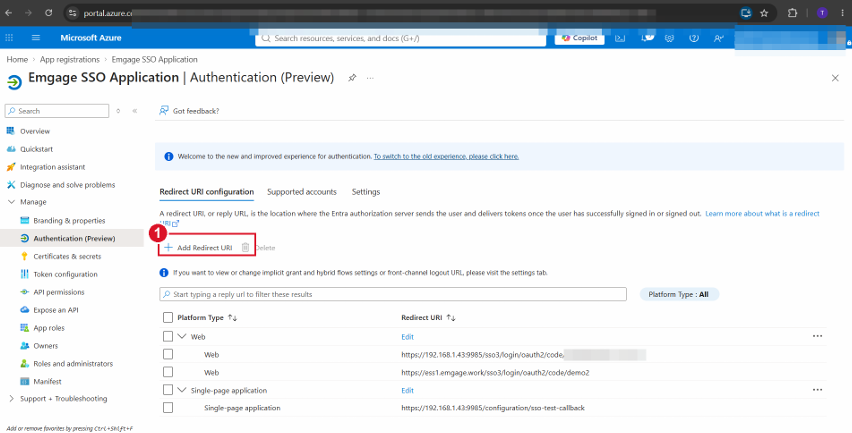
Go back to Azure → Add Redirect URI.
-
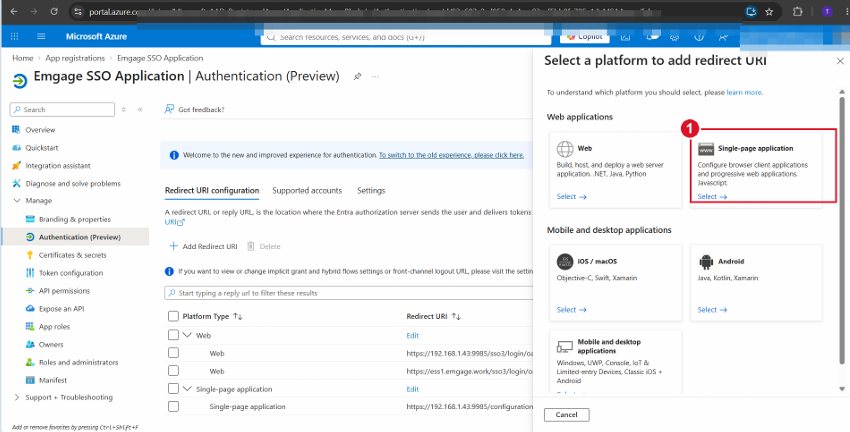
This time choose Single-page application, paste the copied URI.and click Configure.
-
Return to Emgage and click Verify Now.
-
A Microsoft sign-in window opens. Sign in with a real employee account that exists in both Azure and Emgage.
Successful Verification
On success:
- A confirmation message appears.
- The configuration is saved automatically.
- The status changes to Active.
- SSO is now live.
Failed Verification
On failure:
- The exact reason is shown on screen.
- Nothing is saved.
- See the troubleshooting section below.
10. Step 8 — Confirm It Works
| # | Check | Expected Result |
|---|---|---|
| 1 | SSO Setup status | Shows Active |
| 2 | Employee clicks Login with Microsoft | Signs in and reaches the dashboard |
| 3 | Employee present in Azure but not in Emgage | Login refused with a clear message |
| 4 | Log out, then log in again | Works without re-entering configuration |
11. Troubleshooting
| Message or Symptom | Cause | What to Do |
|---|---|---|
| AADSTS50011 — redirect URI mismatch | The URI in Azure does not exactly match the one in Emgage | Re-copy the URI from Emgage and paste it again. Check for a trailing slash or http vs https. |
| Verify works, but employee login fails | Only the Single-page application URI was registered | Add the Web platform URI as well (Step 6). |
| Employee login works, but Verify fails | Only the Web URI was registered | Add the Single-page application URI as well (Step 7). |
| Username Attribute "…" not present | The attribute is not returned by Microsoft | Set Username Attribute to sub. |
| Attribute "employeeid" not present | The claim was never published, or mapped claims are off | Complete steps C2 and C3 — add the employee ID claim and set acceptMappedClaims to true. |
| Employee Id option verifies, but one employee cannot log in | Their Employee ID in Azure is blank or differs from Emgage | Set it under Edit properties → Job Information to match the Emgage code exactly. |
| Attribute "…" found but value is "…" | The attribute holds neither an email nor a yes/true value | Point Attribute Name at preferred_username or email (Step 5). |
| One employee cannot log in, everyone else can | Their Azure value and Emgage value do not match | Compare the Azure email / Employee ID against the Emgage profile, character for character. |
| Worked before, suddenly stopped for everyone | The client secret expired | Create a new secret in Azure, paste the new Value into Emgage, and click Verify & Save. |
| Sign-in blocked by your organisation | Admin consent not granted | Azure → the app → API permissions → Grant admin consent. |
12. Ongoing Maintenance
| Item | Action |
|---|---|
| Client secret | Note the expiry date and renew before it lapses — SSO stops for all users the moment it expires. |
| New employees | Ensure the Official E-mail ID (or Employee ID) on the Emgage profile matches Azure. |
| Employee email changes | Update it in both Azure and Emgage, or that employee will lose SSO access. |
| Client secret handling | Treat it like a password — share only through a secure channel, never by plain email. |
13. Quick Reference
| Emgage Field | Where It Comes From in Azure |
|---|---|
| Client ID | Overview → Application (client) ID |
| Client Secret | Certificates & secrets → New client secret → Value |
| Scopes | openid,email,profile |
| Authorization URI | https://login.microsoftonline.com/<TENANT_ID>/oauth2/v2.0/authorize |
| Token URI | https://login.microsoftonline.com/<TENANT_ID>/oauth2/v2.0/token |
| User Info URI | https://graph.microsoft.com/oidc/userinfo |
| JWK Set URI | https://login.microsoftonline.com/<TENANT_ID>/discovery/v2.0/keys |
| Username Attribute | sub |
| Attribute Name | preferred_username, email, or employeeid |
| Attribute Mapping | Email or Employee Id |
| Employee ID claim | Entra → Enterprise applications → Single sign-on → Attributes & Claims |
acceptMappedClaims | App registrations → Manifest → set to true (Employee Id only) |
| Redirect URI (Web) | Copied from Emgage → registered in Azure |
| Redirect URI (SPA) | Shown by Emgage on Verify & Save → registered in Azure |
Important Security Notes
- Treat the Client Secret like a password.
- Never share the Client Secret through plain email.
- Copy the Client Secret Value immediately when it is created because it is shown only once.
- Monitor the Client Secret expiry date and renew it before expiry.
- Ensure employee matching values in Azure and Emgage are identical.