Template
Last Updated: Oct 06,2025. Document Version: 1.0 Prepared for: Emgage HRMS Implementation Team
Template
** Streamlined Task Creation with Templates** The Template Management feature enables creation of reusable task templates with predefined fields and configurations. This system allows teams to standardize task creation processes, maintain consistency across projects, and reduce repetitive data entry through customizable template structures.
Overview Features
Template Management Benefits
The Task Template system provides powerful template configuration capabilities, enabling:
- Reusable Templates: Create standardized templates for recurring task types.
- Custom Fields: Configure custom fields with various data types and validation.
- Field Activation Control: Enable/disable fields based on template requirements.
- Default Values: Set predefined values to speed up task creation.
- Required Field Validation: Enforce mandatory fields for data completeness.
- Version Control: Track template modifications and maintain history.
- Employee Assignment: Assign templates to specific users or teams.
- Template Duplication: Copy existing templates for quick variations.
- Status Management: Activate or deactivate templates as needed.
Template Interface
Overview
The Template List displays all configured task templates with their details and management options.
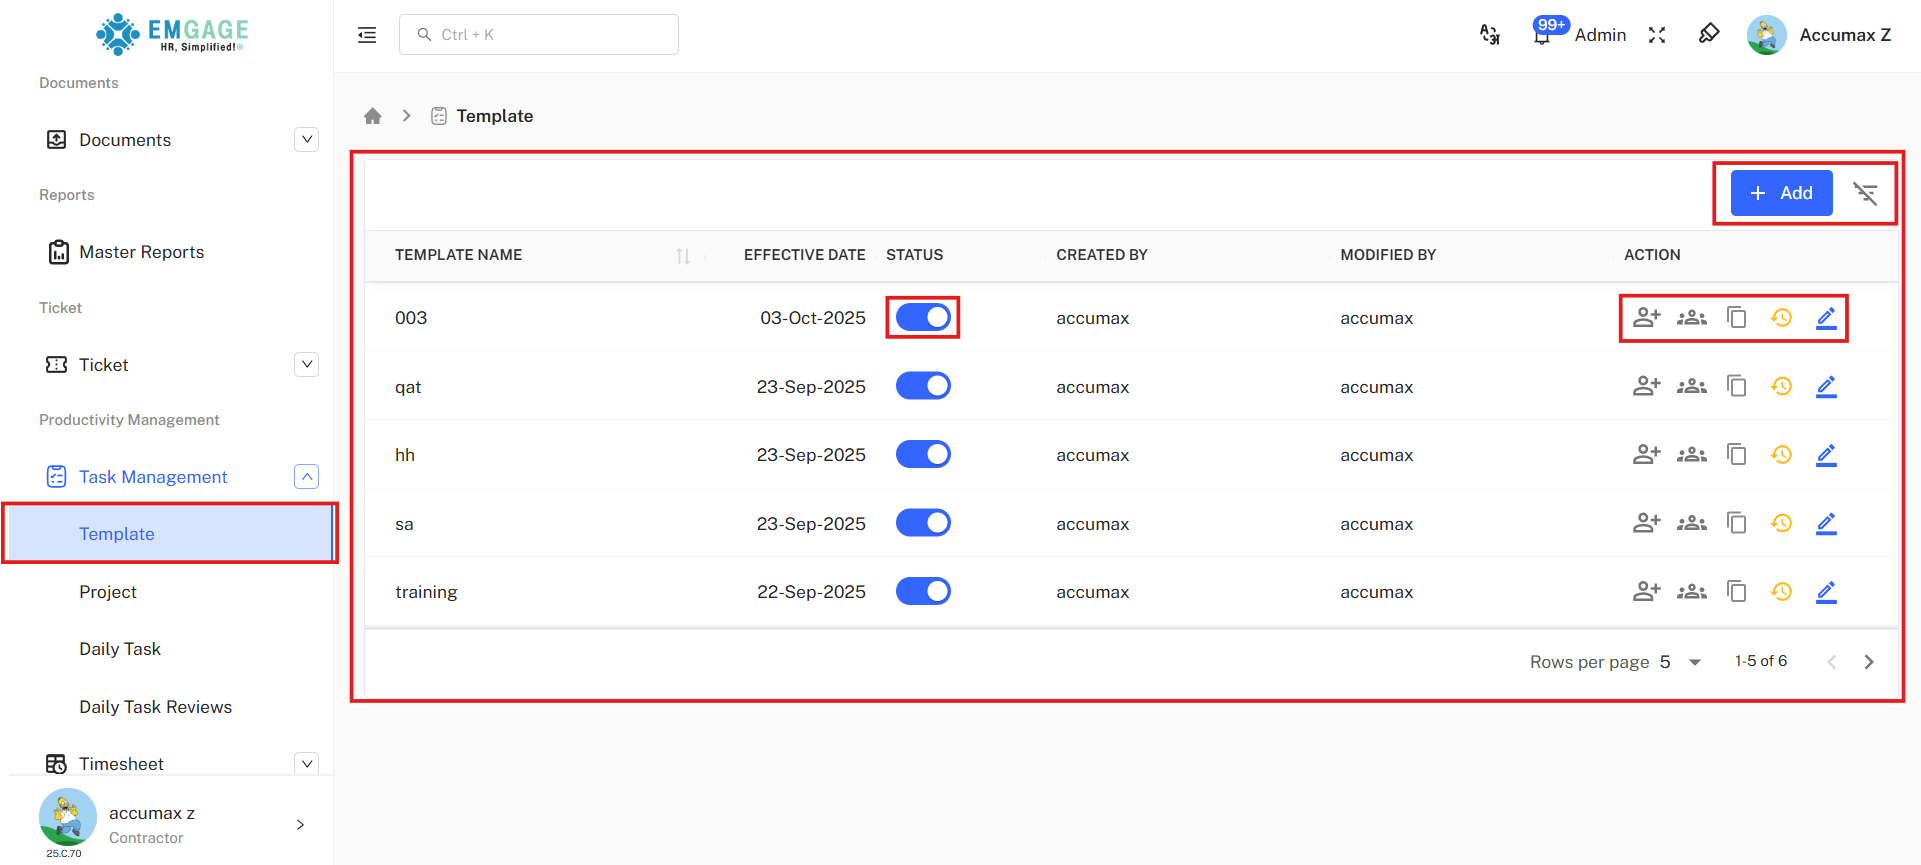
Table Columns:
- Template Name: Unique identifier for the template
- Effective Date: Date when template becomes active
- Format: DD-MMM-YYYY
- Status: Template activation status
- Created By: User who created the template
- Modified By: User who last modified the template
- Action: Available management operations
- Assign Employee Icon (+): Assign template to employees or teams
- View Employees Icon (): View users assigned to this template
- Copy Template Icon (): Duplicate template for creating variations
- History Icon (): View template modification history
- Edit Icon (): Modify template configuration
Once a template is created, it cannot be deleted or renamed. However, you can disable its status or create a duplicate template with a new name.
Creating a Template
Template Creation Form
Accessing Form:
Click the "+ Add" button to open the "Create Template" dialog.
Basic Information
Required Fields:
-
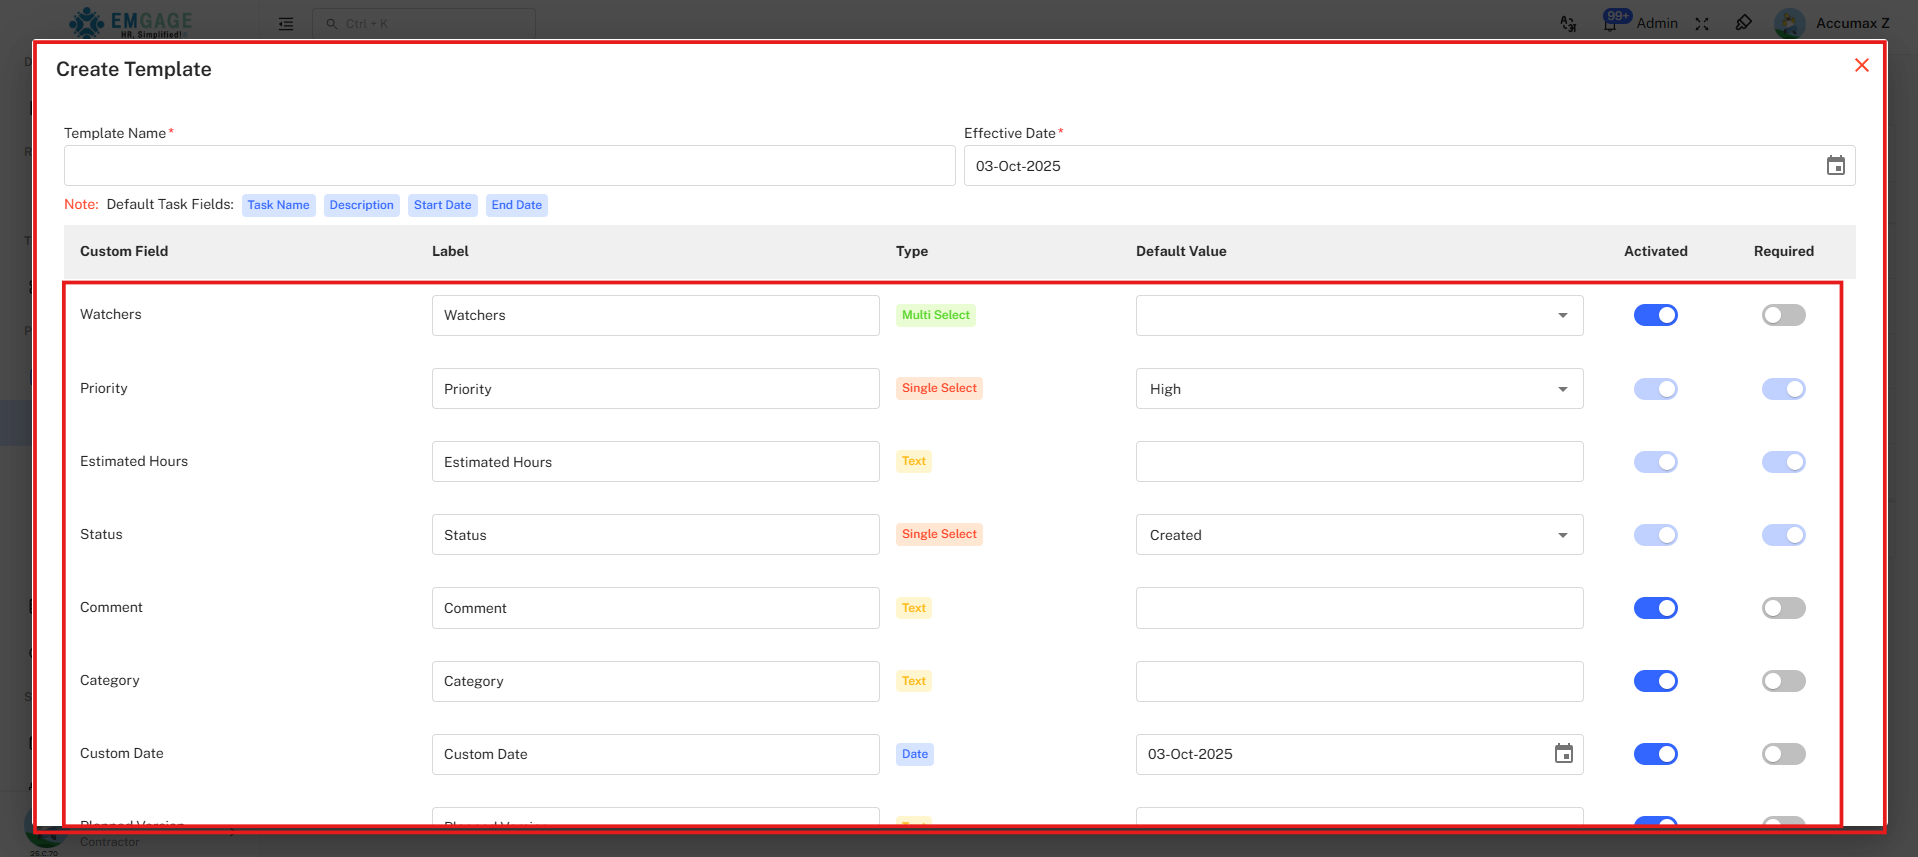
Template Name* (Required):
-
Unique identifier for the template
-
Text input field
-
Should be descriptive of template purpose
-
Effective Date* (Required):
-
Date when template becomes active
-
Date picker format: DD-MMM-YYYY
Custom Field Configuration
Field Configuration Table: The customizable fields section displays each field as a row in the configuration table. Each row contains the field configuration options from left to right.
- Watchers
- Label: Watchers (editable text field)
- Type: Multi Select (green badge) - allows selecting multiple users
- Default Value: Dropdown field (empty by default)
- Priority
- Label: Priority (editable text field)
- Type: Single Select (orange badge) - allows selecting one option
- Default Value: "High" (dropdown with options like High, Medium, Low)
- Estimated Hours
- Label: Estimated Hours (editable text field)
- Type: Number (yellow badge) - HH:MM formate
- Default Value: Empty text field
- Status
- Label: Status (editable text field)
- Type: Single Select (orange badge) - allows selecting one option
- Default Value: "Created" (dropdown with options like Created, In Progress, On Hold, Completed)
- Comment
- Label: Comment (editable text field)
- Type: Text (yellow badge) - plain text input
- Default Value: Empty text field
- Category
- Label: Category (editable text field)
- Type: Text (yellow badge) - plain text input
- Custom Date
- Label: Custom Date (editable text field)
- Type: Date (blue badge) - date picker field
- Default Value: "Today's date" (date picker shows selected date)
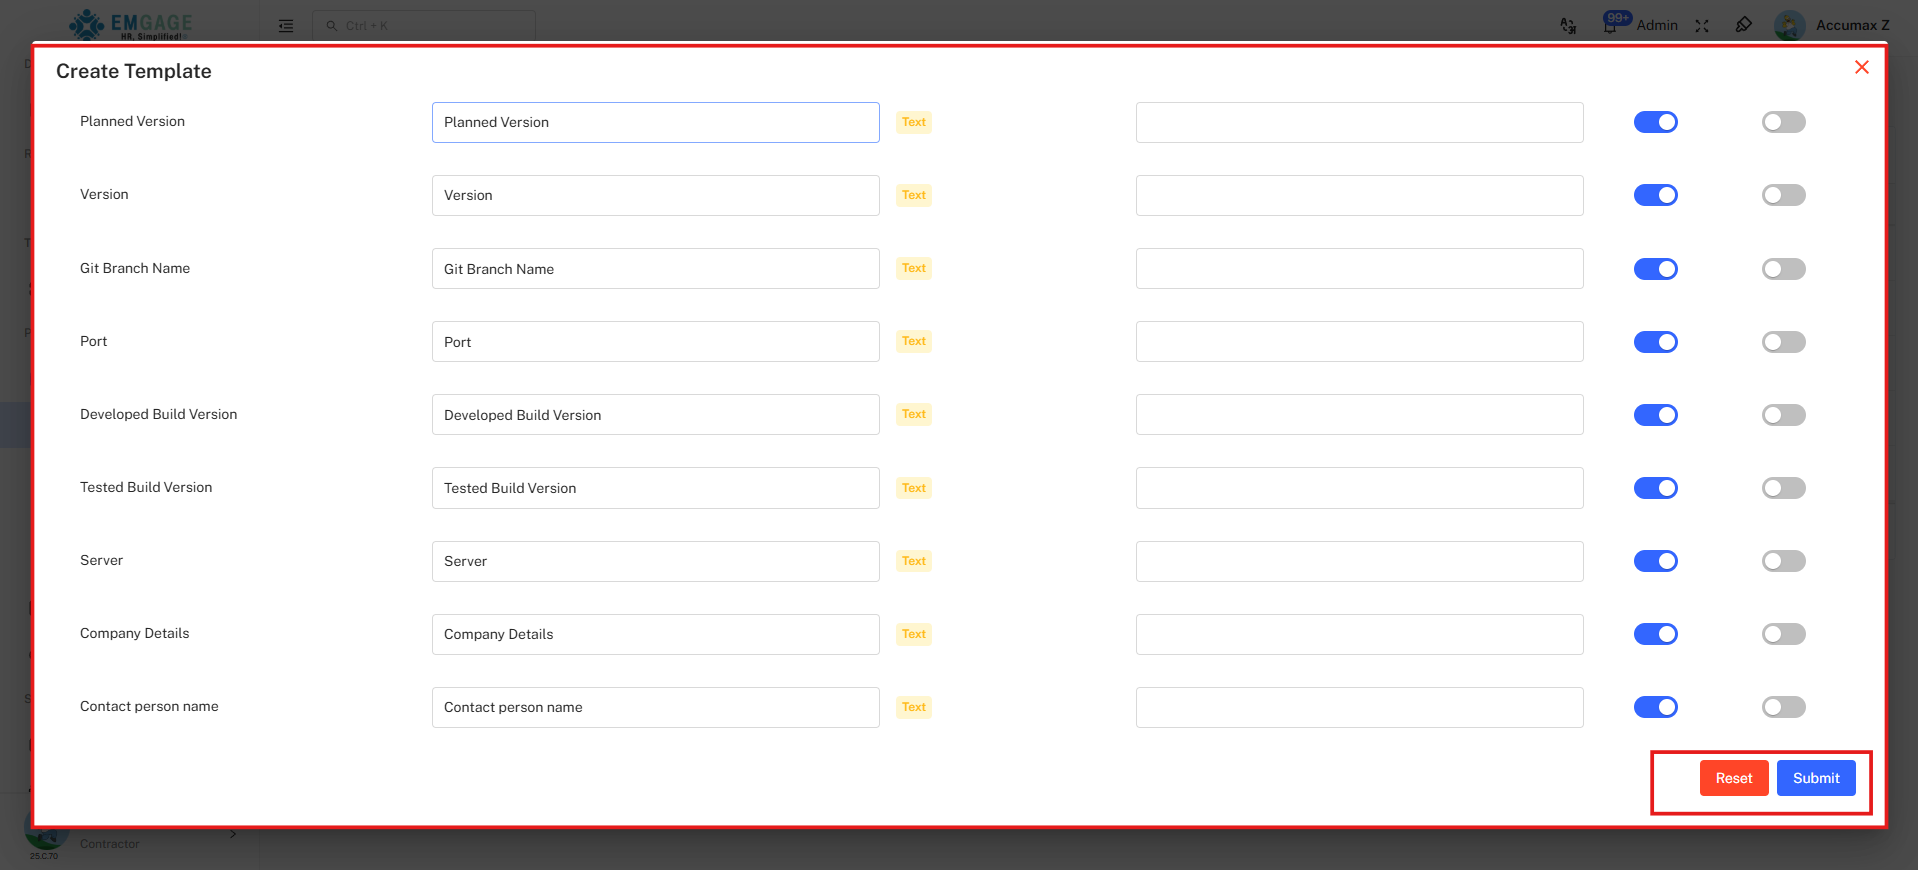
- Planned Version
- Label: Planned Version (editable text field)
- Type: Text (yellow badge) - plain text input
- Default Value: Empty text field
- Version
- Label: Version (editable text field)
- Type: Text (yellow badge) - plain text input
- Default Value: Empty text field
- Git Branch Name
- Label: Git Branch Name (editable text field)
- Type: Text (yellow badge) - plain text input
- Default Value: Empty text field
- Port
- Label: Port (editable text field)
- Type: Text (yellow badge) - plain text input
- Default Value: Empty text field
- Developed Build Version
- Label: Developed Build Version (editable text field)
- Type: Text (yellow badge) - plain text input
- Default Value: Empty text field
- Tested Build Version
- Label: Tested Build Version (editable text field)
- Type: Text (yellow badge) - plain text input
- Default Value: Empty text field
- Server
- Label: Server (editable text field)
- Type: Text (yellow badge) - plain text input
- Default Value: Empty text field
- Company Details
- Label: Company Details (editable text field)
- Type: Text (yellow badge) - plain text input
- Default Value: Empty text field
- Contact Person Name
- Label: Contact person name (editable text field)
- Type: Text (yellow badge) - plain text input
- Default Value: Empty text field
Activated:
- Toggle to show/hide field in template
Required:
- Toggle to make field mandatory/optional
Understanding Each Component
Each custom field row contains six components from left to right:
- Custom Field: The field identifier name (non-editable)
- Label: Editable display name shown to users
- Type: Field data type with color-coded badge
- Default Value: Pre-filled value or empty field
- Activated: Toggle to show/hide field in template
- Required: Toggle to make field mandatory/optional
Form Actions
Bottom Action Buttons:
- Reset: Clear all entered data and return to default state (red button)
- Submit: Save template configuration and create template (blue button)
Best Practices
** Template Configuration Guidelines** Effective Field Selection:
- Start Simple: Begin with By Default and Mandatory fields only
- Add Gradually: Enable Non-Mandatory fields based on actual usage needs
- Avoid Over-Configuration: Too many required fields slow down task creation
- Test Thoroughly: Create sample tasks to validate template configuration
- User Feedback: Collect input from team members using the template
- Regular Review: Audit and update templates quarterly
- Consistent Labels: Use clear, standardized field labels across templates
- Logical Defaults: Set helpful default values based on common patterns
Field Category Decision Guide
When to Use By Default Fields
Activate these when:
- Field is useful for most tasks (70%+ usage)
- Information helps with task tracking
- Data is optional but recommended
- Team members expect to see the field
When to Configure Mandatory Fields
Make these required when:
- Information is essential for task completion
- Data is needed for reporting or compliance
- Field drives workflow or automation
- Absence of data causes confusion or errors
When to Enable Non-Mandatory Fields
Activate these when:
- Field is specific to certain task types
- Information is contextual or situational
- Only subset of team needs the field
- Field supports advanced workflows
Troubleshooting
Common Configuration Issues
Field Not Appearing in Task Creation:
- Verify Activated toggle is ON (blue)
- Check template status is Active
- Confirm template is assigned to user
- Refresh browser or re-login
Required Field Validation Not Triggering:
- Confirm Required toggle is ON (blue)
- Verify Activated toggle is also ON
- Check field type supports required validation
- Test end-to-end task creation workflow